
My Secret Plot to Kill SwiftUI
A playbook for returning to normalcy


This is the story of how I migrated the entire Granola iOS app architecture from SwiftUI to UIKit in a week. That’s the elevator pitch.
I work for an AI unicorn in London. Our iOS app was released about a year ago, and we’re barely scratching the surface of all the cool stuff we can build. But we had a problem.
Contents
If you like this post, subscribe to join 100,000 senior Swift devs learning advanced concurrency, agentic iOS engineering, and Swift performance for 10 minutes a week.
This post is full of knowledge, so much so that your email client might cut it off. Read on my website for the best experience.
Days of Future, Past
SwiftUI was the future, until it wasn’t.
I won’t bore you with the details, but long story short: you can do less stuff in SwiftUI:
UI is less customisable.
There are no delegates to perform heavy lifting and fine-tuning.
UIPresentationController isn’t there, so good luck crafting satisfying transitions.
Namespacing is a bloody mess.
You’re encouraged to tightly couple your navigation code to your view code, which, to use Generation Z parlance, gives me the ick.
It’s never going to reach full parity with UIKit.
Got it?
Oh and the performance is also worse. Dramatically so. Profile any scroll-based screen between SwiftUI and UIKit, and you’ll probably notice a few hitches and hangs in short order. If you don’t believe me, please take a look right here (we have gifs).
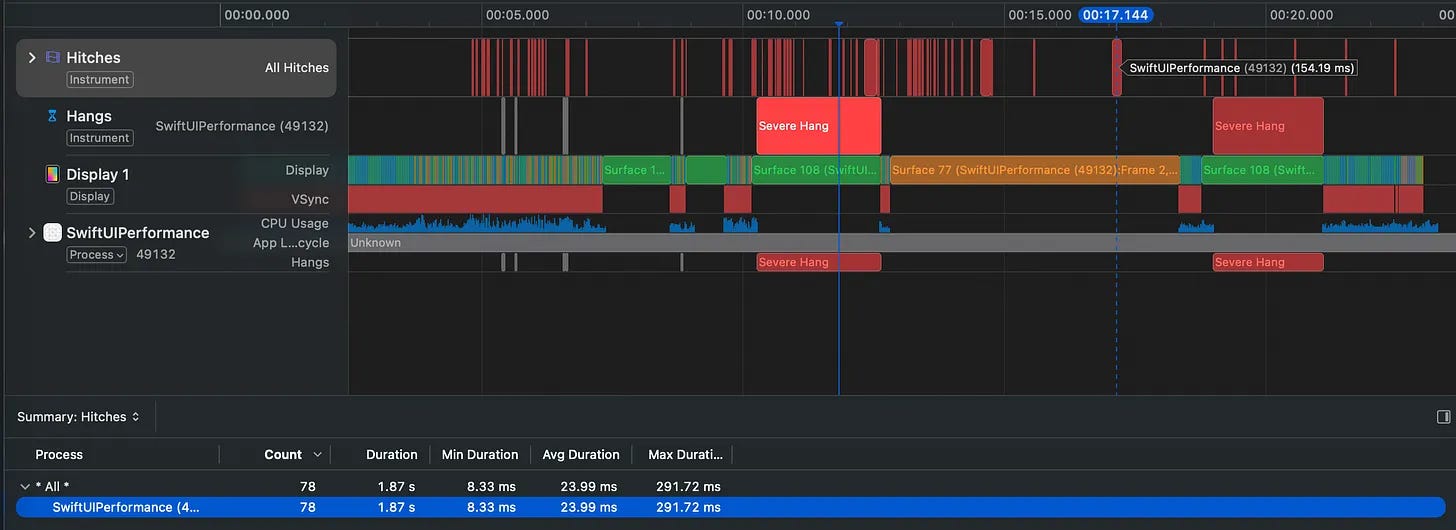
But this is on your shiny new iPhone 17 Pro Max. Give it a crack on low power mode, or your nan’s old XR, and tell me if you think SwiftUI is the future. Any major screen subject to complexity creep becomes harder and harder to keep smooth, taking on UI performance regressions at the drop of a hat.
Okay, I’ve bored you with the details. Sorry. I’ve pontificated a lot already, but if you’ll indulge me for one more complaint: SwiftUI is buggy as hell.
One of my first features for Granola was image attachments on notes, a button that opened a Gmail-style SwiftUI Menu component. You then selected Photos or Camera to open a PhotosPicker or (f*ck sake) a wrapped UIImagePickerController that opened the relevant camera or photo album modal.
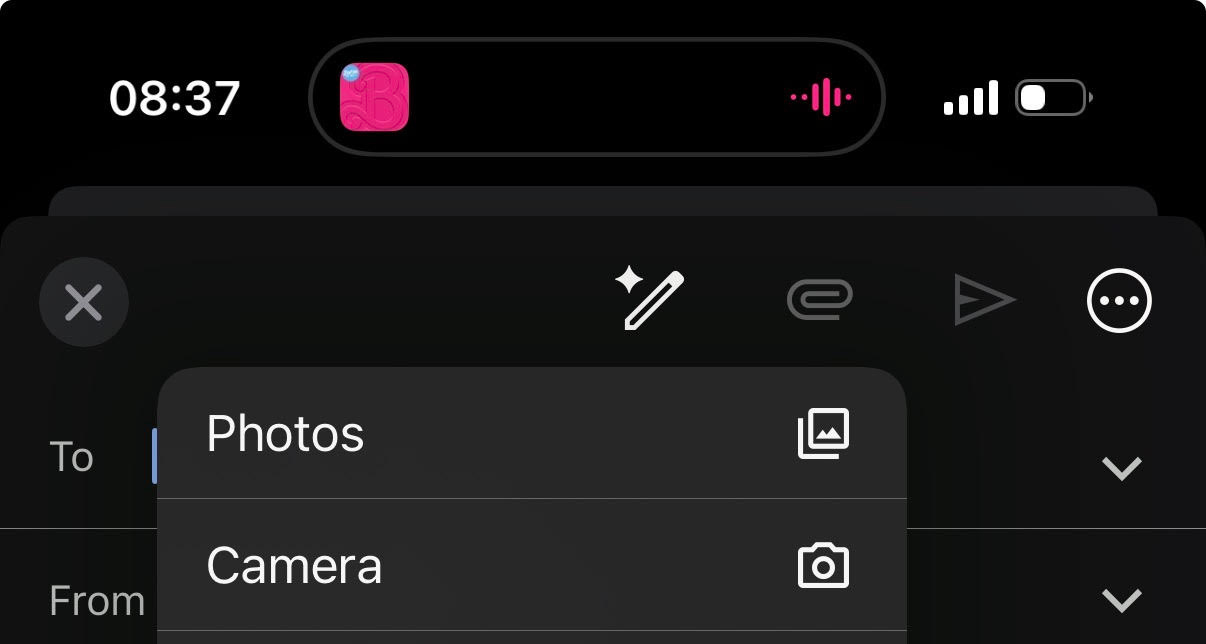
Oh, but 50% of the time, the Menu’s dismiss animation collided with the modal presentation, and nothing is presented at all. The solution? Add Task.sleep between tap and presentation. For a native UI framework!
We just split it into two separate buttons in the end.
</rant>
UIKit who?
On the other side of the fence, the forgotten stepchild jealously observed the love, gifts, and double servings of organic ice cream given to SwiftUI via the, uh, @Observable macro. But UIKit’s new mommy (Tim Cook) finally remembered his existence, and backported Observation to work on UIKit in iOS 18+.
Now, @Observable SwiftUI view models port directly to UIKit with no changes needed.
Finally, agentic tooling has evolved in a big way. It’s not just writing your code anymore. It’s planning a multi-step migration, implementing it Pretty Well™, and, most importantly, verifying its own work.
Today I’ll show you how.
What used to be a years-long migration project can be done in under a week*
*YMMV if, for instance, your team just finished migrating Uber or Facebook to SwiftUI.
Convincing Your Product Team
As with all sweeping codebase refactors with hard-to-quantify user benefit, the hard part isn’t actually doing the work. It’s convincing stakeholders to give you air cover to do the work.
Like all opportunistic enterprising developers, I waited for my moment.
It came when two projects coincided on the horizon.
Meeting Bar
First, the “meeting bar”.
The main flow of the Granola app is recording meeting notes, using a modal drawer that contains controls for recording, notes, and attachments. Our designer proposed making this collapsible, allowing you to navigate through the rest of the app during recording.
We didn’t have the stomach to consider building this with a SwiftUI view modifier.
It would mean shoving a .safeAreaInset view into the bottom of every screen, or perhaps having it live on the top level above everything. Our chat screen would become a UIKit keyboard view, embedded in SwiftUI, re-embedded in UIKit… with a bar floating on top. No thanks.
But with UIKit? Trivial. There’s already a system component that powers this for us. The tab bar. We simply show and hide the bar, replace its view with our custom bar, and the system automatically holds it there throughout the app!
With UIKit, we also get UIPresentationController. This allows us full control over the transition animation between collapsing the drawer and presenting the meeting bar. Total control over both animation curves. This allowed us to tweak the animation curve based on the velocity of your swipe, which landed on an unbelievably satisfying experience.
AI Chat
The second project was our AI chat screen, which allows users to chat with an AI using all their meeting notes as context.
The SwiftUI screen had the classic scrolling feed issues, getting hitches and animation stutters while scrolling fast on weak devices, and had weird stutters as we streamed in text responses from the AI. SwiftUI also did not play well with the system keyboard. The screen needed some love.
And what better way to show love than to rebirth it anew, stronger and more lightweight? This screen was our proof of concept, the test ground for a potential future autonomous agent-driven rebuild.
These two projects were the perfect opportunity to perform a UIKit migration, since it served as a prerequisite task for these projects. Replacing the SwiftUI-based navigation architecture with a UIKit skeleton would make both of these features possible.
The Old World
The existing navigation was… fine. Not great, not terrible.
We target iOS 18, so used SwiftUI’s iOS 16+ NavigationStack APIs. My main qualm with this has always been tightly coupling navigation logic to your view code. We are re-inventing the “massive view controller” problem by coupling all the logic to your UI!

NavigationStack works.
But it means any UIKit you add comes wrapped in a SwiftUI host, which is iffy for performance. Anything particularly complicated like a scroll delegate or navigation transition animation, and we’re pushing back on our designer.
SwiftUI works fantastically if your designers are easy breezy and happy to have you say “no” to their most interesting ideas.
Architecting the New World
A navigation refactor is impossible to do as a big bang. You can’t really rewrite your entire app at once, and you probably won’t want to YOLO an agent to give it a try over the weekend. That’s not going to fly.
As it happens, I’m a big fan of the incremental approach.
I pitched the refactor as: keep SwiftUI views, but introduce a UIKit skeleton for navigation plumbing. We get the best of both worlds: imperative UIKit-style navigation fully decoupled from view logic, with the simplicity and iteration speed of SwiftUI for building screens (and we avoid throwing everything in the bin).
I’ve built SwiftUI navigation at five different startups since 2019. With that experience comes a pretty well-developed palate for navigation APIs.
The classic coordinator approach where each module has flows? Nice and simple, but not flexible at all. It’s quite hard to reach screens from other parts of the app without reaching for dodgy AnyView wrappers.
I’ve played with a cool experimental architecture centred on deep links. Every bit of navigation is powered by a deep link. It’s insanely flexible, letting any screen jump to any other screen, but the plumbing is extremely complex.
My best advice on the topic is thus:
“Don’t be an architecture astronaut.”
—Jacob Bartlett, 2026
That simplicity will save you long-term. I’ve learned the hard way. I settled on a Goldilocks approach:
Apple sold us a dream with SwiftUI. But that’s all it was. Today you’re getting the escape plan.
Read ahead for my full UIKit re-migration playbook, including router-based navigation architecture, screen factories, visual verification loops, and, ultimately, exactly how much performance you’ll unlock for free.
Paid members also unlock several nice things:
⚓️ Access my full library of 48 paywalled articles
🚀 Read free articles a month before anyone else
🧵 Master concurrency with my full course and advanced training
❤️🩹 Support independent, sometimes funny, tech writing
🧑🚀 Get a free copy of my new eBook, “Land your iOS Tech Job”
🤑 Lock in the lower price now: prices go up tomorrow at midnight!
