
Advanced Keyframe Animations in SwiftUI
Total control over your SwiftUI animation


iOS 17 was easily the best year SwiftUI ever had. It’s the gift that keeps on giving. We got Observation, advanced Mapping, and, best of all, Metal Shaders!
One neglected, but incredibly powerful part of this release was something I’ve been wanting to write about for ages: Keyframe Animations!
These are an advanced kind of animation that gives you total control.
Vanilla SwiftUI animation interpolates between from and to values when some state changes, defined by a simple timing curve. With keyframes, you can fully define the path taken by a movement, a transformation, or a value over time, with different timing curves for every part of a movement. This brings a whole ‘nother level of customisation and composability!
Keyframe animations contain a series of tracks. These define a timeline of points, which define exactly how a property will vary between each segment. Moving an object from point A to point B, you can, for example:
Tell it to use a physically-accurate cubic curve to accelerate for the first 100px.
Move smoothly and linearly for the next 300px.
As it comes to a stop, create a whimsical spring motion as it comes to a stop.
You can orchestrate the same animations for virtually any property such as size, opacity, scale, 3D rotation, and even hue.
This is great if your properties conform to Animatable. But there are instances where you might be asked to animate something arbitrary, like a flip-book animation switching between many images at once. Perhaps your designer sadistically demanded an accelerating flipping speed for this animation.
SwiftUI provides a lesser-known API that makes this an absolute cakewalk. You can read out values from keyframe animation tracks and apply them to anything, anywhere. After today, there will be nothing you can’t animate.
In a minute, I’m going to bang on about:
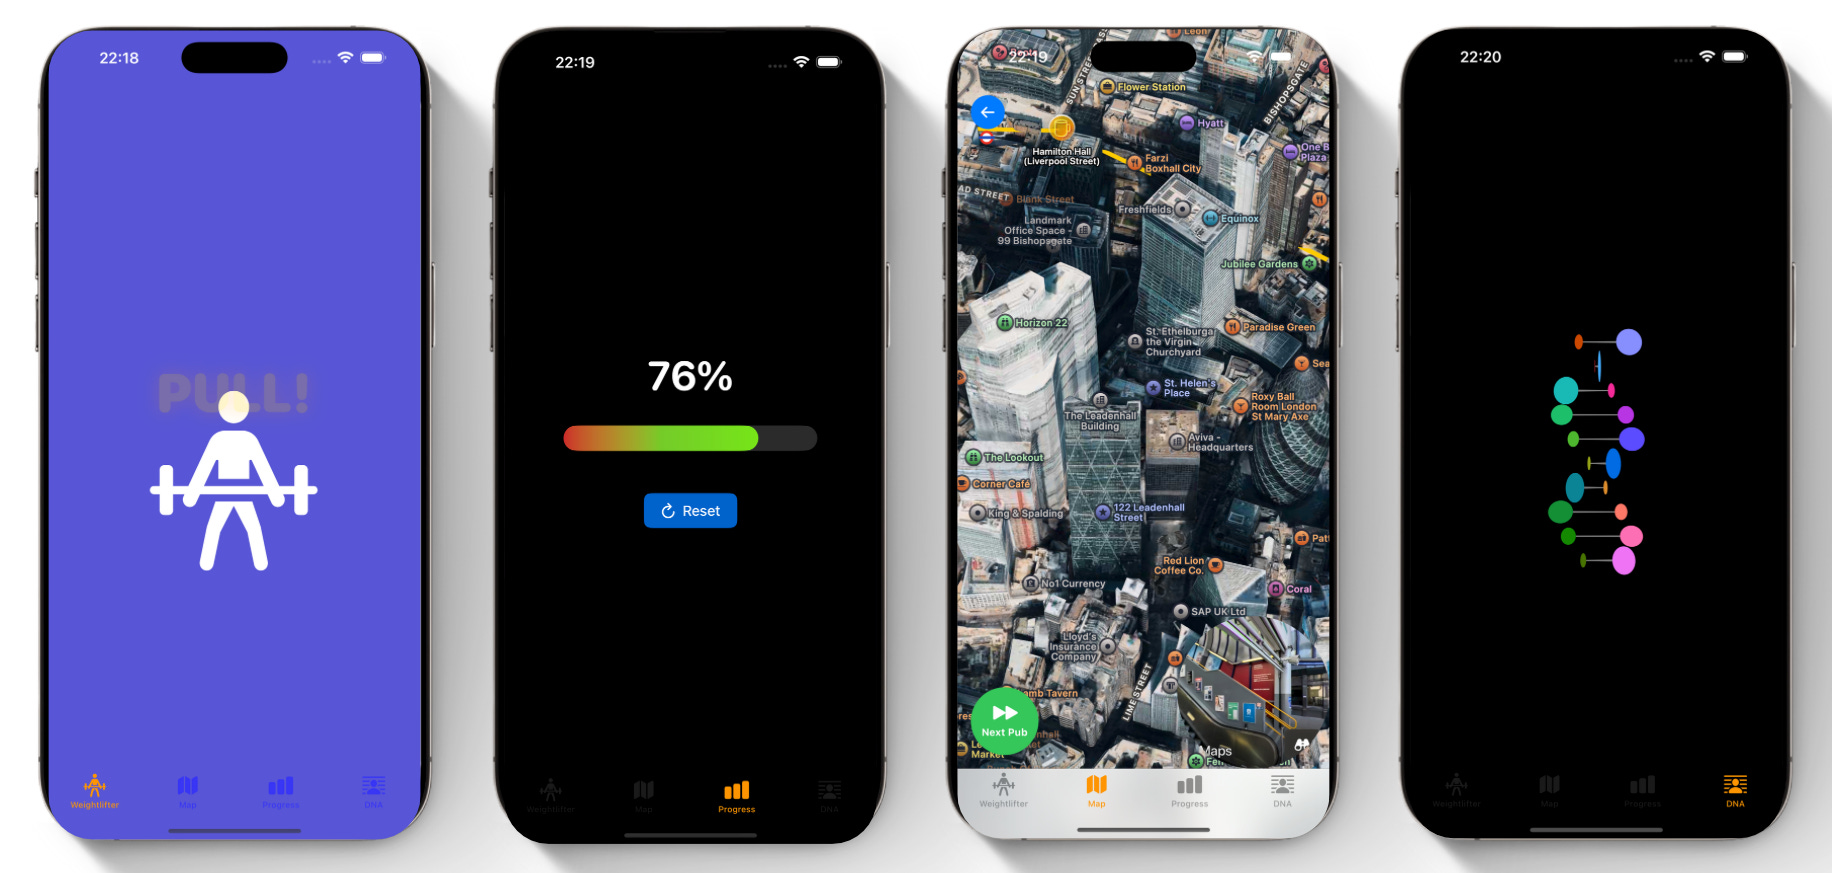
To demonstrate everything, I created a sample project that demonstrates the various ways you can apply the keyframe APIs in your code:
Subscribe to Jacob’s Tech Tavern for free to get ludicrously in-depth articles on iOS, Swift, tech, & indie projects in your inbox every week.
Paid members unlock several extra benefits:
Read Elite Hacks, my exclusive advanced content 🌟
Read my free articles 3 weeks before anyone else 🚀
Access my brand-new Swift Concurrency course 🧵
Etymology: What is a keyframe?
Etymology is the study of the origin of words and the way in which their meanings have changed throughout history. Understanding a word often helps you to build your intuitive mental model, and keyframes are no different.
The term “keyframe” originates from Disney in the 1930s, specifically, the way they divided responsibility for hand-crafting their animation:
Master animators would draw “key” frames established between character poses and facial expressions.
Junior animators drew the intermediate animation frames between these.

Disney designed their animation production process around keyframes, introducing timing charts that specified how many frames existed between each keyframe. They introduced twelve principles of animation to create lifelike characters, several of which can still be felt in digital animations today:
Slow in, slow out (think ease in-out)
Physics-based timing (think spring motion)
Squash and stretch (think liquid glass)
Flash animation made digital keyframe animations available to the masses, spurring on the heyday of incredible dial-up-powered videos I enjoyed during my formative years. Core Animation had caught up by the time iOS came about.
Now, before we start writing our own keyframes, because this is Jacob’s Tech Tavern, let’s briefly look at how they work under the hood.
Under the hood of Keyframes
While SwiftUI is built on top of Core Animation for rendering, it is unclear whether it directly ports CAKeyframeAnimation under the hood, or provides its own implementation. There isn’t much documentation on SwiftUI keyframe internals.
Therefore, this section is semi-speculative, but we can make the educated assumption that they at least work pretty similarly to CAKeyframeAnimations. Just so long as you agree to take this section with a pinch of salt and enjoy the ride.
When any animation is rendered, the system gathers information. The start & end states, alongside any animation timing curves, are placed on a render tree. This data structure is managed by the system and invisible to your app. This tree is traversed at 60fps (or 120fps) to render animations. Keyframe animations, essentially, supply a series of timing curves to the tree instead of a single one.
When some state changes, from the perspective of your app, the new value is immediately applied. The system’s render server then applies maths to animation timing curves in order to calculate the intermediate states. These intermediate states are interpolated from timing curves to render each frame:
Calculate the current time elapsed by the animation.
Determine which keyframe track is being applied.
Work out where this keyframe segment begins and lands.
Within the segment, calculate the frame’s position based on timing curve:
linearKeyframe: Simple weighted averagecubicKeyframe: Solves cubic Bézier equations for smooth curvesspringKeyframe: Solves a harmonic oscillator equationmoveKeyframe: No interpolation, just jumps to the end state
Here’s what these timing curves look like. Each point is a new keyframe, and the timing curve determines the trajectory a value takes to the next keyframe.

So it’s basically maths, but you could probably work that one out. Time for a practical demo.
Practical Keyframe Animations
In classic Tech Tavern fashion, I made a little sample project you can check out and enjoy as we go through the examples. I advise you to muck around with them to learn how each animation looks and feels, to get a better grasp yourself.
Basic setup with keyframeAnimator and KeyframeTrack
In a perfect example of Swift’s progressive disclosure principles, you pretty much know the score when you’ve seen a single example of the API. The angels are in the details of its flexibility.
Here’s a cute little animation of an exaggerated weightlifting clean and jerk, which is usually the opposite order in which I do things.
This looks elaborate because there are lots of things being animated on screen, but each individual keyframe animation is very simple once you see it.
The basic API has a few key moving parts:
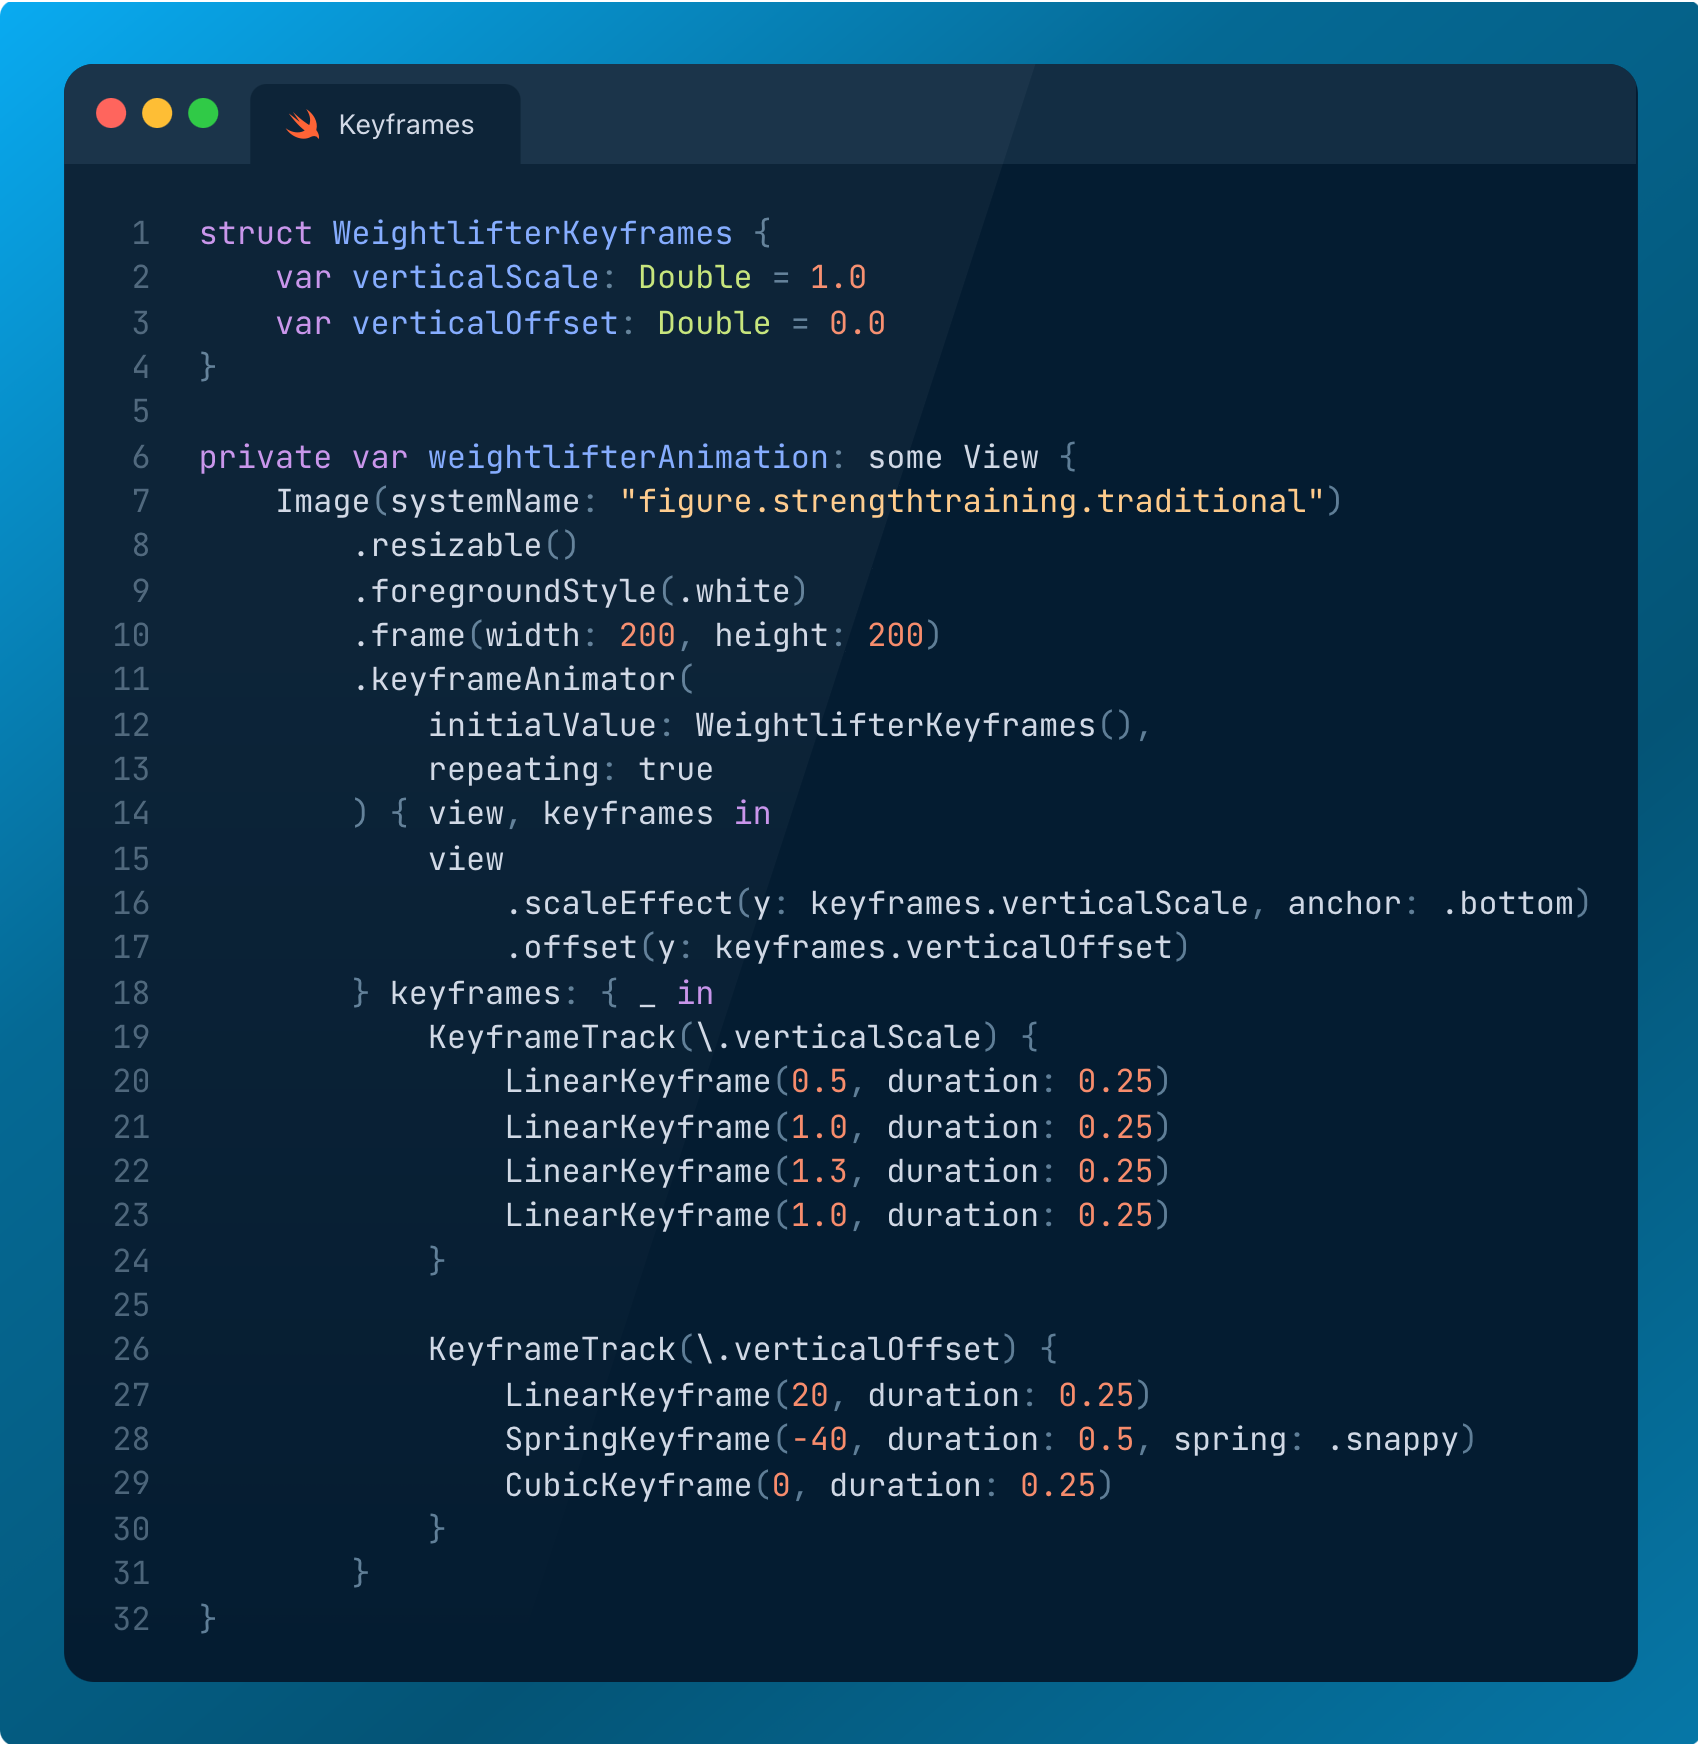
.keyframeAnimator() allows you to create the keyframes, and configures the initial values of the animation state.
WeightlifterKeyframes is a plain Swift struct that wraps the values of the properties we want to change over the course of the animation.
The first closure applies modifiers and effects to the view, using the values we are modulating in our keyframes struct.
KeyframeTrack that lets you define the changes on a selected property inside the WeightlifterKeyframes struct individually.
LinearKeyframe defines a linear timing curve that changes the value of the selected property in the keyframe track over a defined time period.
Simple enough? Let’s see it in the sample code.
…it’ll make more sense when we narrow in on just a single track:
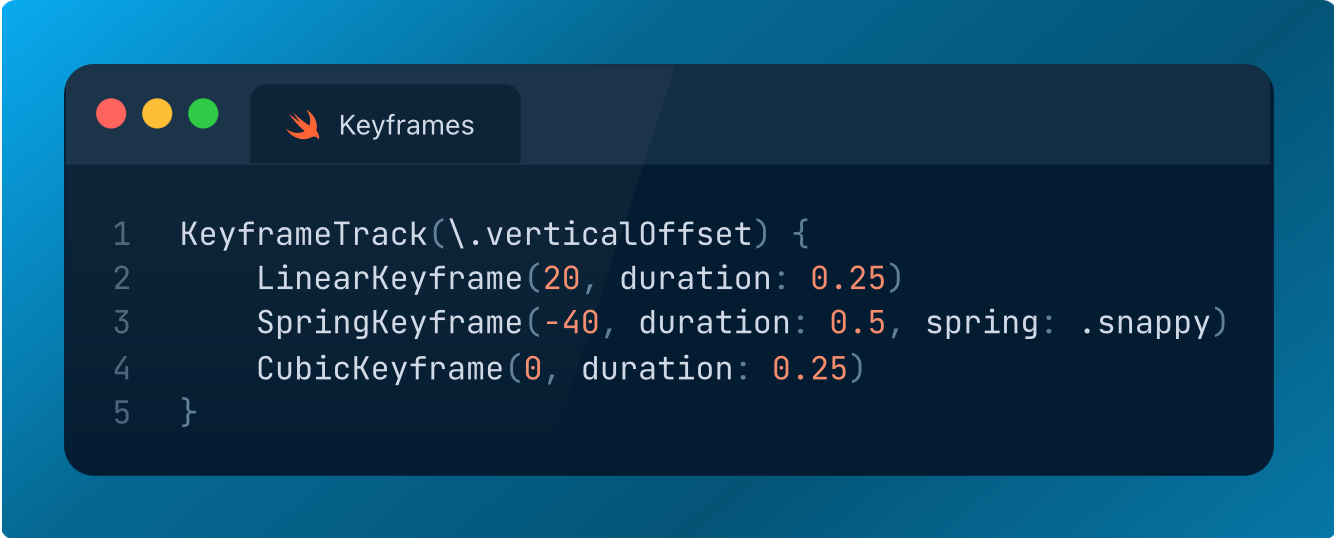
This keyframe track defines the value of the weightlifter’s vertical offset, as he (or she!!) jumps:
For 0.25 seconds, we linearly move them down 20pts
For 0.5 seconds, we have them jump up, using a springy keyframe, having the vertical offset change by +60.
Finally, for 0.25 seconds, the figure accelerates downwards with a CubicKeyframe to land at their original position.
So once you analyse a single track, it’s pretty straightforward. The real magic happens when you layer together the animations, chaining, composing, and orchestrating transitions across multiple views and properties.
The key to choosing a track is:
LinearKeyframe is the basic start point for a constant-speed change.
CubicKeyframe is good for a smoother, physically accurate, acceleration. You can also initialise it with start and end velocities.
SpringKeyframe is nice for a playful boing. You can fine-tune the physical parameters of the spring in the initializer.
MoveKeyframe is basically teleportation without any interpolation. I don’t have any examples of this one because it isn’t very interesting.
This is honestly all you need to do to get started. Everything down below is for the really advanced use cases.
You should still read them, of course. But hey, I get paid either way.
Reading the value of keyframes to animate anything
Last month I was trying to perform some tricky animation work in UIKit, where I needed some text to match a loading bar percentage. The label used an attributed string. The bar loaded with a complex hard-coded sequence of animations*.
*this is a trick of the design trade. If you aren’t sure how long a process might take, you can distract the user with a loading bar in the meantime. If it starts very fast and then slowly fills in the last 10%, humans tend to perceive it as if it loaded pretty fast.
The problem was, attributed strings could not be animated by cubic Bézier.
No problem: I vibe-coded a little throwaway function that manually coded a Bézier timing calculation. Big mistake, this did not pass muster in PR.
I was gently guided to an obscure but useful technique that piggy-backed off Core Animation’s CAMediaTimingFunction to piggyback off core animation timing functions and sync up other properties to animation curves.
It took all afternoon. And my code was hot garbage.
But if I’d done it in SwiftUI, it would have taken 2 minutes:
SwiftUI keyframe animations expose a dead-simple API that allows you to expose the elapsed progress from your keyframe animations.
value(time:) returns the interpolated value of the keyframe track’s property at the given time.
value(progress:) returns the interpolated value of the keyframe track’s property at the given progress in the range zero to one, that is, from the start to the end of the animation.
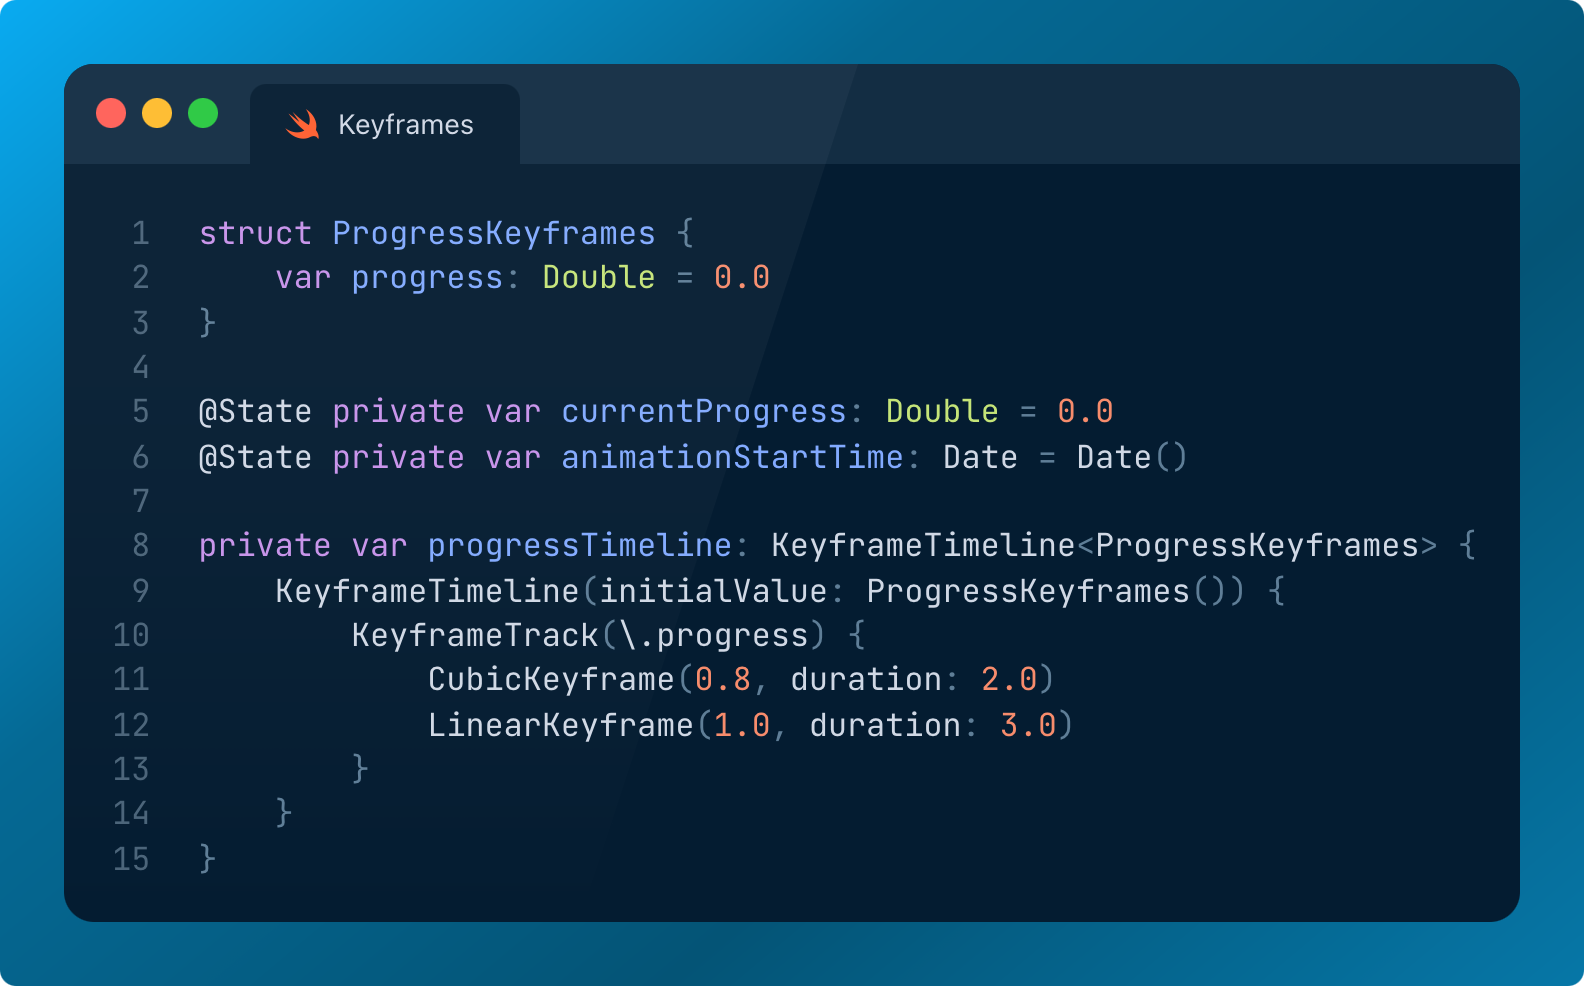
My fake progress bar moves rapidly on a cubic curve to 80% over 2 seconds, then slowly and linearly to 100% over 3 more seconds. Because I love refactoring, I placed the keyframe timeline as a property on the view.
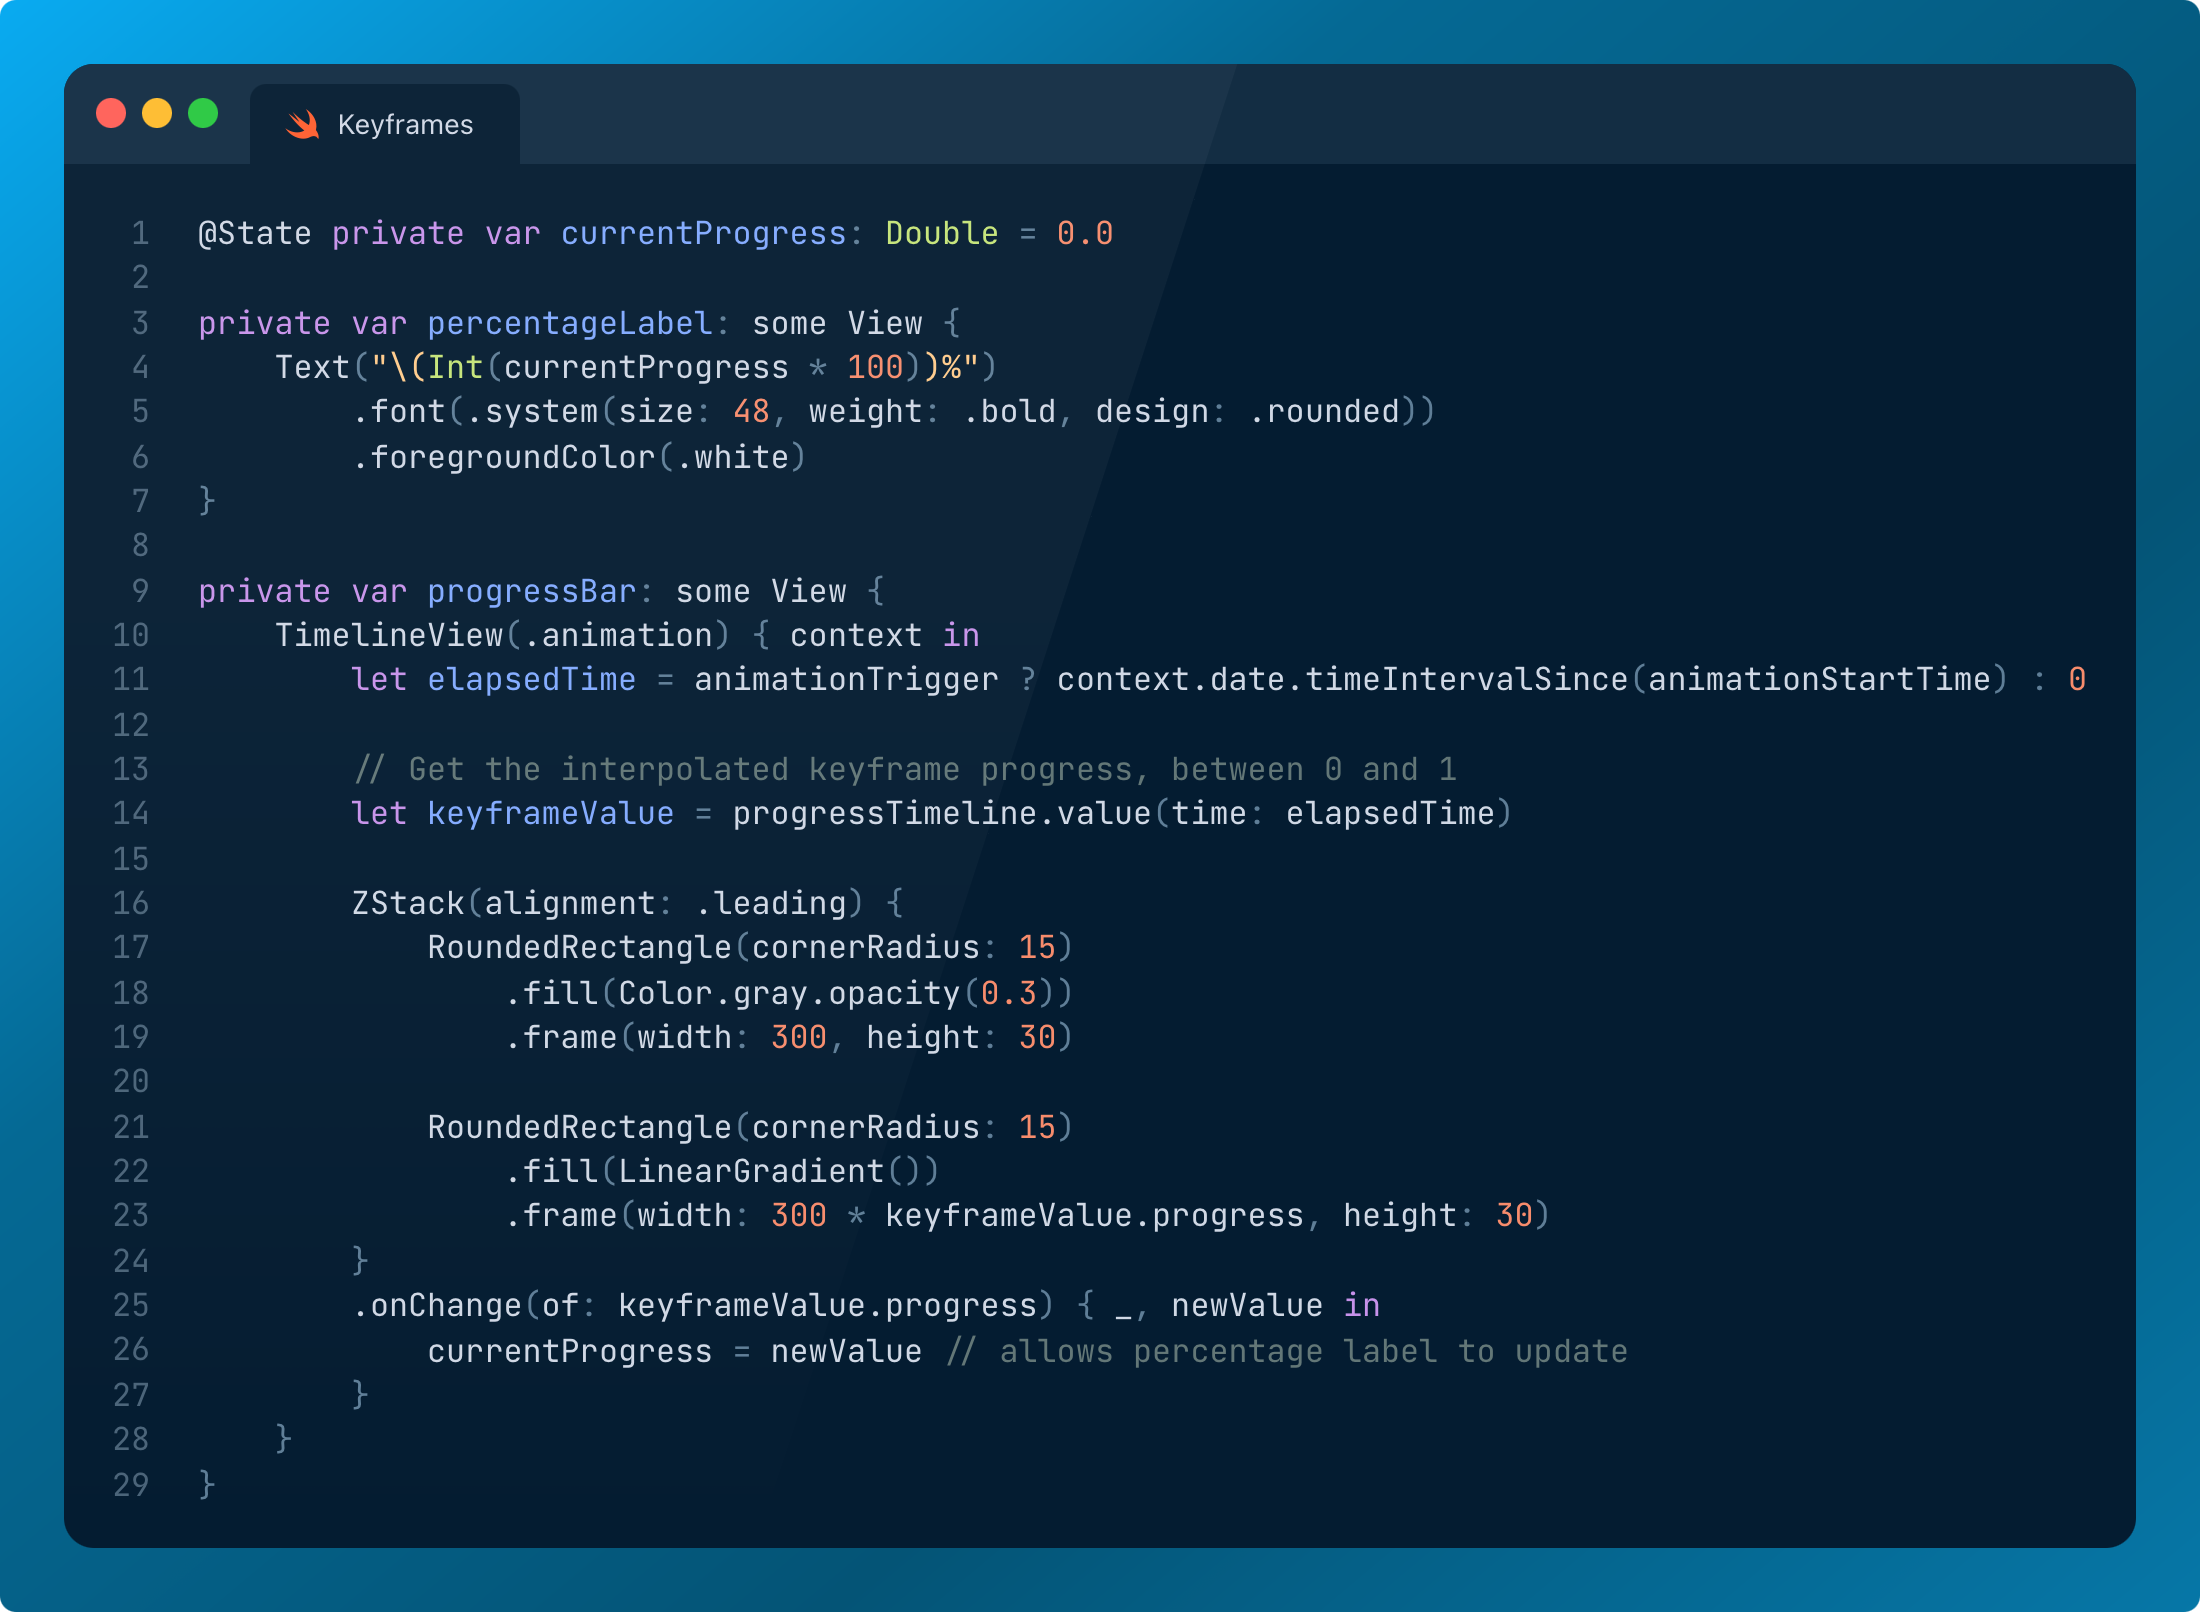
Using Date and value(time:), we can calculate the percentage progress of the loading bar at each stage of the keyframe animation.
At 0 seconds, the progress is 0.0, so 0%.
At 2 seconds, the progress is 0.8, so 80%.
At 5 seconds, the progress is 1.0, so 100%.
And, best of all, this API follows the correct timing curve between each keyframe.
This pair of APIs grants us two advanced capabilities:
We can reuse the same keyframe animation tracks for multiple properties.
We can apply these keyframe animations to non-Animatable properties.
Now let’s look at how you might use keyframes in the wild. Or, if you aren’t on safari, perhaps the mean streets of London.
Using keyframe animations in Mapping apps
mapCameraKeyframeAnimator is one of the understated but incredibly cool APIs that came out of the same WWDC. Here’s how it looks giving a dramatic street-level 3D view as we journey from pub to pub on the circle line pub crawl.
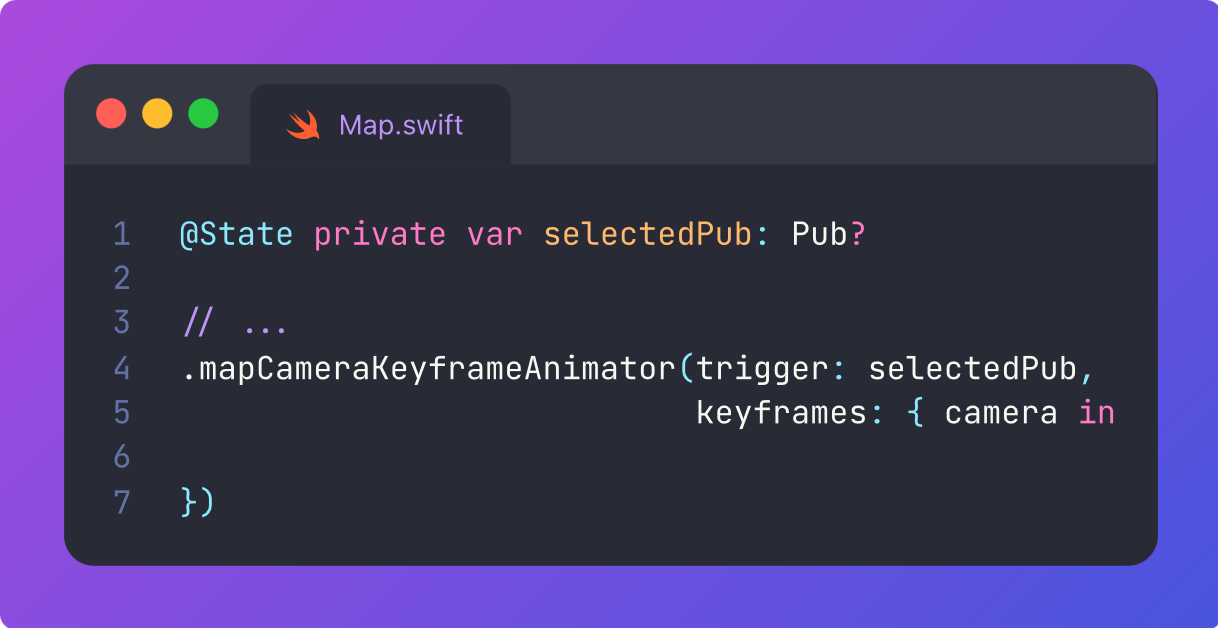
It uses the mapCameraKeyframeAnimator to precisely manipulate and transform the camera configuration over time.
This has a slightly different API that you apply on your map, with a trigger value that kicks off the animation, plus a keyframes closure that uses the MapCamera, the values of whom we are going to transform.
Inside the keyframes, we create various tracks, one for each property of the camera we want to change.
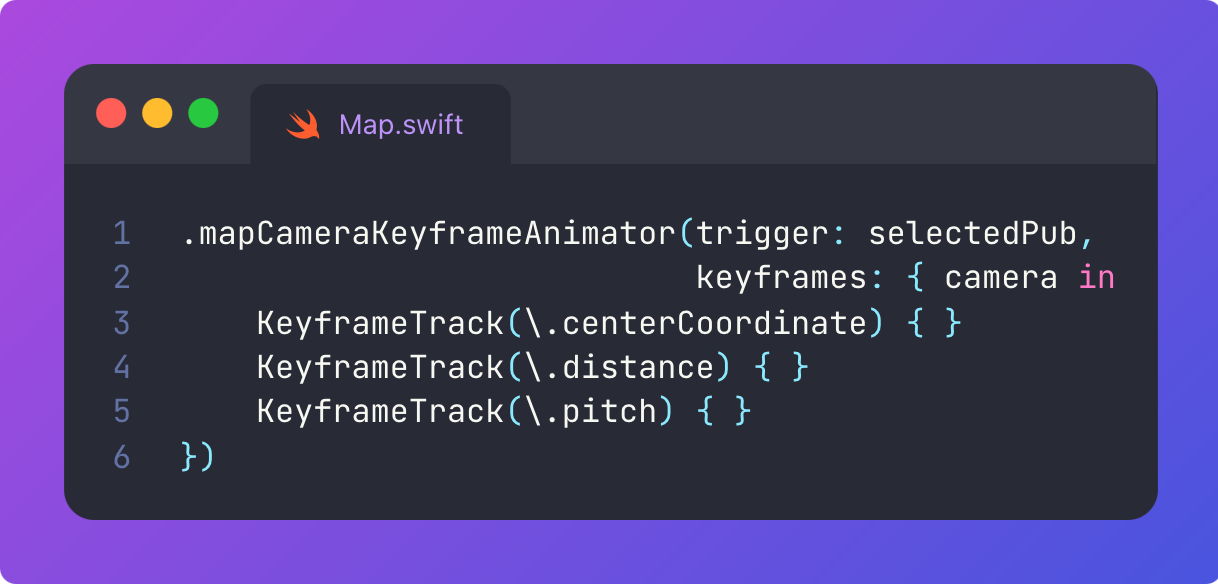
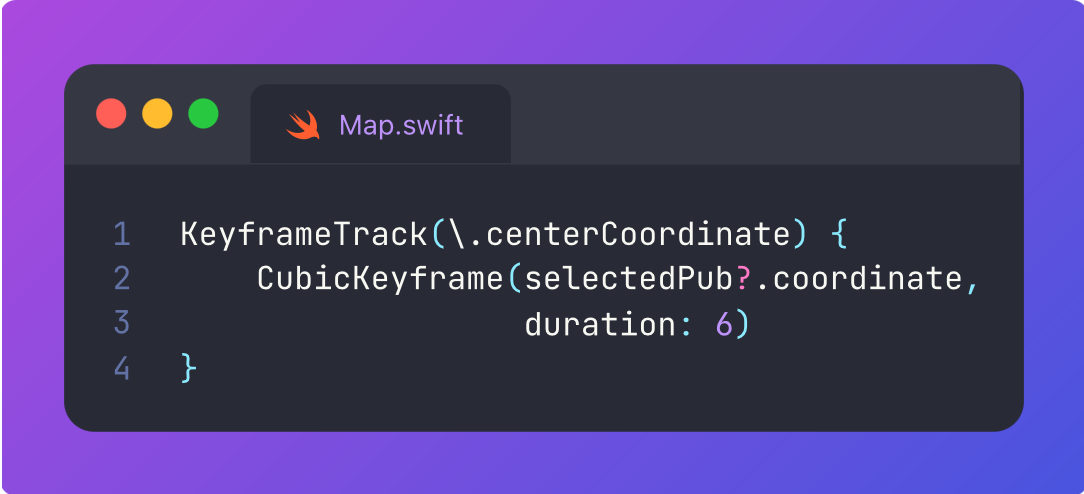
This actually works virtually the same as the standard keyframe animations. The position of the camera we can simply move (with a cubic animation curve) to the new pub’s coordinates.
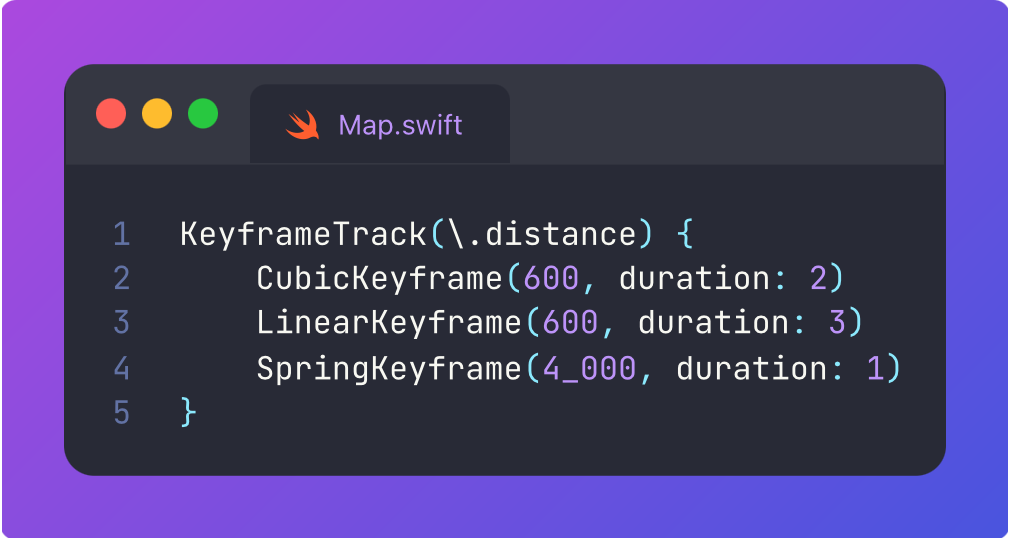
The distance property represents how high above the map the camera is positioned.
Here, we can create a dramatic effect: zooming into street level, moving rapidly through the streets, then rapidly zooming back out once we arrive at the new destination pub.
Naturally, because I don’t have a designer breathing down my neck, asking me not to make my map animations or Canva thumbnails ridiculously elaborate, I’ll spam any set of curves I want.
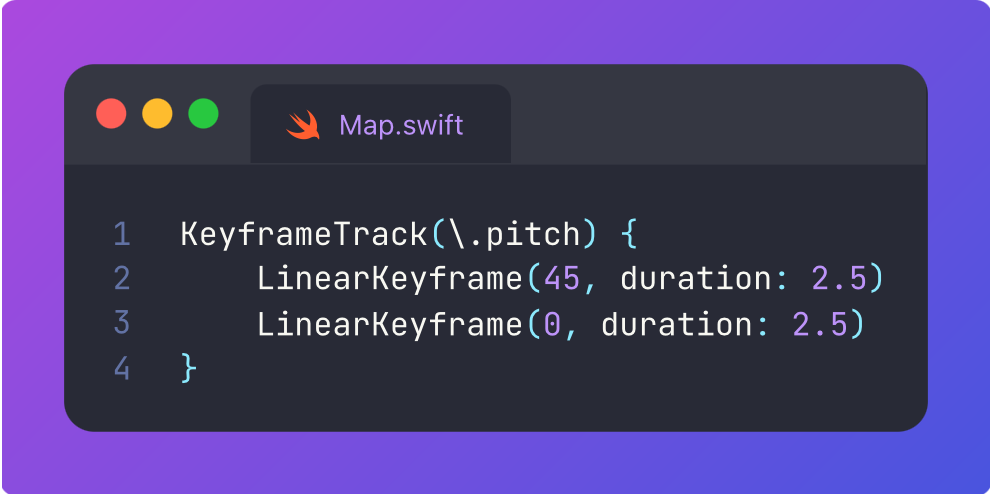
This motion synergises incredibly nicely with the map elevation, giving us a realistic 3D traipse through Zone 1. To make it even more dramatic, we can adjust the pitch to tilt the camera slightly.
If this segment was familiar to you, it’s because I partly borrowed it from my previous work on the SwiftUI Map APIs.
SwiftUI Map is RIDICULOUSLY Powerful

Seriously, I don’t usually use clickbaity titles but bear with me on this one.
Going a bit crazy with it
To see how far we could take keyframes, here’s the most elaborate animation I could envision, a sci-fi style DNA helix that rotates in real-time.
The effects and tracks involved include:
KeyframeTrack(\.rotationY), KeyframeTrack(\.rotationX), and rotation3DEffect
KeyframeTrack(\.scale) & scaleEffect
KeyframeTrack(\.offsetY) & offset(y:)
KeyframeTrack(\.opacity) & opacity
KeyframeTrack(\.hue) & hueRotation (TIL about that effect!)
Feel free to take a look at the code for yourself in the sample project!
Last Orders
I’ve wanted to write about SwiftUI keyframes for ages.
They are enormously powerful, and brought SwiftUI a great deal forward when comparing its power to raw UIKit and CoreAnimation.
The API is really simple to get started with. The keyframeAnimator modifier, KeyframeTrack, and the various timing curves are straightforward and infinitely composable.
The value(progress:) and value(time:) are understated but ludicrously powerful, as they allow you to apply keyframe animations to anything in your app. The only limit is your imagination (and perhaps your GPU).
I’m desperate to build a proper location-based side project in order to get some proper use out of the mapCameraKeyframeAnimator API. It’s a really fun one to play with.
There are a couple of weaknesses to point out.
Firstly, performance. SwiftUI views update on every frame of a keyframe, so you are likely to get frame drops if you have a particularly elaborate or heavy view to render during these animations. Avoid expensive in-view operations such as string interpolations.
Finally, the API does not (yet) allow you to define custom Bézier curves with control points, or more complex mathematical curves like sine waves or exponentials. I guess if you can get away with it, you can always vibe-code them!
Thanks for reading Jacob’s Tech Tavern! 🍺
If you enjoyed this, you might also enjoy some of my other pieces that touch on SwiftUI Keyframe animations:
Through the Ages: Apple Animation APIs

Subscribe to Jacob’s Tech Tavern for free to get ludicrously in-depth articles on iOS, Swift, tech, & indie projects in your inbox every two weeks.
SwiftUI Map is RIDICULOUSLY Powerful
Seriously, I don’t usually use clickbaity titles but bear with me on this one.