
Make Loading Screens Fun with the SwiftUI Game Engine
Clone flappy bird in ~10 minutes

2015.
Gamers worldwide hold their breath. Bandai Namco’s patent on minigames in loading screens expires after 20 years of tyranny.
…
…
crickets.
I’m as disappointed as anyone. 10 years on, and loading screen minigames are all of nowhere. Is it the SSDs? 5G? Pure lack of whimsy on the part of game developers?
I’m taking a stand.
Like all devs, at one point or another, I’ve entertained the idea of going into game development. In my IT GCSE, our final-year coursework was to make a game from Scratch, that is, with a drag-and-drop logic system designed for little kids. As a result, everyone got moderated down a grade, because we were meant to program it in Adobe Flash.
I was actually the only one who cinched an A*. But I deserved it.
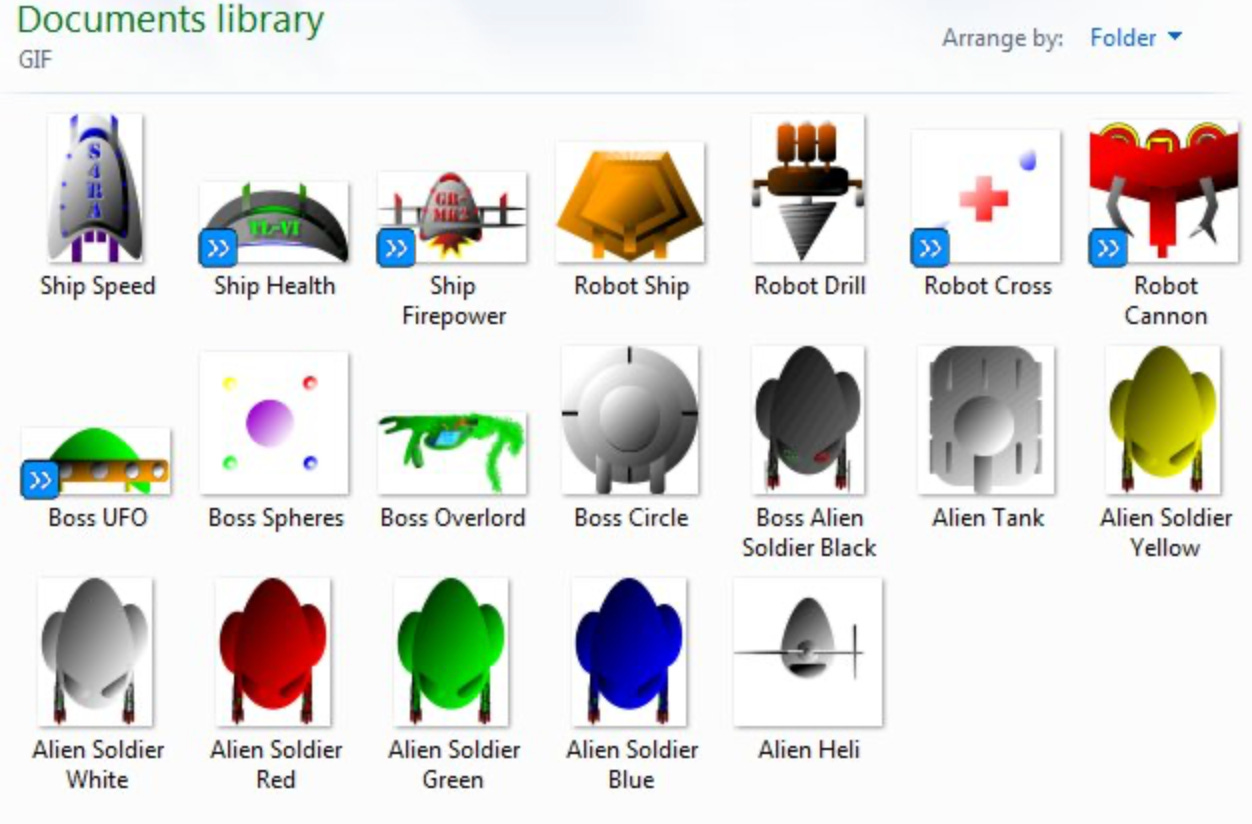
This project consumed me for 9 months. I made an elaborate space shooter with 5 side-scrolling levels, multiple playable ships, an 8-bit heavy-metal soundtrack I generated using midi files, plus co-op, 1-v-1 deathmatch, and boss rush modes.
Like most low-agency 15-year-olds, I didn’t think too hard about the next logical step of my programming prowess. I promptly dropped all my knowledge when I started my science & maths A-levels, so I could work towards my future career as “probably a doctor”.
Since landing in software engineering mostly by chance, I never seriously entertained going into game development. I like money and seeing my family too much.
I got the SpriteKit book in 2017, a book which is still entirely up-to-date (its last release was 2015). I set it aside after my colleague pointed out that I still couldn’t remember to set the Delegates and DataSources on my table views.
I digress*.
*What’s frickin’ new?
I’m re-litigating my past triumphs and blunders for a reason.
Game engines.
Everyone sort of knows what these are. But, uh, maybe not specifically. They essentially divide the responsibilities of game development between the cracked goblins that write shaders in assembly vs the gameplay designers that shuffle the subsequent triangles into playable levels.
Today I’m going to show you…
What is a game engine?
The moving parts of a game engine
How to build your own simple game engine in SwiftUI
How to use this to make 2D games
The future of app loading screens
SwiftUI was a surprisingly perfect fit. My engine is entirely open source, plus my sample app, where I demo some minigames in a real loading screen. The games might just feel familiar if you owned an iPod Touch back in 2011.
Subscribe to Jacob’s Tech Tavern for free to get ludicrously in-depth articles on iOS, Swift, tech, & indie projects in your inbox every week.
Paid members get several benefits:
🧵 Master Swift Concurrency with my course and training kata
🌟 Access Elite Hacks, my exclusive advanced content
🚀 Read my free articles a month before anyone else
This email can be too long for many email clients, so please read on my website for the best experience.
What is a Game Engine?
A game engine is a set of libraries that implements the common functionality that most games will need. It handles things like:
2D and 3D graphics rendering to draw stuff on-screen
Physics and collision detection to move objects realistically
Audio to play sound effects and music
User input with keyboards, mice, controllers, or fingers
Networking to support online multiplayer
AI for enemy behaviour and pathfinding
Consider the iOS SDK: you don’t need to think about the window server, capacitive touch hardware, runloop events, or hit-testing every time you use the gesture recogniser APIs.
The way a ray of light bounces off a 3D texture doesn’t change much between games. Keyboard and controller inputs are pretty standardised. Physical laws are often the same, barring a few tuning parameters like gravity.
The wheel (or, perhaps “the engine” in this instance) has been invented, we are just shaping the chassis and slapping on some sick decals. We can focus on what makes your game unique.
This engine is what I built for you today. Let’s look at how the moving parts are implemented using SwiftUI.
Anatomy of the SwiftUI Game Engine
If you reckon me a charlatan for redacting my code blocks, here’s the full monty on GitHub: go ahead and install my package today:
https://github.com/jacobsapps/GameEngine
Windowing
Every game needs a window in which to display.
Since iOS 15, SwiftUI ships with Canvas, a simple 2D graphics engine which allows us to freely draw onto the screen. It’s exactly what we need. This naturally locks our engine into 2D, but I suspect I’ll lose some of you if I dive straight into 3D shader math*.
*Also, I’d have to learn it.
Canvas has a graphics context in which we can pretty much draw anything we like. It also gives us a CGSize, allowing us to scale everything accurately.
Canvas { graphicsContext, size in
    // Draw game here
}
The Game Loop
The game loop is the most fundamental concept in game programming.
It’s the central source for everything that happens. Since this is ostensibly an iOS blog, it’s a bit like the iOS run loop:
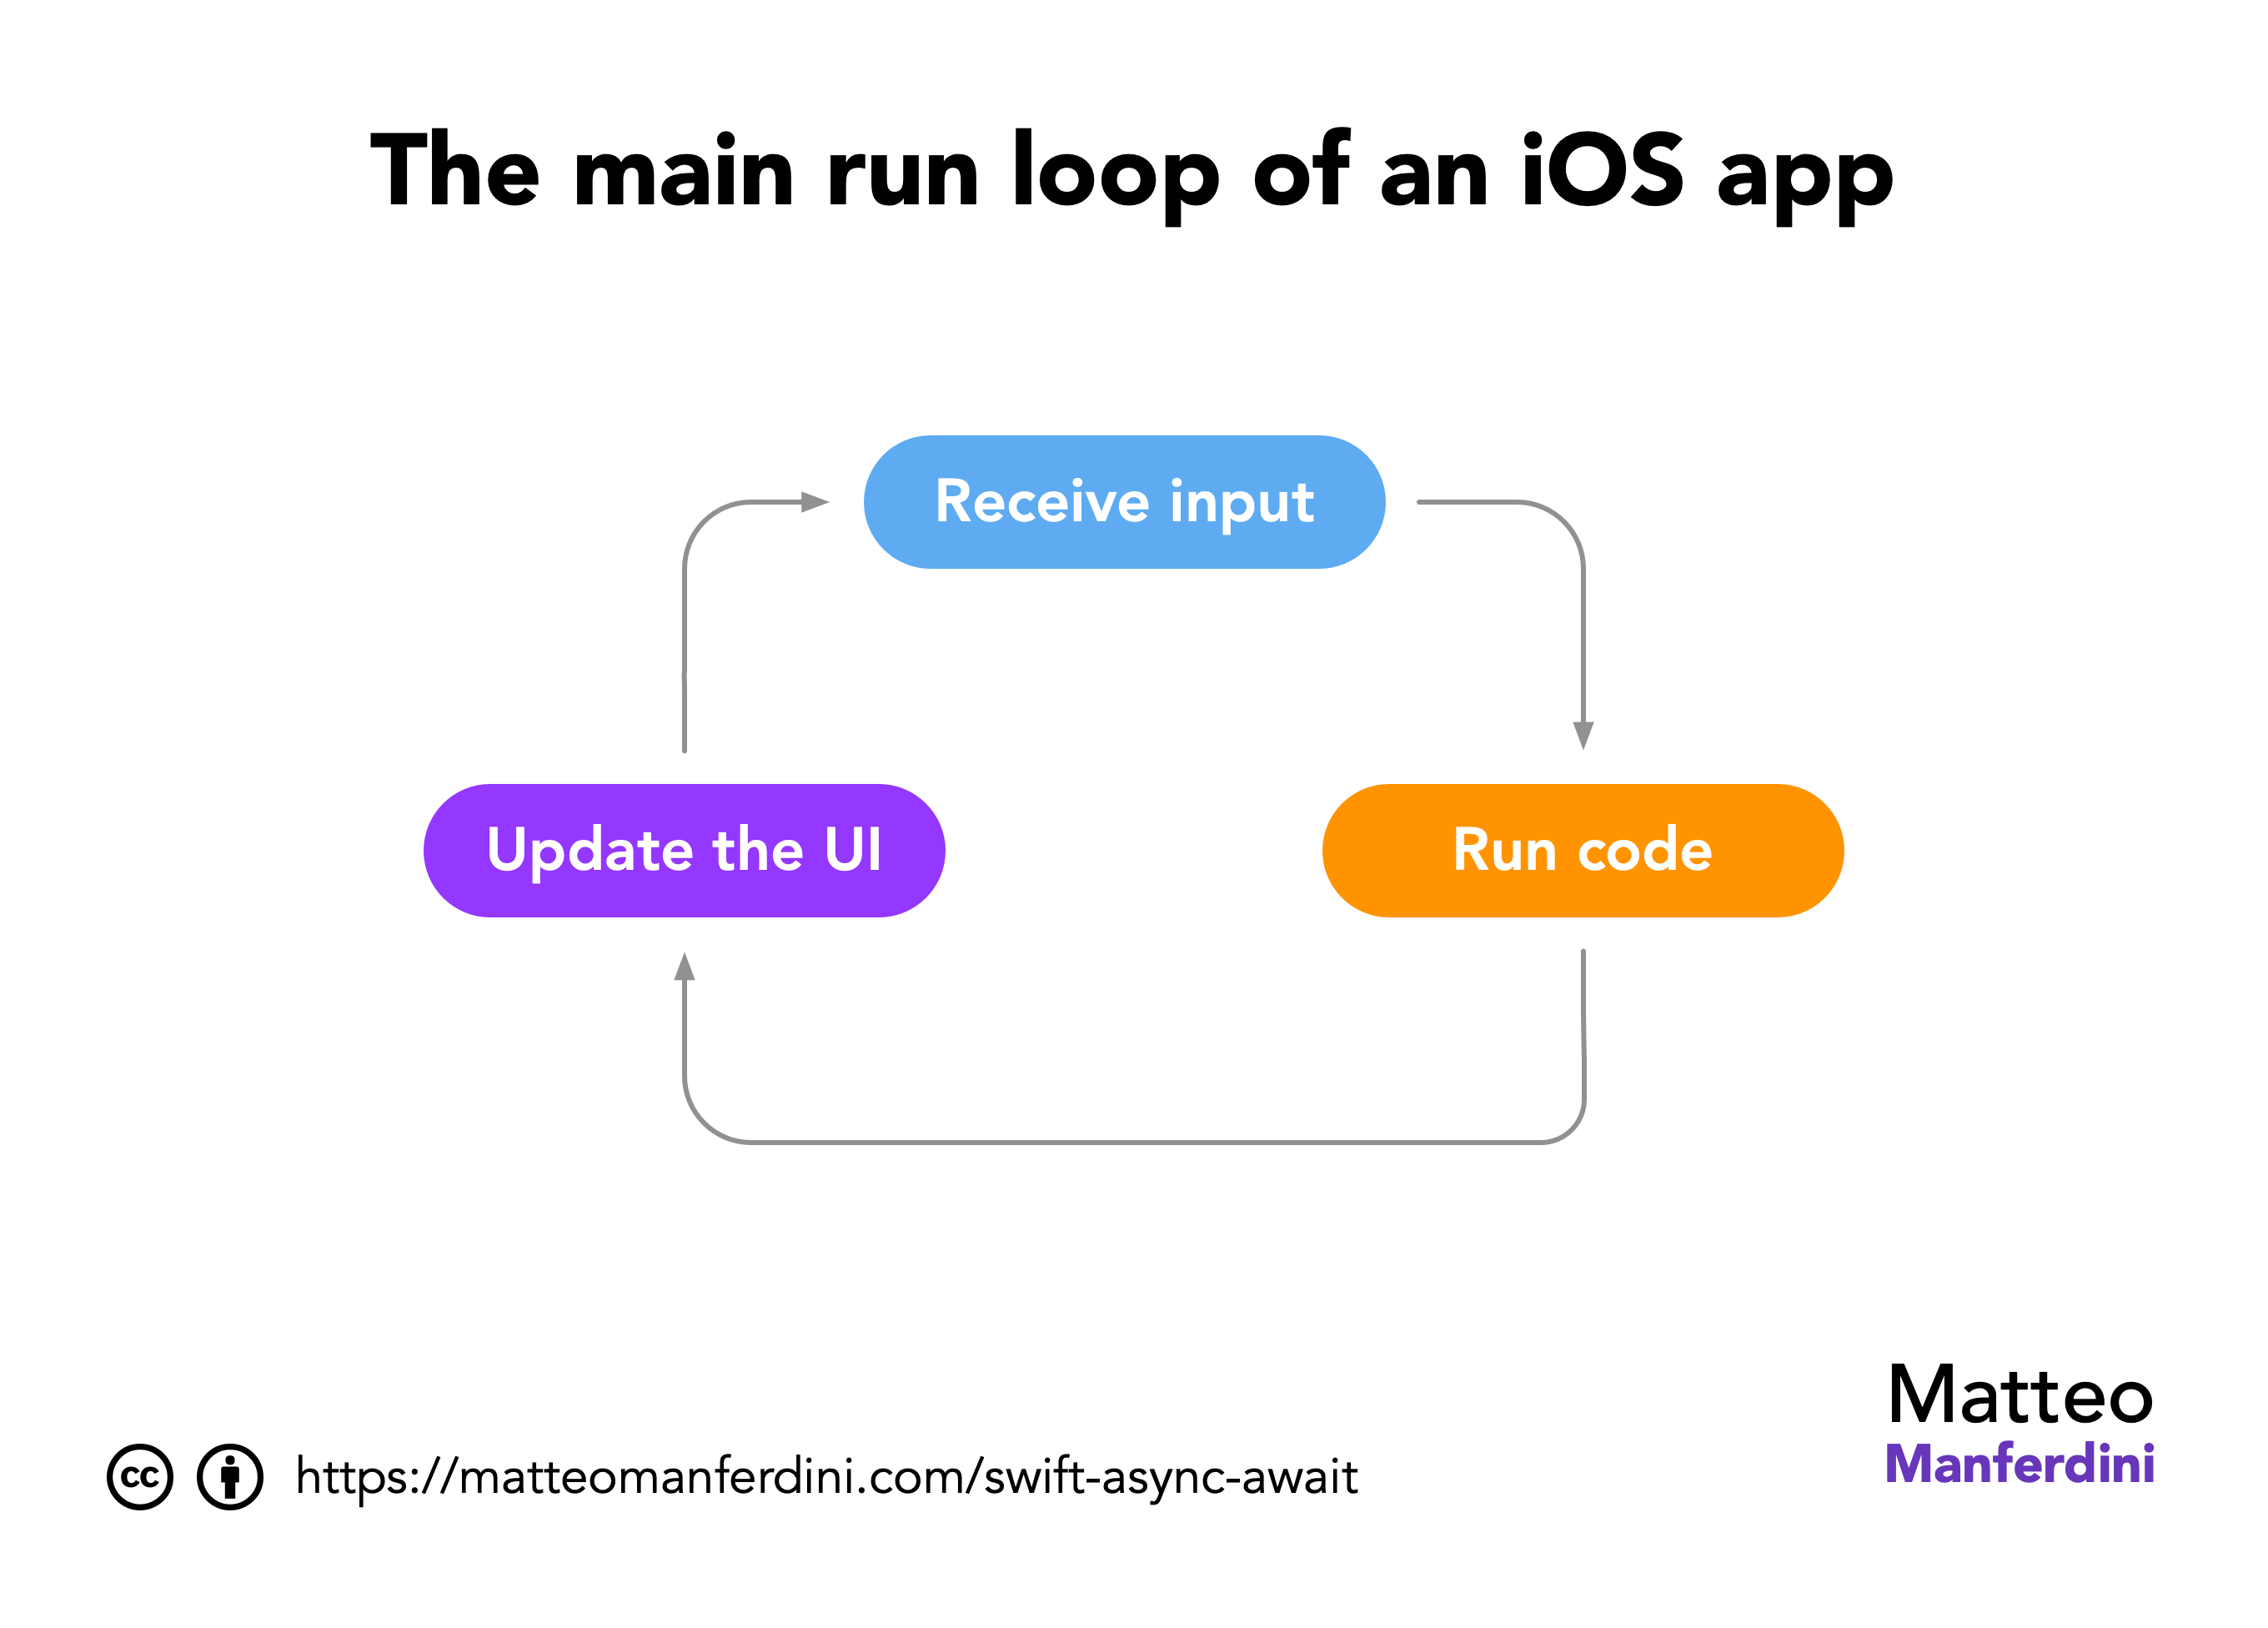
Actually, yeah, it’s exactly like the run loop. Another classic Jacob Perfect Analogy™.
While your game runs, there’s a while(true) loop that ticks at the frame-rate. It receives events (user input), updates the logic in the game, then renders everything to screen for a frame.
A game is this while loop.
Input.
Logic.
Rendering.
Repeat.
If you didn’t think SwiftUI was already a great fit, we can wrap our Canvas in a TimelineView that ticks every 1/60 of a second, and lock in a buttery 60fps for our game loop.
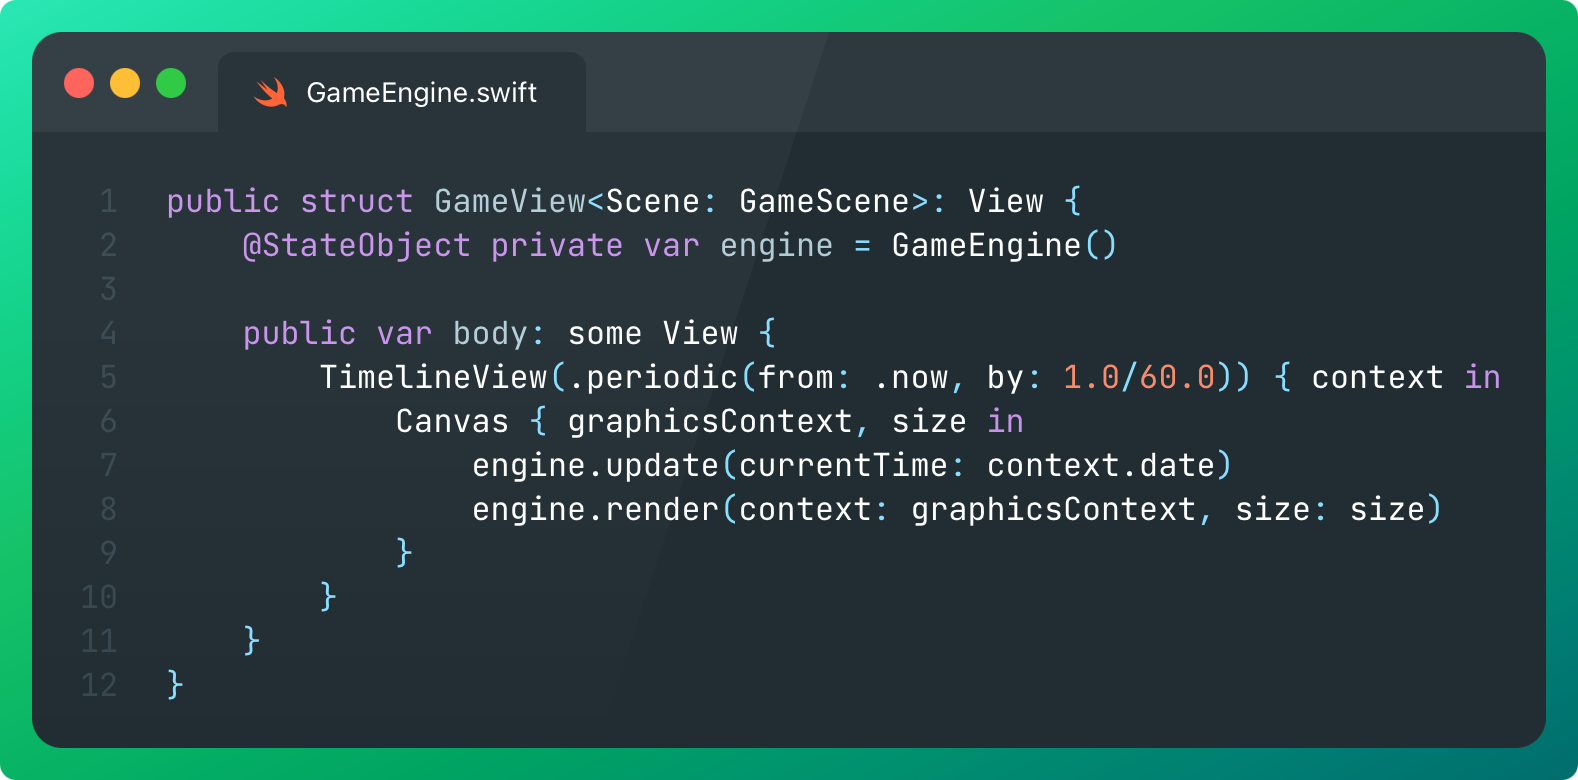
These 7 lines of logic achieve the 4 most important functions of a game engine:
Set up windowing with Canvas.
Set up the game loop using TimelineView locked to 60fps.
Pass game ticks into the game engine so all objects update.
Pass the graphics context into the game engine so we can render everything.
Logical Building Blocks
Games are very object-oriented.
Literally.
While this is anathema if you’re a protocol-oriented composition Stan, it makes sense for games to be crufty.
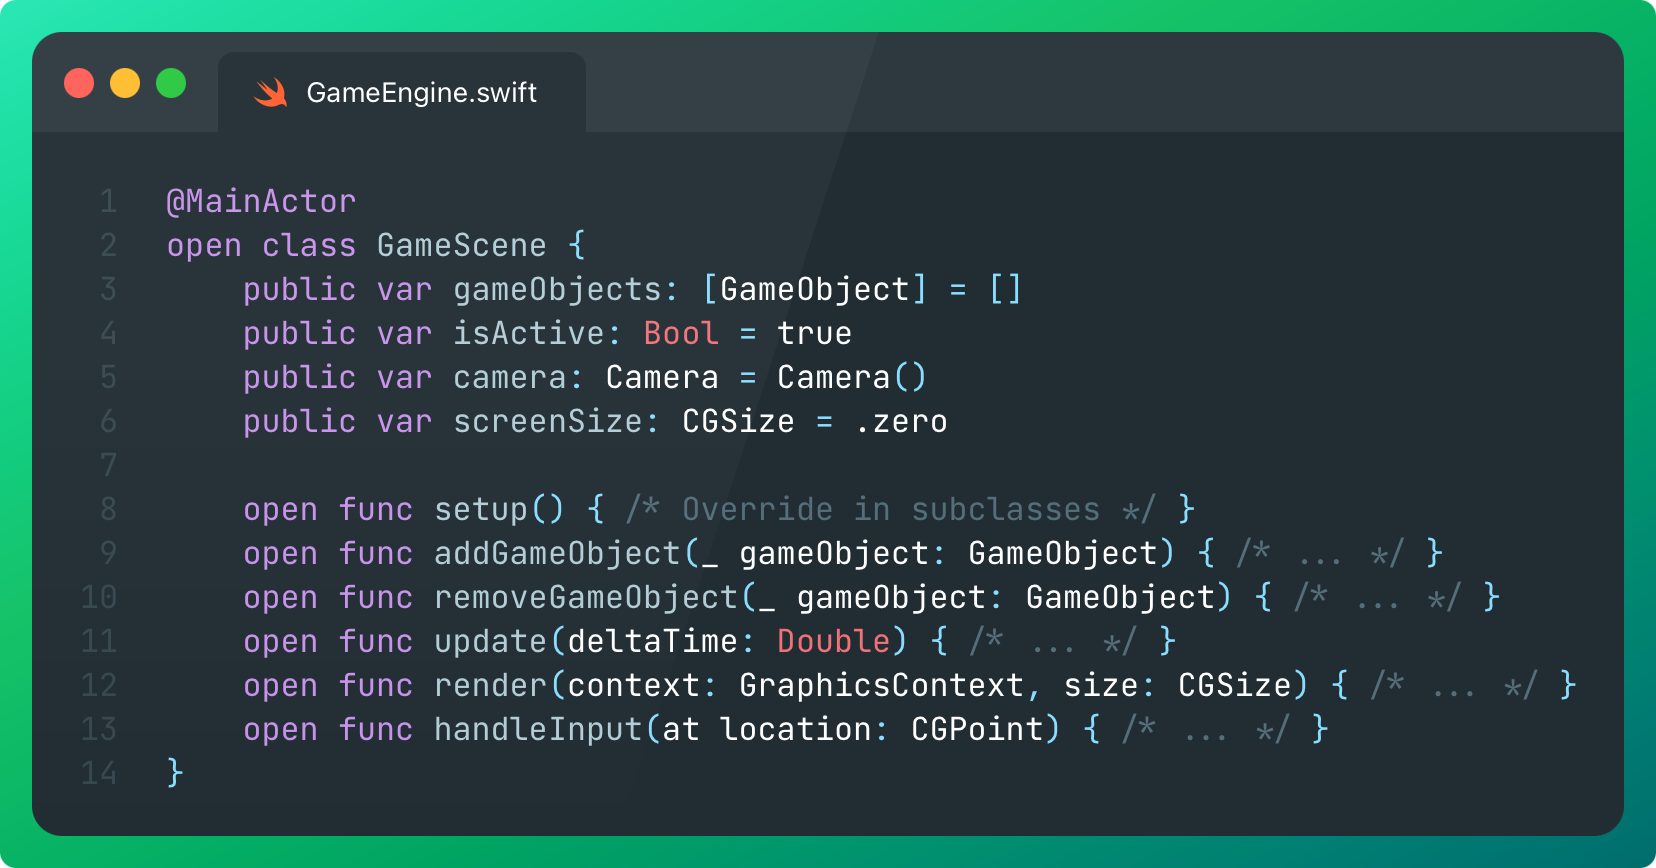
Everything in a game is a game object.
Inheriting from the GameObject superclass, to be exact.
This is really critical because everything in the game has the same basic properties.
Inheritance is genuinely the way to go here. In a game, you really do want every object to work the same way by default. Re-implementing the same properties and functions across interrelated game objects is a waste of time, since objects form a natural inheritance hierarchy.
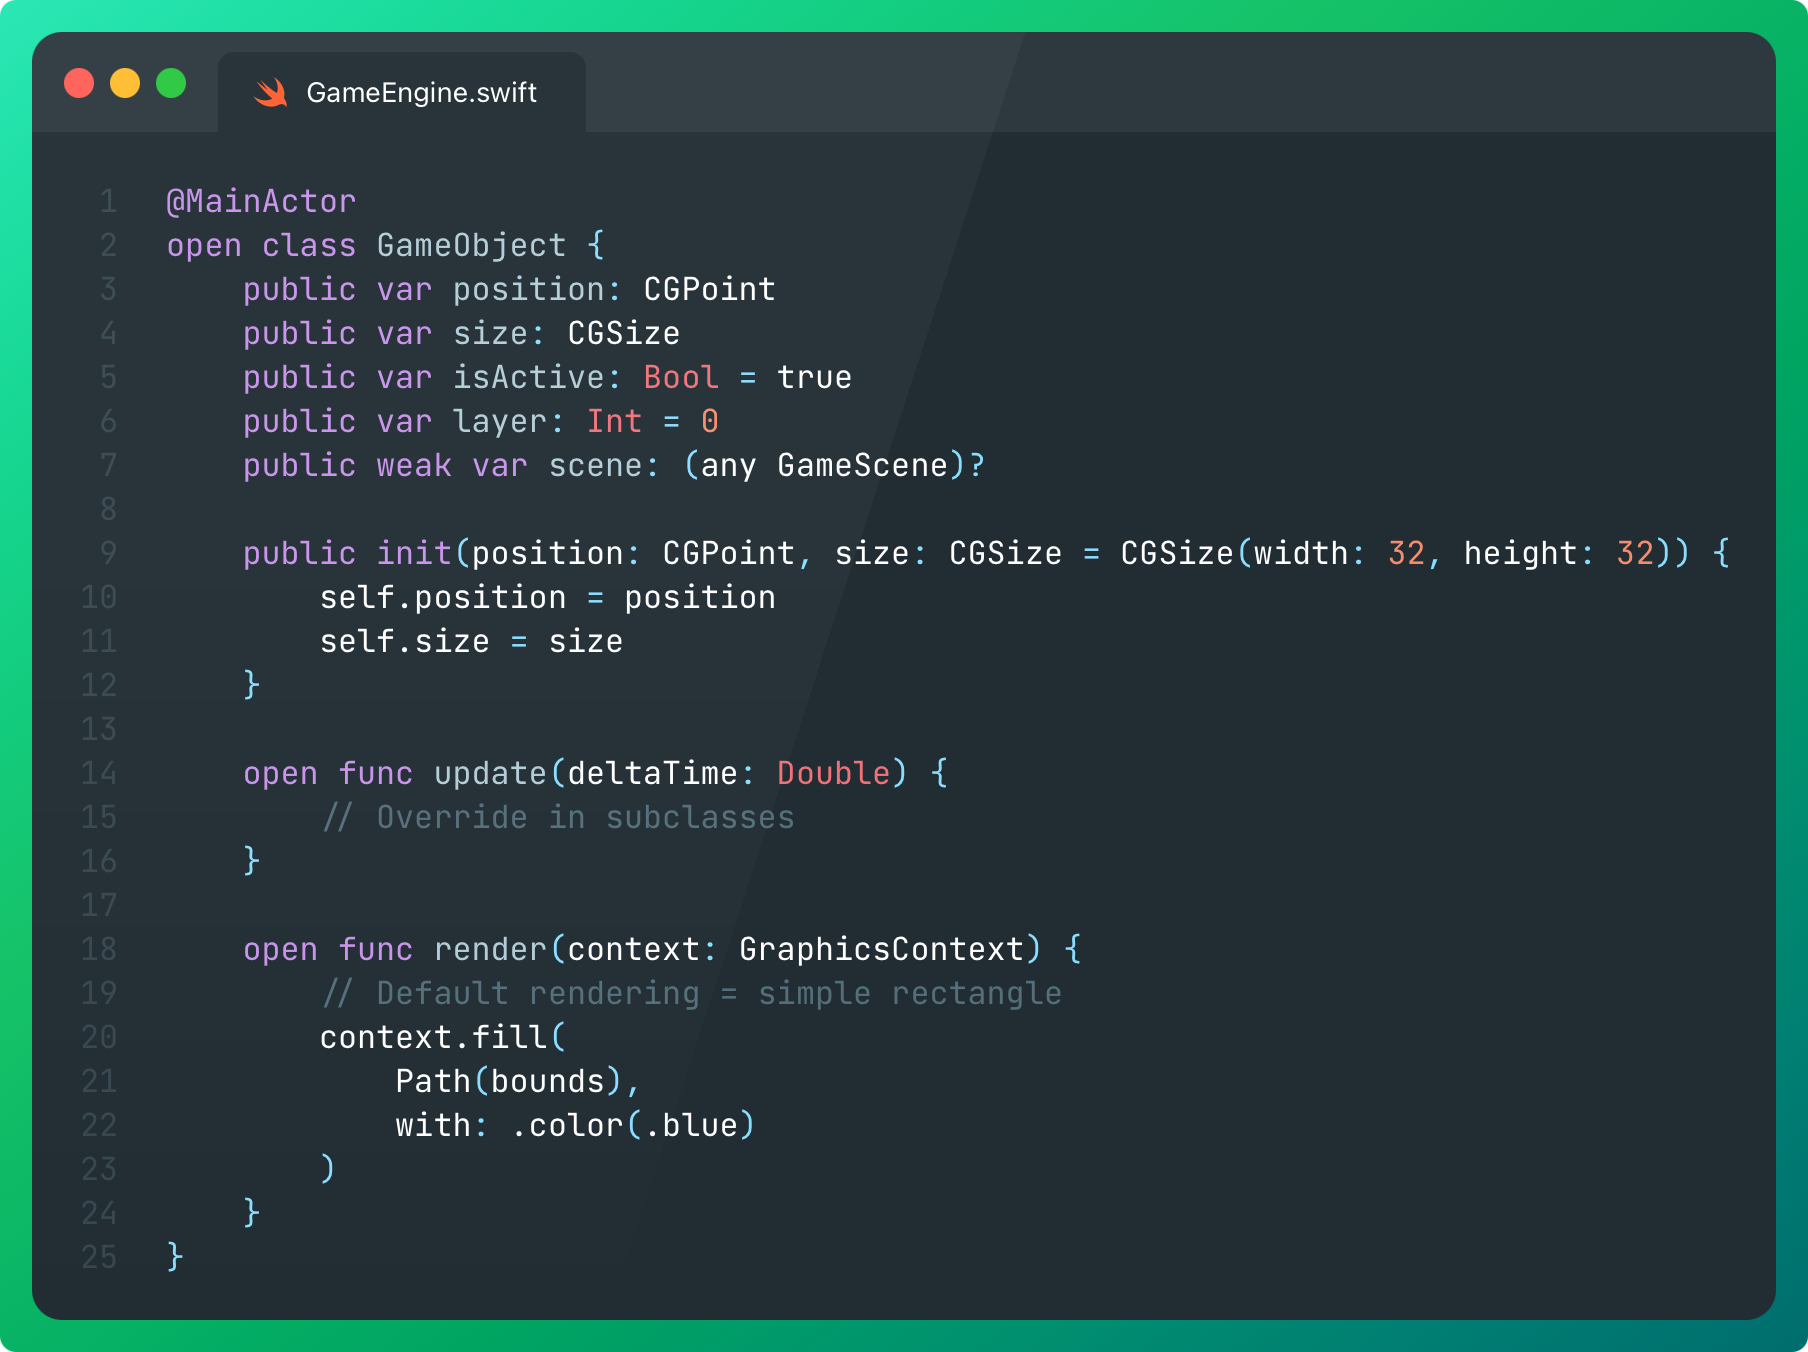
Everything in your game subclasses from this basic functionality: size, position, and layer (so we know what to render if there’s overlap).
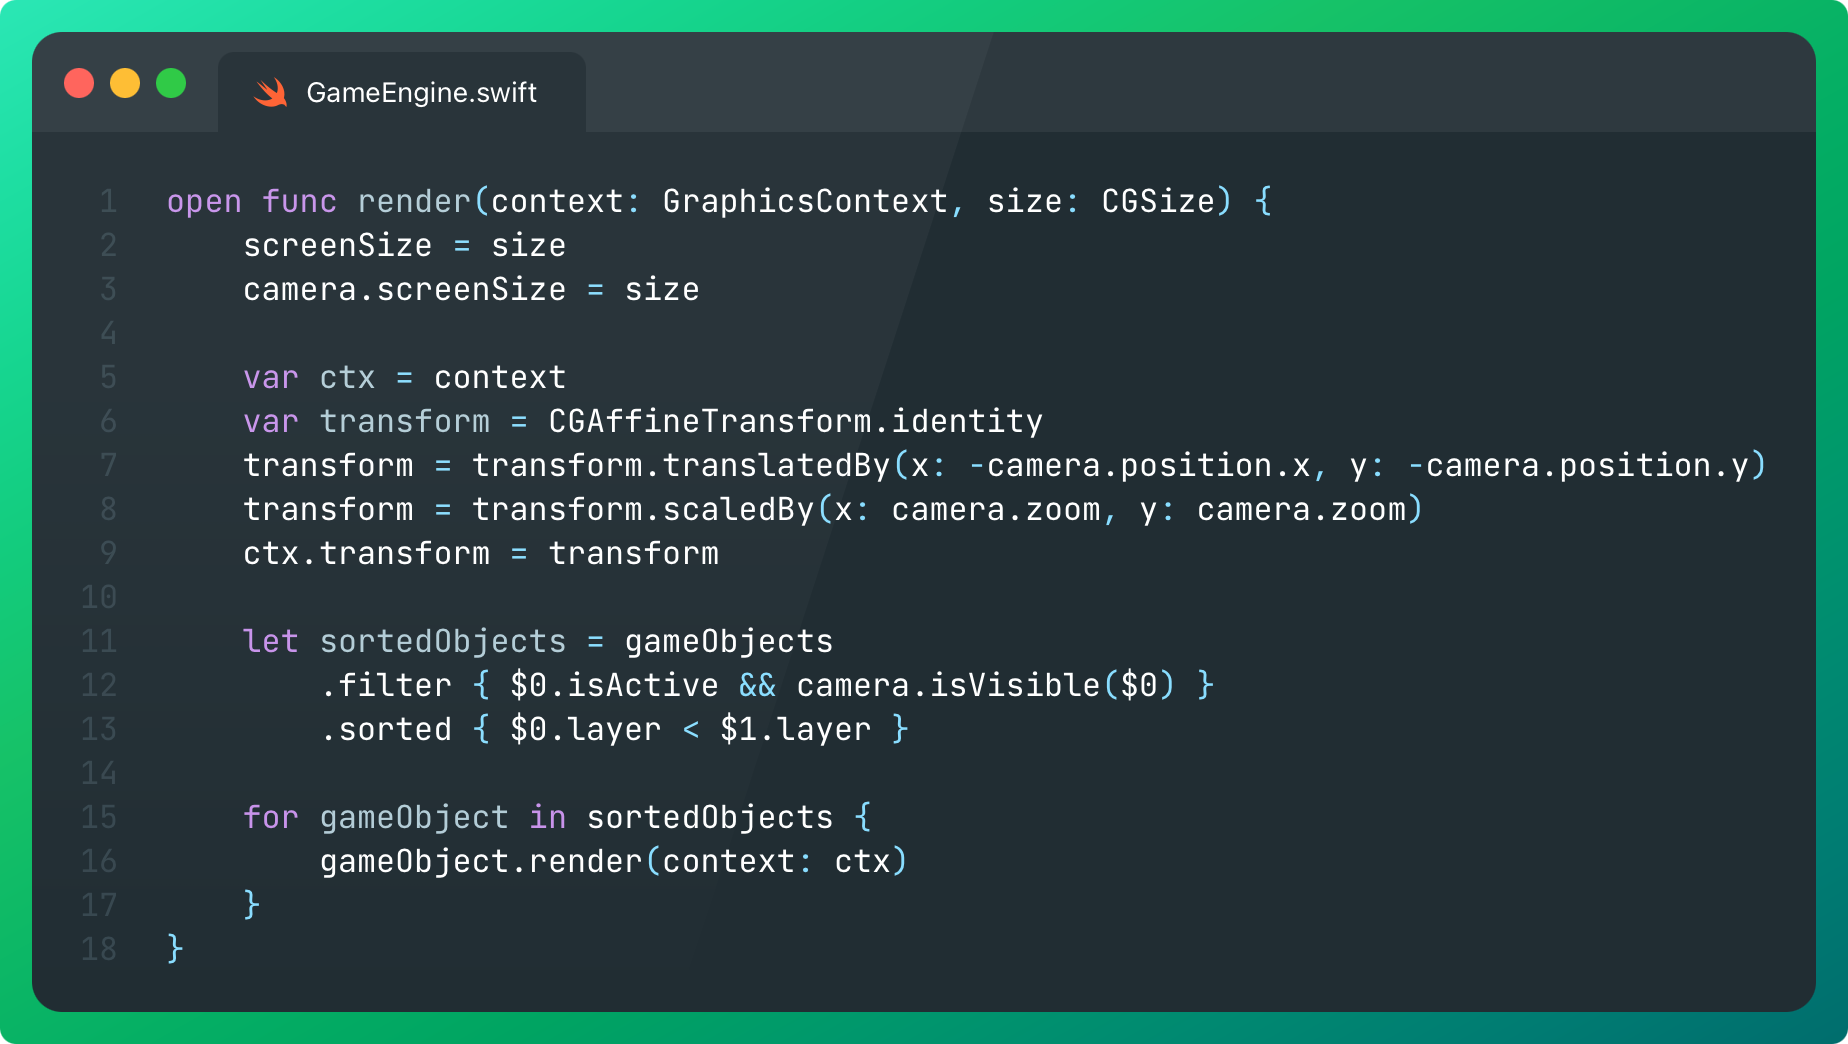
Rendering
Everything visible will be drawn on-screen. The render() function takes the GraphicsContext created in the Canvas to draw the GameObject directly onto the Canvas using SwiftUI drawing APIs. You can subclass with a more complex Path, a gradient, or even a sprite from your asset catalog.
For anything complex, use context.resolve() to cache views into GraphicsContext.ResolvedImage to avoid re-rendering static content over and over every frame.
Logic
All game objects have logical properties which are modified every game tick inside update(deltaTime). This is a no-op on the superclass, but every subclass may have properties that change with time.
The ticks of the game loop are the core of everything. Every single object in your game follows the ticks, updates their logical properties, and re-renders their current state on-screen.
isActive is a flag for cleanup. When an enemy scrolls off-screen, we stop rendering it, then deinit. This is vital for performance as you get more objects in a level. It was critical in 1985 for NES games, and it’s still important now.
User Input
Interactivity is the definitional differentiating factor for media to be considered a game. Engines have to handle user input.
On a mobile app, input can be as varied as taps, drags, accelerometer data, shakes, camera data, or bluetooth data streams. It’s a bit 2011, but you can even implement software joysticks.
We can start by handling user touch input gestures on our main GameView:
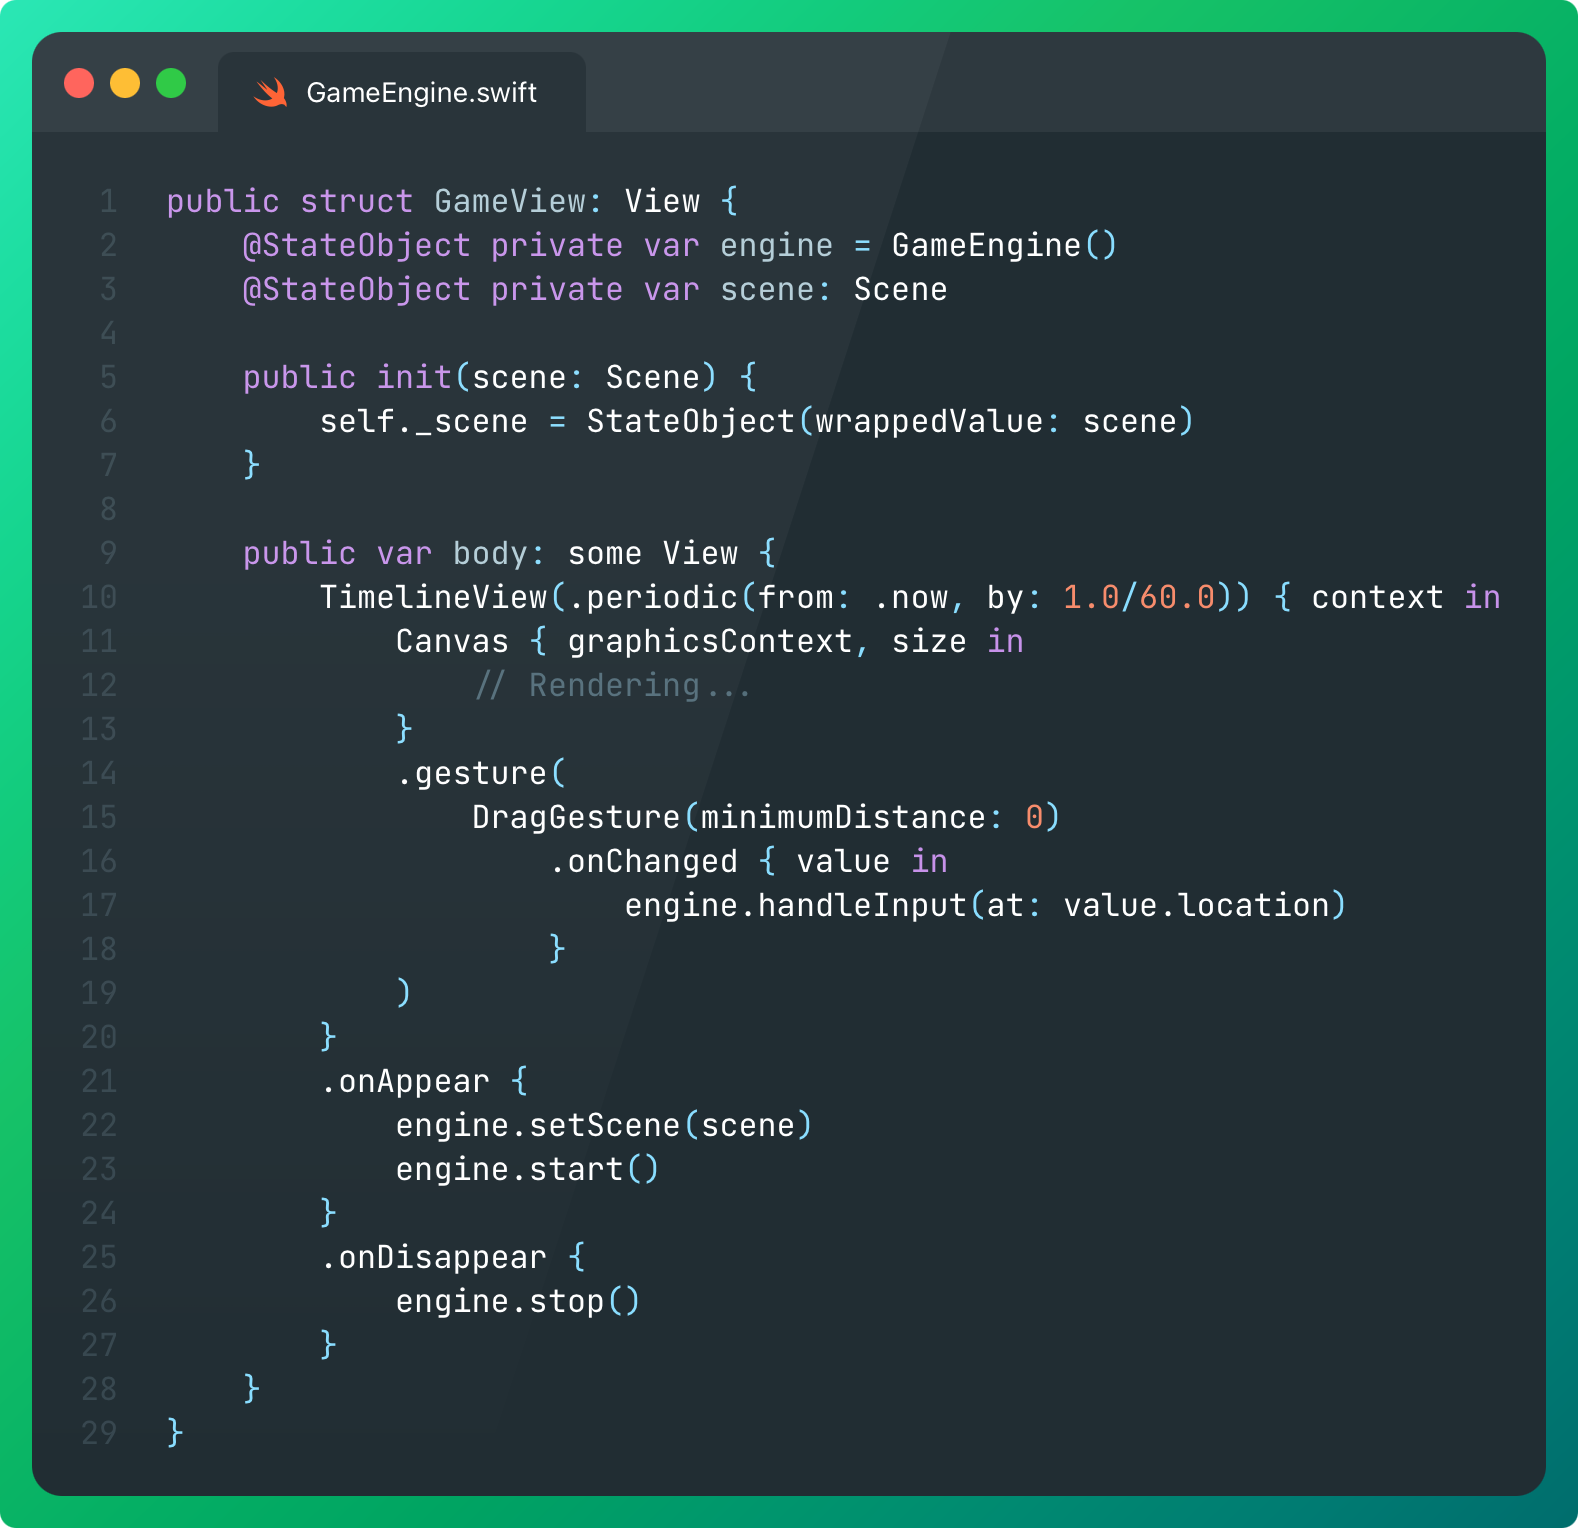
DragGesture(minimumDistance: 0) is used here instead of a tap gesture because this allows us to continuously stream the user’s finger position each game tick. This takes a complex range of potential inputs and condenses them into a single input, at the given location, each game tick. These gestures may be propagated down towards game objects.
The Game Engine object
We’ve looked at the top level with our windowing and game view. And we’ve seen the low-level GameObject that ultimately makes up all the stuff in our game.
Now let’s see the GameEngine object itself. It doesn’t do a huge amount, it’s more the proxy through which logic propagates with each game tick.

More on the scene in a minute.
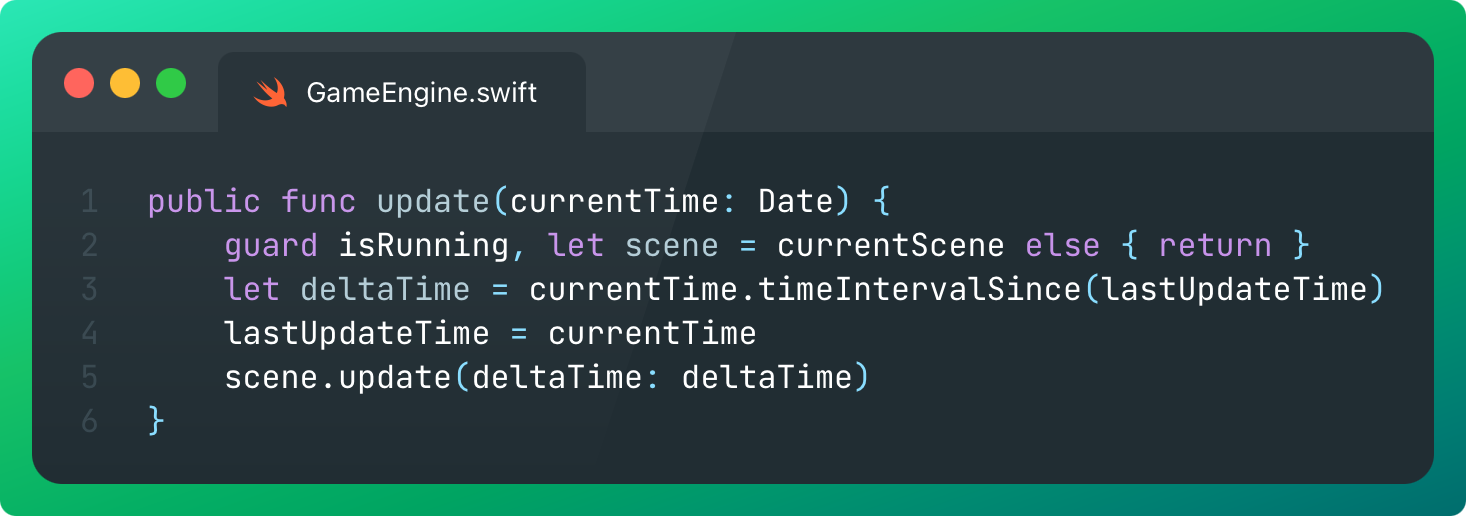
The engine also contains the functions that forward the three core “run loop” methods down to the scene.
…game tick updates:
…rendering:

…and user input:
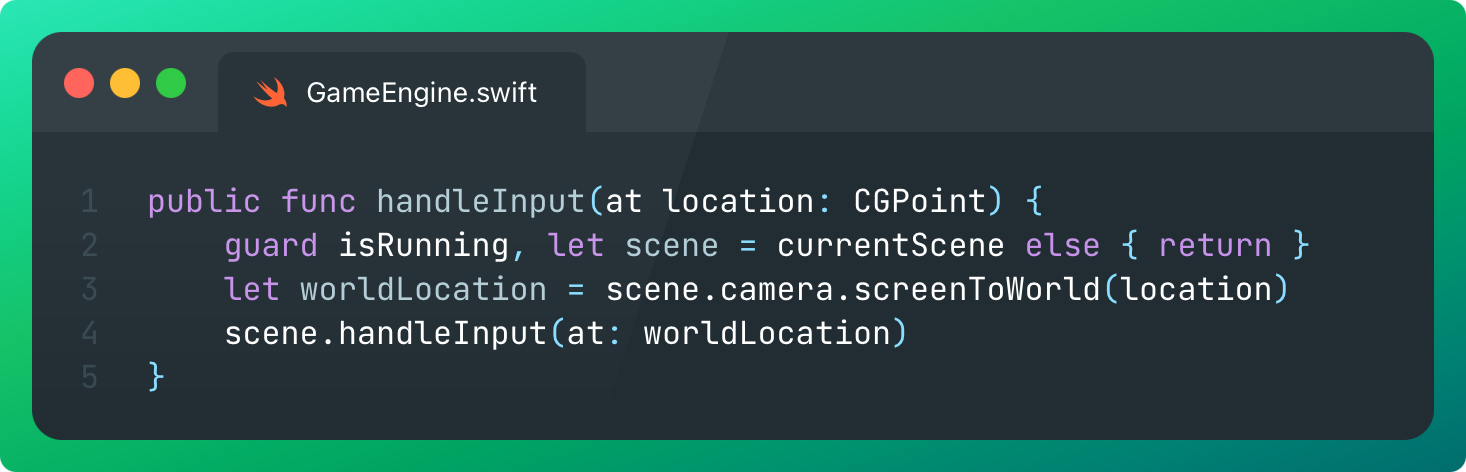
The key here is that every single object in your game behaves the same way. On every game tick, the render, update, and handleInput functions are called. The game engine forwards each of these functions down to the scene.
The Game Scene
The GameScene is the object management repo. It’s the container for all our active game objects, and determines which ones live or die. The scene propagates each core game tick function to each object in your game.
Think of it like the logical space where game objects reside. You can have a different scene to represent the menu, each level, or the active portion of a game world.
Let’s look closer at the update function:
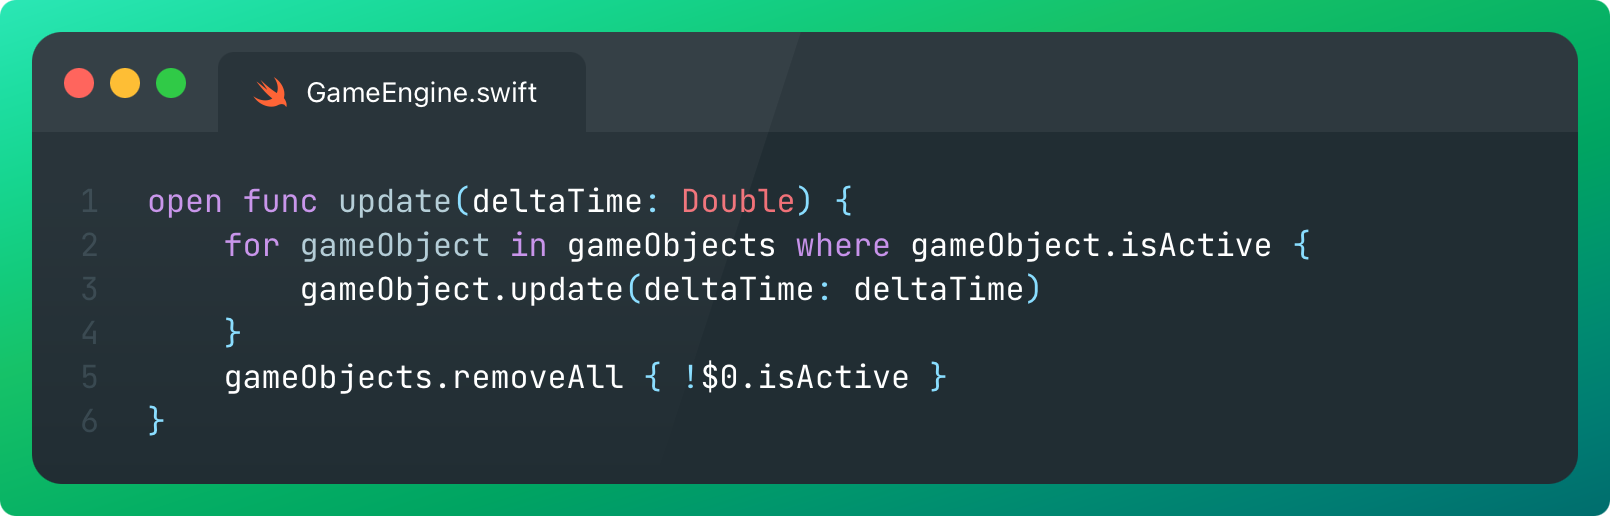
For every logical game tick, in every frame, the scene iterates through each active object and updates them. After this, it removes any game object that marked itself as inactive. This ensures that a game object that’s no longer used cleans itself up and won’t waste clock cycles any longer than required,
Camera
The Camera object stores the location of our scene, the zoom level, and helps inform which objects render. It determines the visible scope of our world.
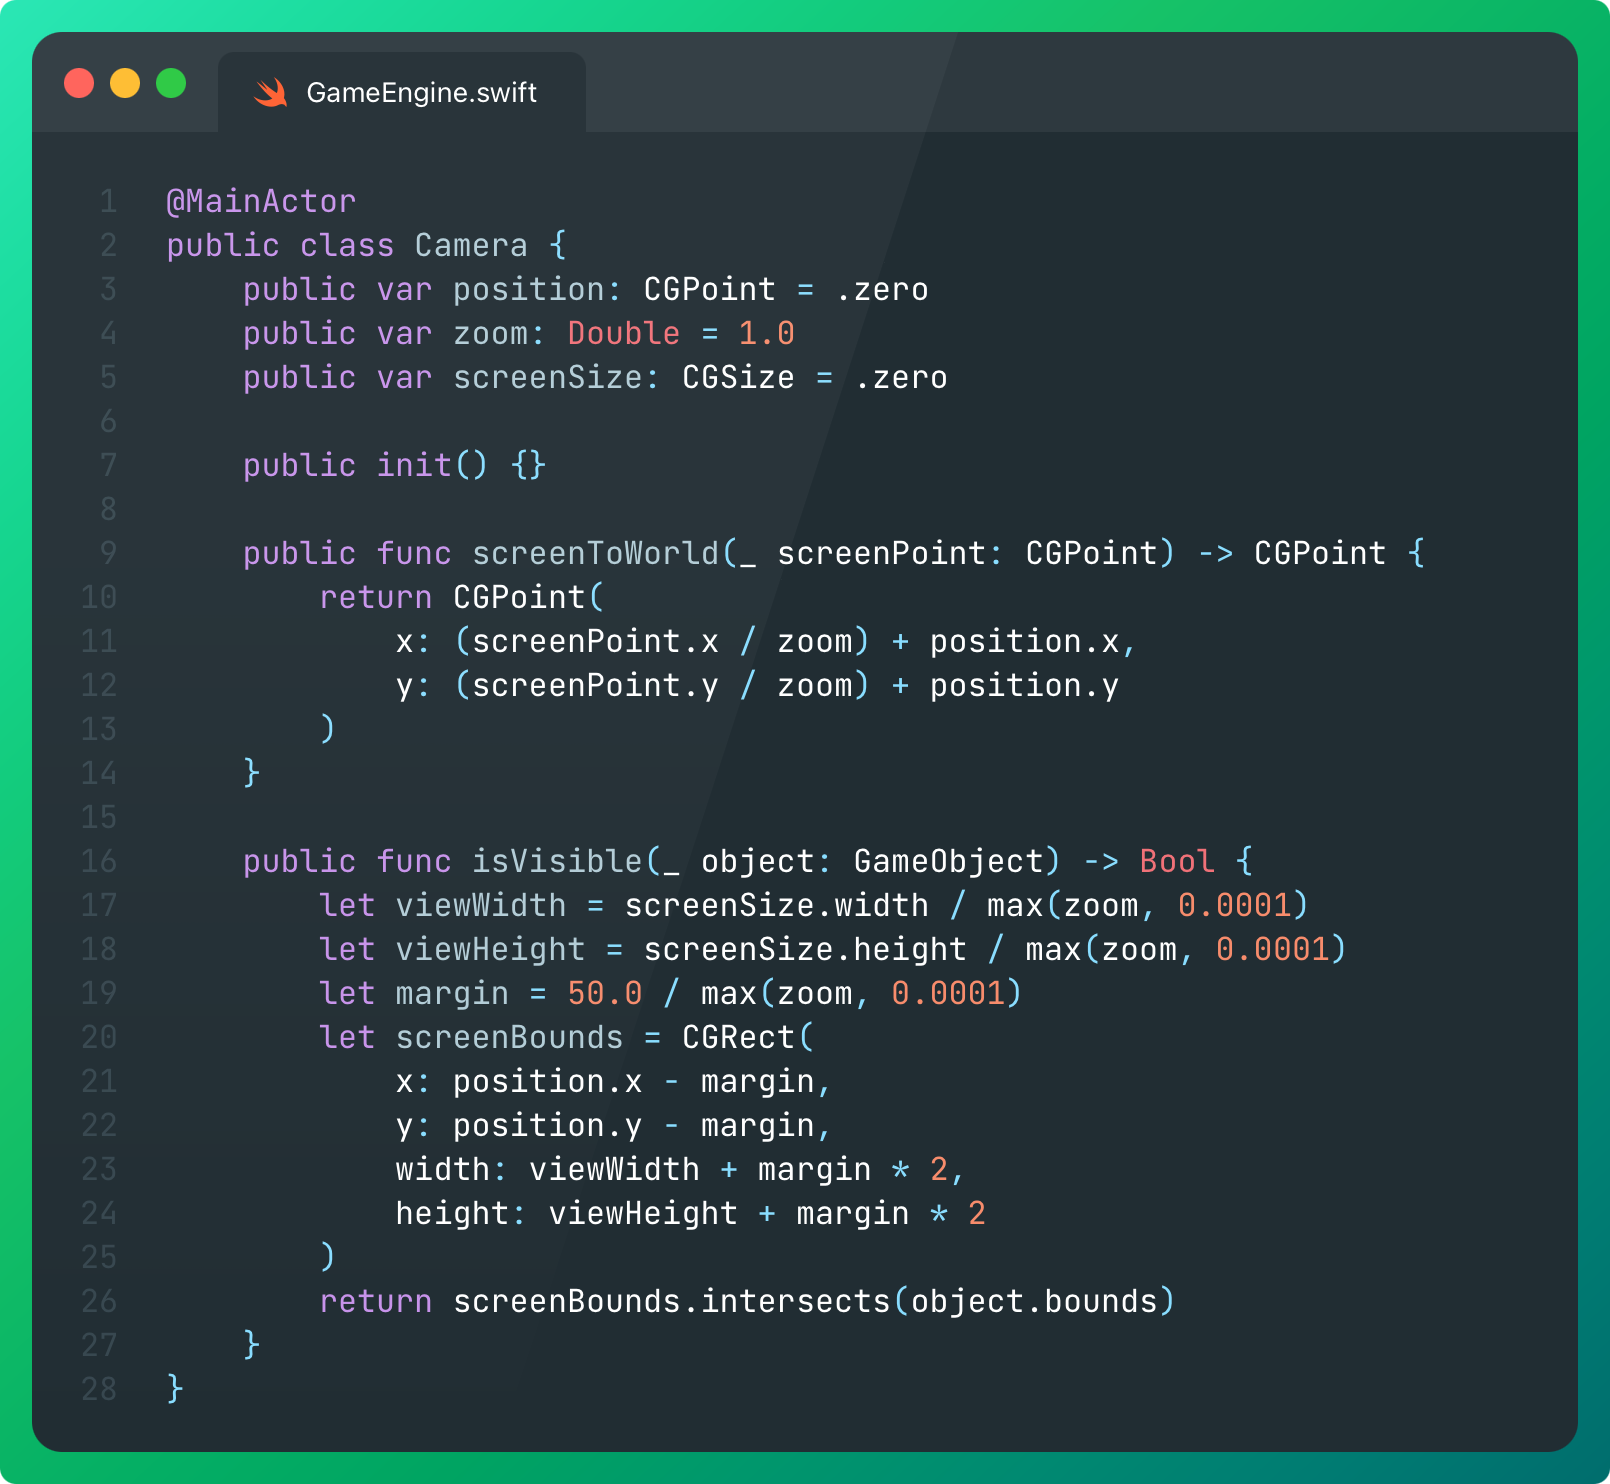
screenToWorld() maps world-space coordinates in the scene to screen-space coordinates. The game engine uses this method to map user tap inputs to the game world.
isVisible() determines what’s drawn on-screen so the engine can work out which game objects to render. This means you can build the entire level into the scene and ensure that only the part around the player character is rendered at any time. This is simply done by determining whether the bounds of each object intersects with the camera’s field of view.
Our engine also contains functionality for snapping to a specific location or following a player character.
The GameScene performs some CGAffineTransforms using the camera to decide what content is on-screen each tick, and renders just those game objects.
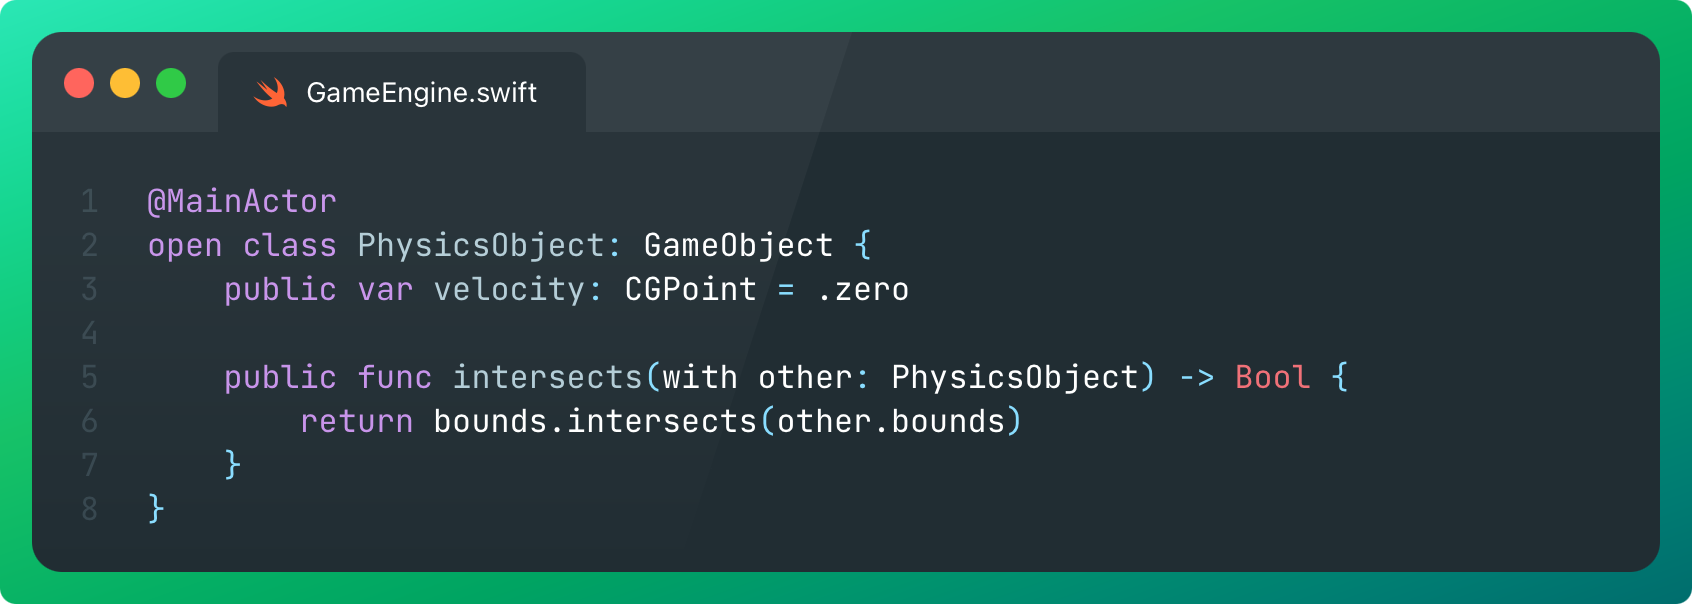
Physics
Physics. The final frontier.
The physics engine decides how an object behaves over time, and how it interacts with other objects.
The two most critical bits of any physics engine are:
Mechanics, that is, how an object moves under gravity and its own velocity
Collisions, i.e. whether objects are touching
Collision physics is usually the decider of both score (picking up coins and points) and the game over state (hitting something dangerous). We can implement rudimentary physics by subclassing* GameObject:
*I TOLD YOU!!!
Instead of pre-computing the entire path of a physical object, our game objects live in the moment. They have a velocity, speed, and position. Every frame, they continue moving to the next point in space as defined by these properties. Each tick applies gravity (or user input like jumps) to velocity.
This intersects function is perhaps the most important part* of a 2D game engine because it determines whether one object collides with another. This is how most game objects interact.
*Okay I think that is 6 or 7 “most important” parts now? Who’s keeping track?
My game engine is very simple and treats everything as a box. Rectangles either intersect or not. A non-loading-screen-production-level engine might compute collisions using edge paths, transfer velocity with kinematics, or introduce friction.
One big downside of our engine is the gnarly O(N²) collision detection per frame. Each PhysicsObject checks itself vs all other active physics objects. Okay for a fella and some platforms, or a bird n’ some pipes, but not fantastic for a bullet-hell game.
In a serious engine, we’d use a quadtree to compute collisions, splitting the game world into cells and only checking objects within the same cell. This can achieve O(N log N), scaling less intensely with the number of game objects.
If you haven’t been practicing your leetcode, a more simple, equally valid way to get to O(N) is just defining collisions with respect to your player character: bullets in a bullet hell don’t care about each other.
Other Pieces of a Game Engine
The game engine I’ve created is intentionally very simple and minimal, so I haven’t done much vis-à-vis any special scripting, AI, audio, or networking. That was on purpose. My games are for chucking in a loading screen, I’m not trying to win any Apple Design Awards™.
It’s a public package! Use it!
https://github.com/jacobsapps/GameEngine
How? Okay, let me show you the engine in action.
Building a Game: Flappy Bird Clone
Once you look at a simple worked example, you’ll wonder what all the fuss was about and feel confident making your own stuff. Honestly.
Here’s the Flappy Bird clone code.
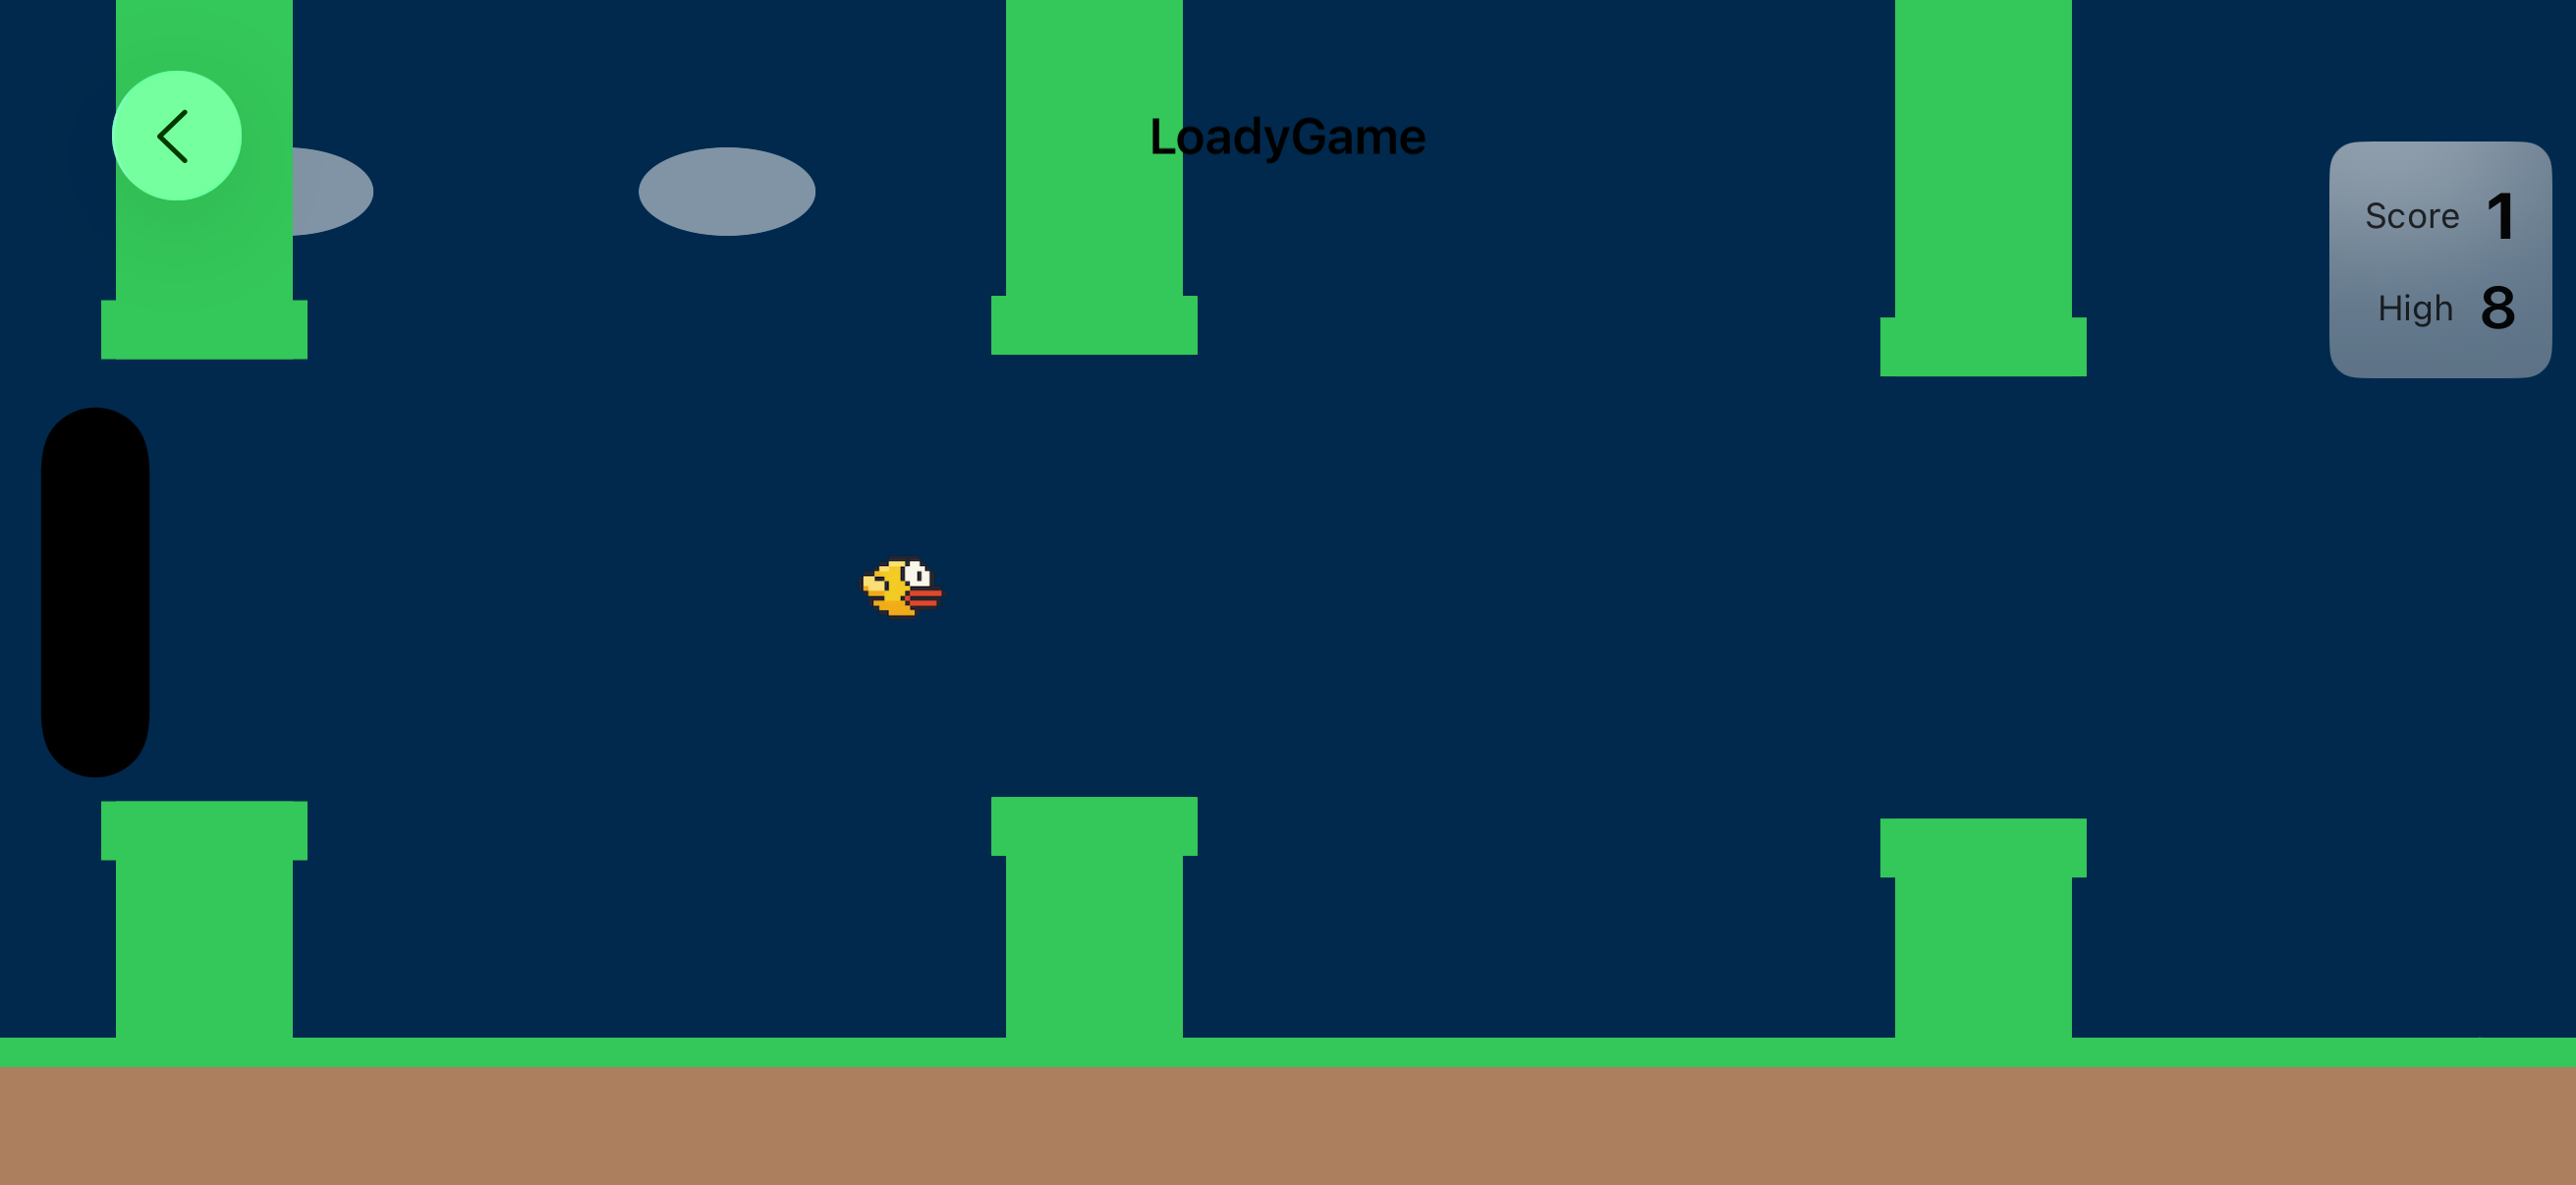
The whole thing clocks in at about 300 lines of code. We’re essentially setting up one scene, and less than 10 different objects. Let’s start by looking at the objects:
ScoreGatePipeSpawnerGroundScrollingBackgroundPipeFlappyBird
This article is already pretty long, so I won’t take you through a totally comprehensive example, you can just look at the open-source code.
Let’s just look at the player character: the eponymous Flappy Bird.

While the object code themselves isn’t strictly very SwiftUI, it is kind of declarative. As we’ve covered, each object just does 3 things:
The object responds to logical game ticks, handling position and collisions:
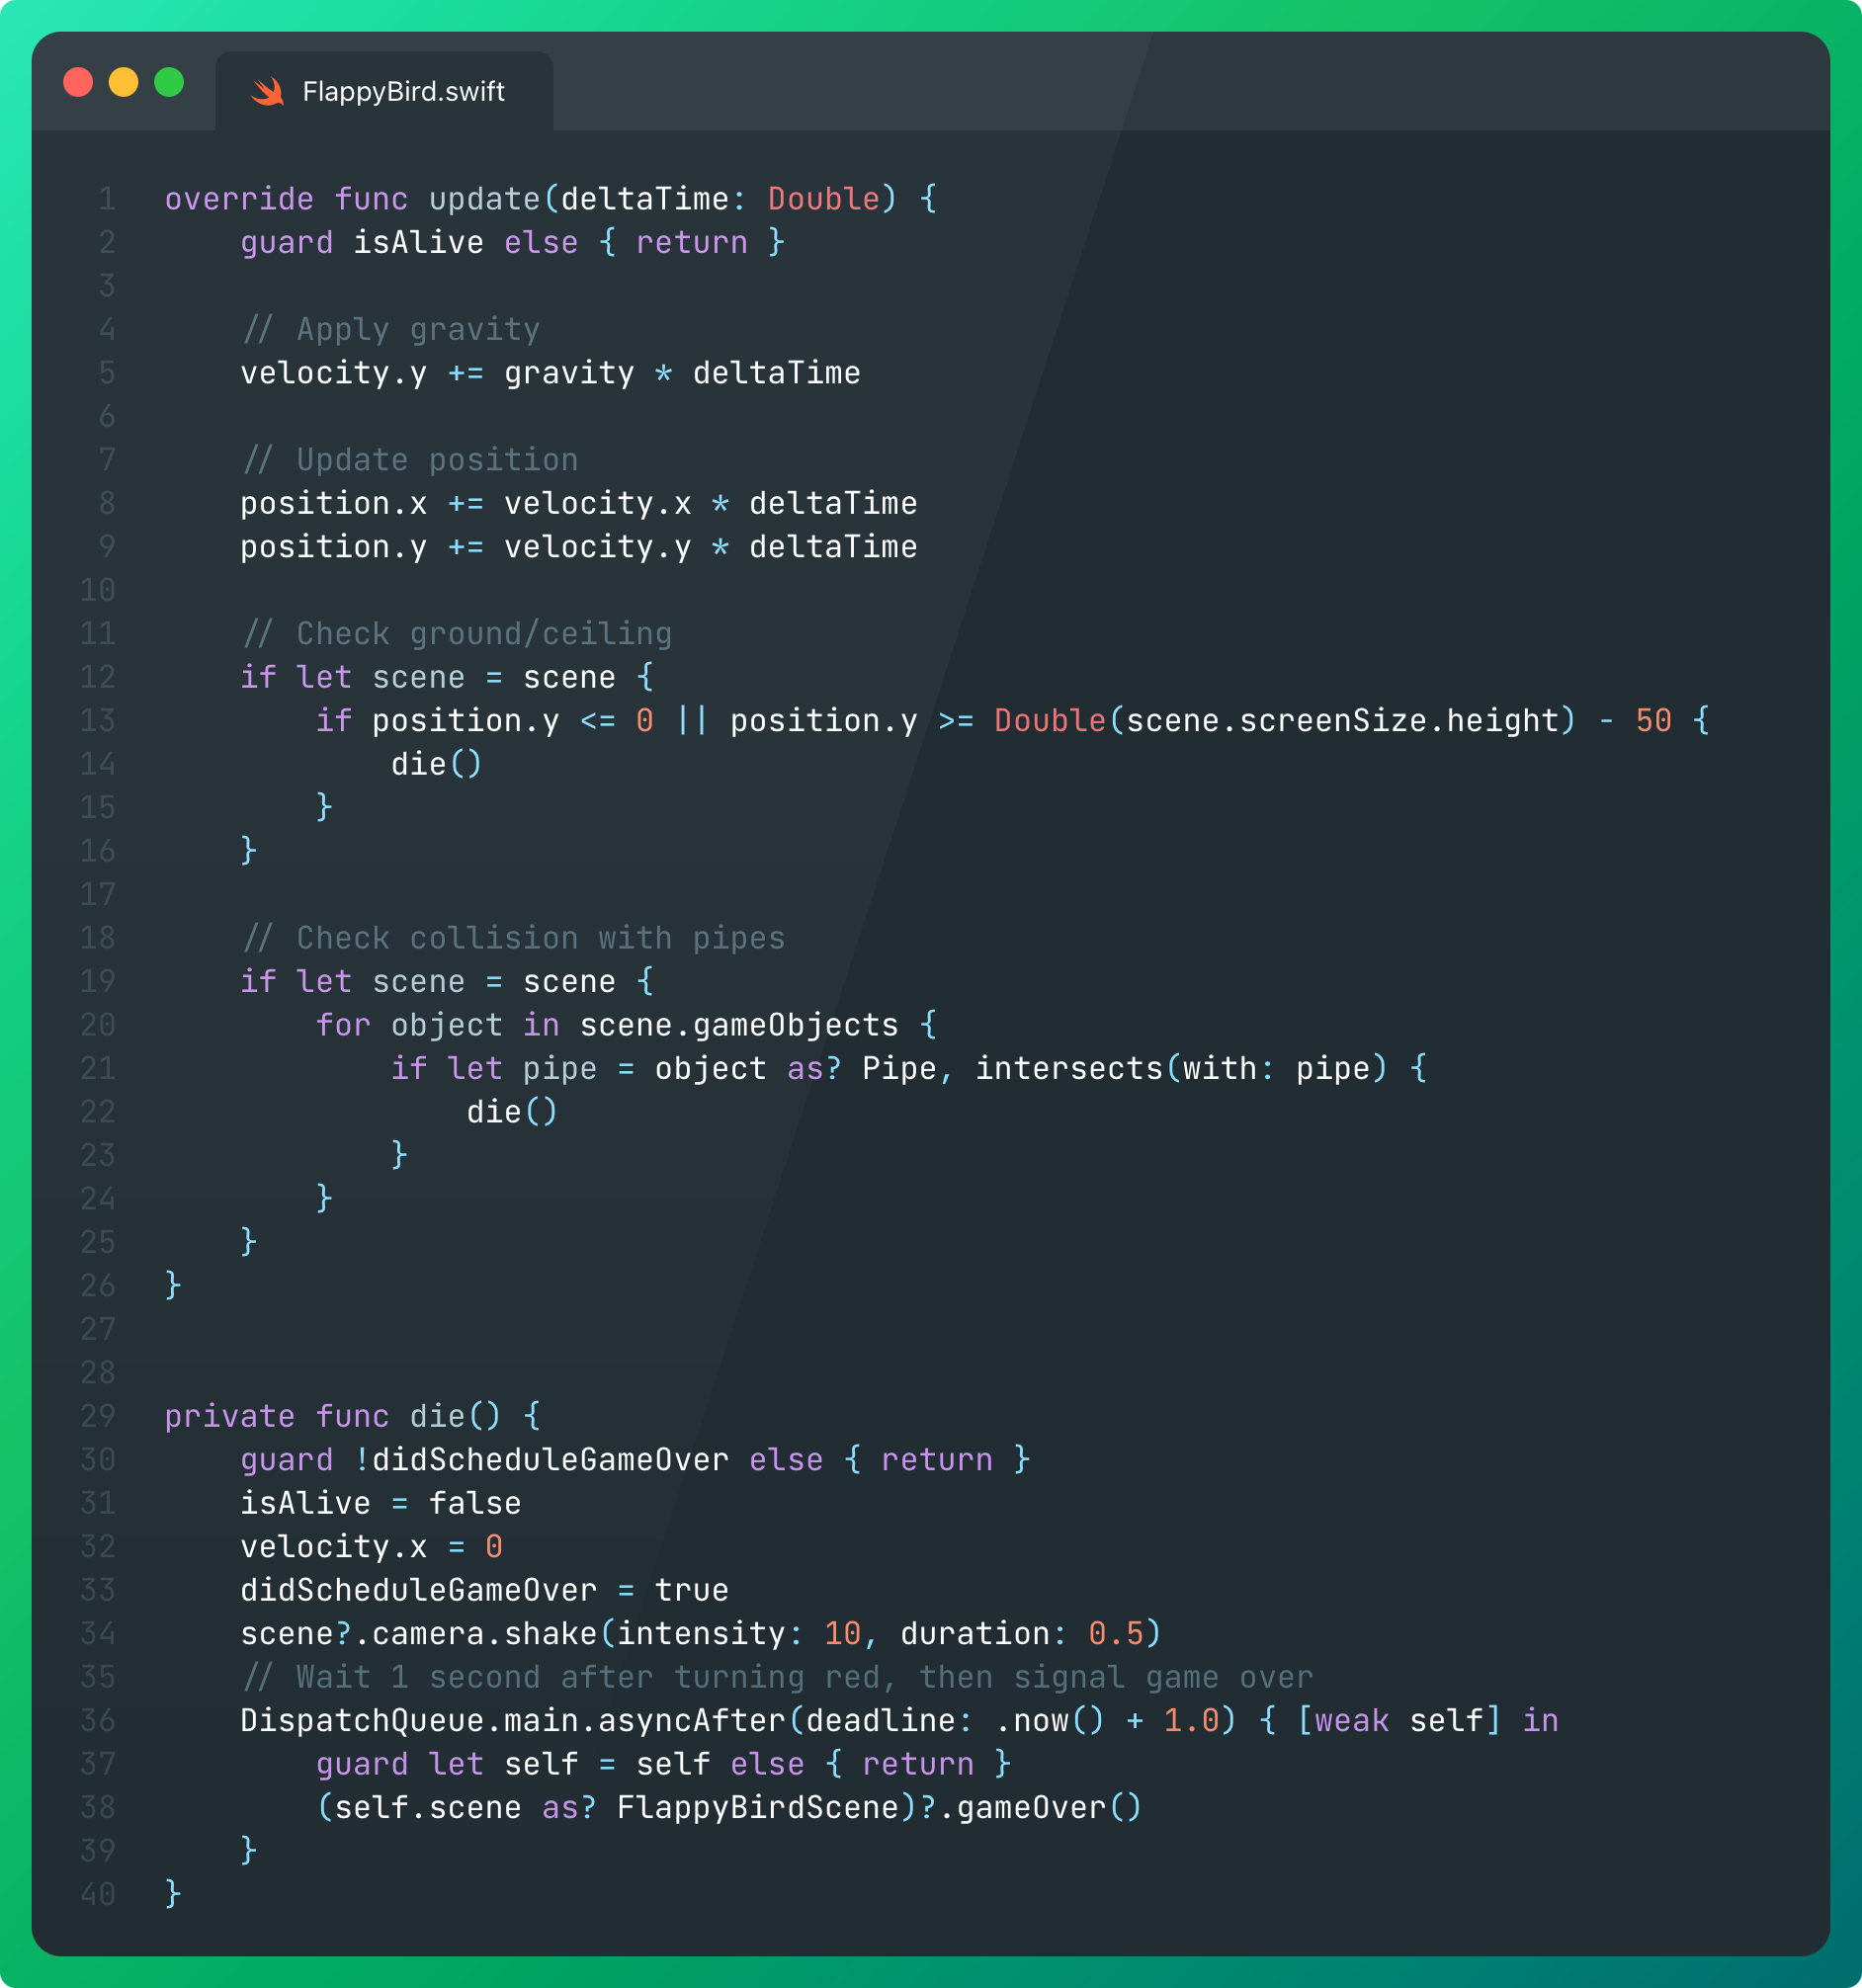
Every frame, gravity accelerates our velocity down to the ground. The bird’s position per tick updates based on velocity. We check if the bird collides with obstacles and dies.
The object renders itself to the frame using the graphics context:
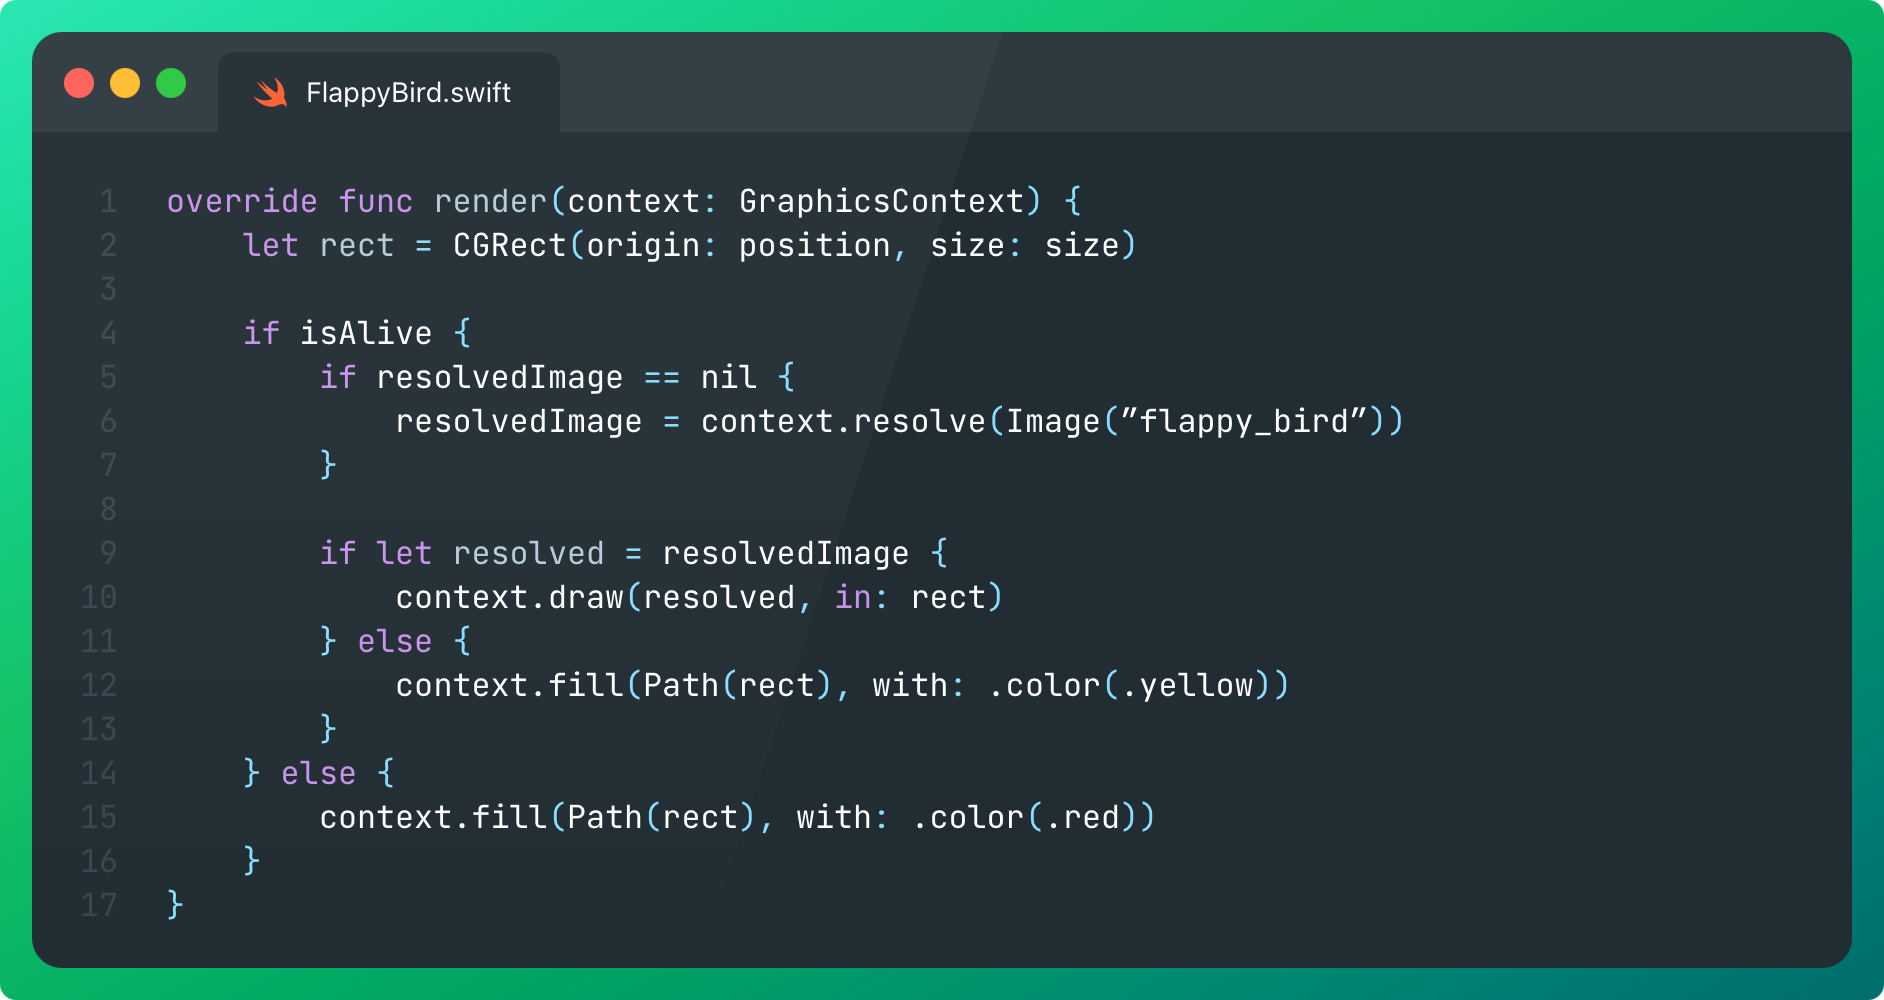
If it’s alive, the bird renders its sprite. If it’s died, it manifests as a grotesque and highly pixellated slurry of avian gore: a red square.
The game object handles user input (usually just for the player character):
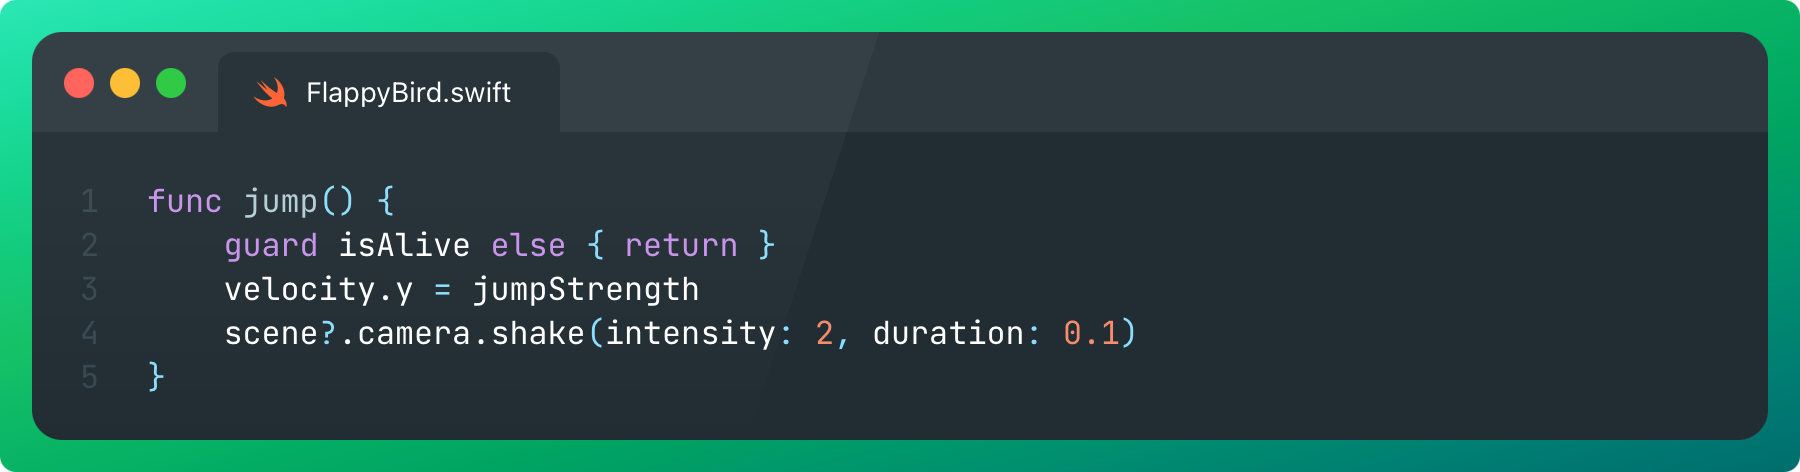
That’s it.
That’s the entire player character. The other objects are much more simple, mostly rendering scenery, obstacles, or score gates.
We also have an invisible “pipe spawner” object that generates these obstacles and scoring gates periodically:

Finally, the game scene handles the user input important events like scoring or dying:
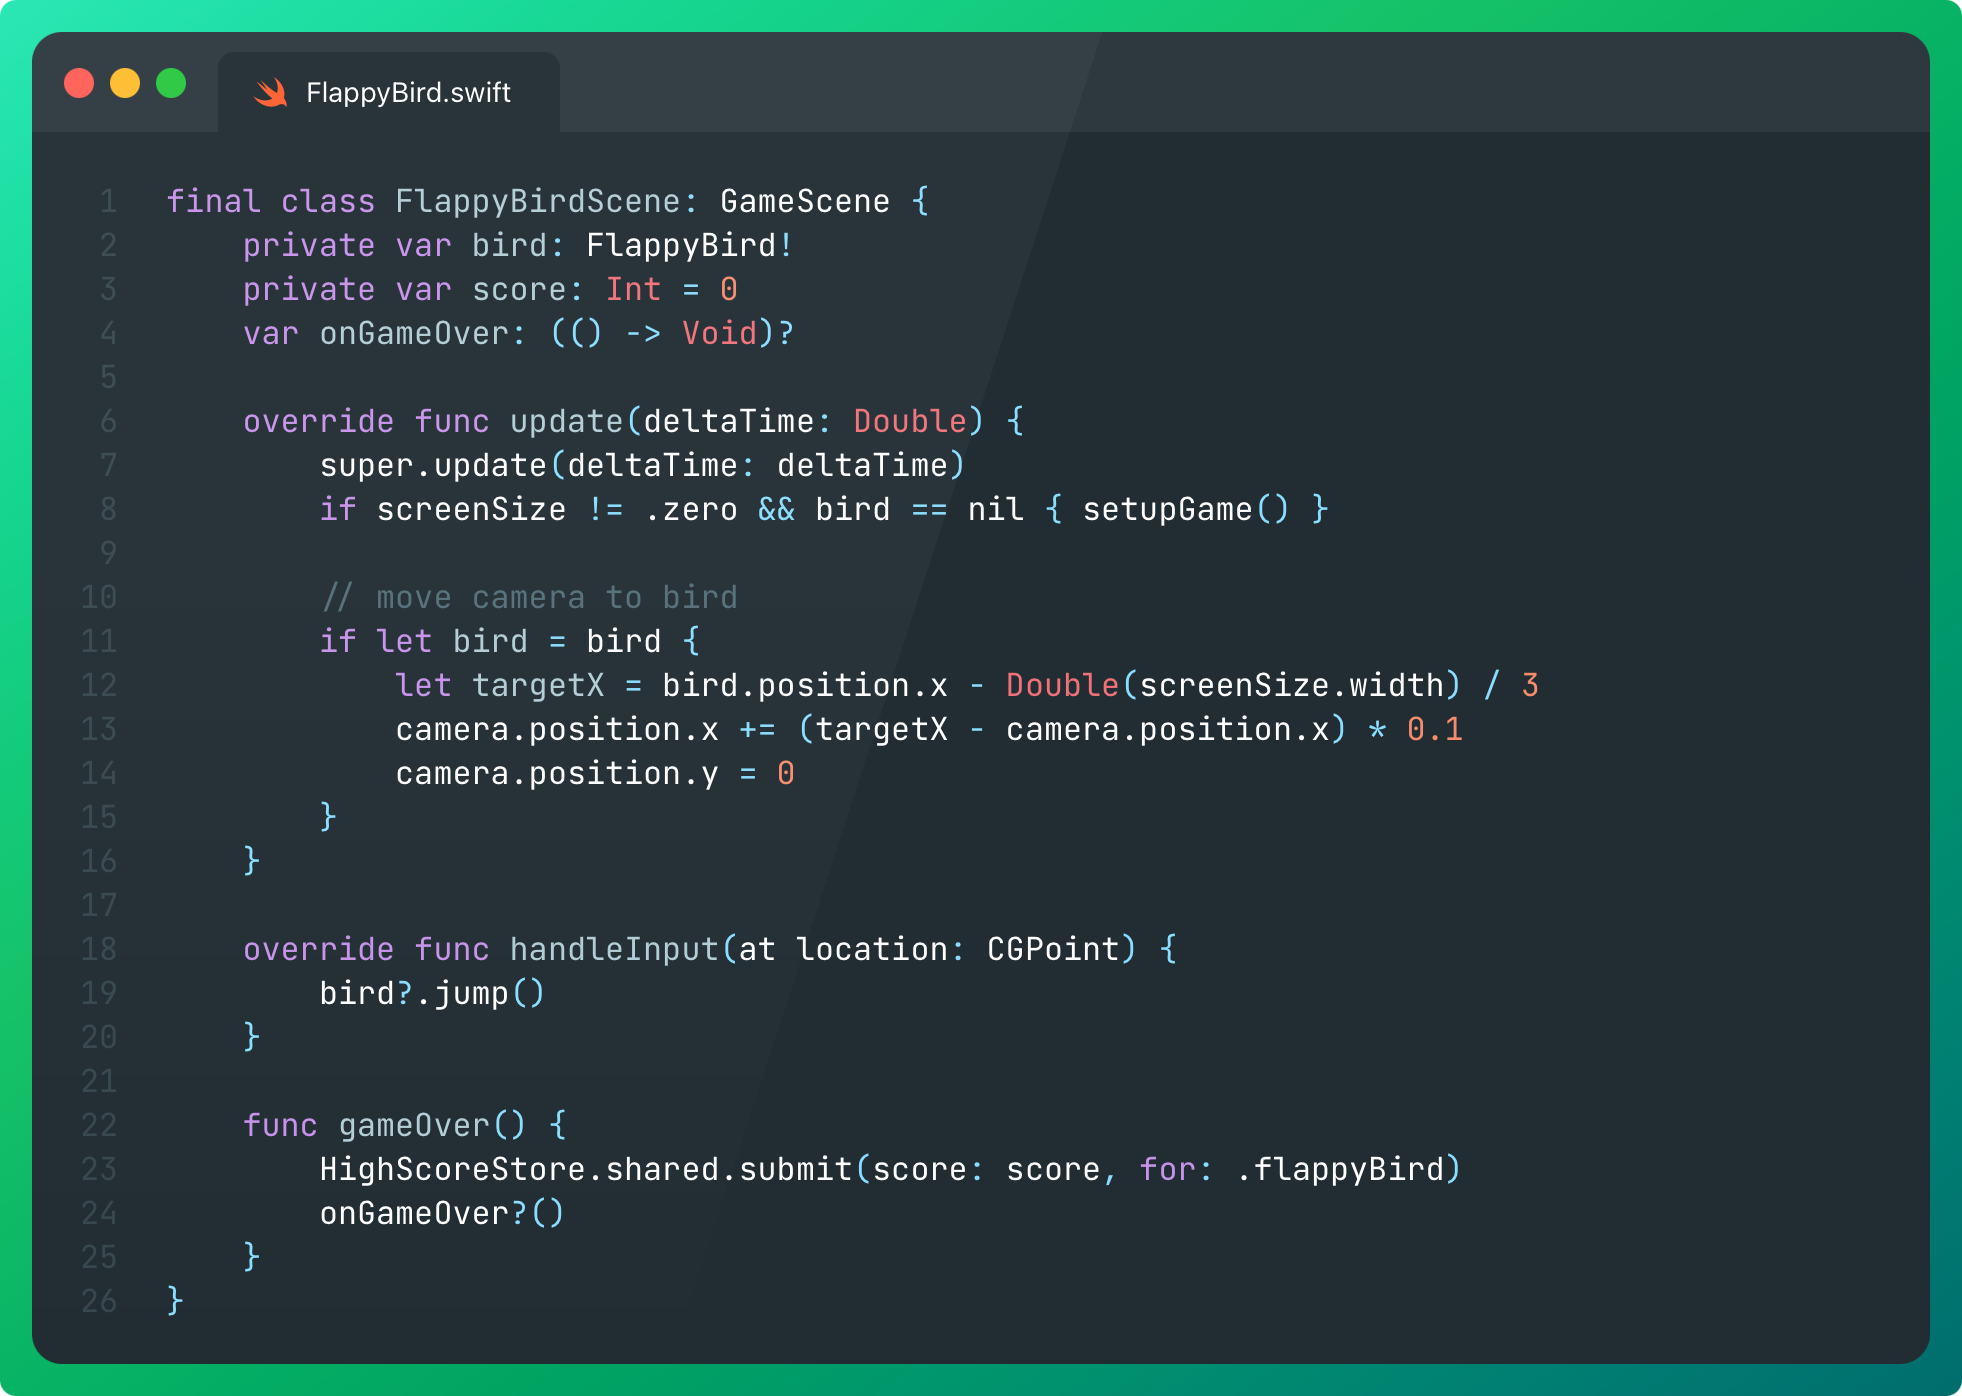
The update() method follows the bird with the camera. When the user taps anywhere, the bird jumps. Our scene also has a couple of closures that forward game states like game over and high scores to the parent views.
setupGame() is the most important method, pulling all our game objects together. It creates scrolling backgrounds, ground objects, the bird, instructions text, and a pipe spawner.
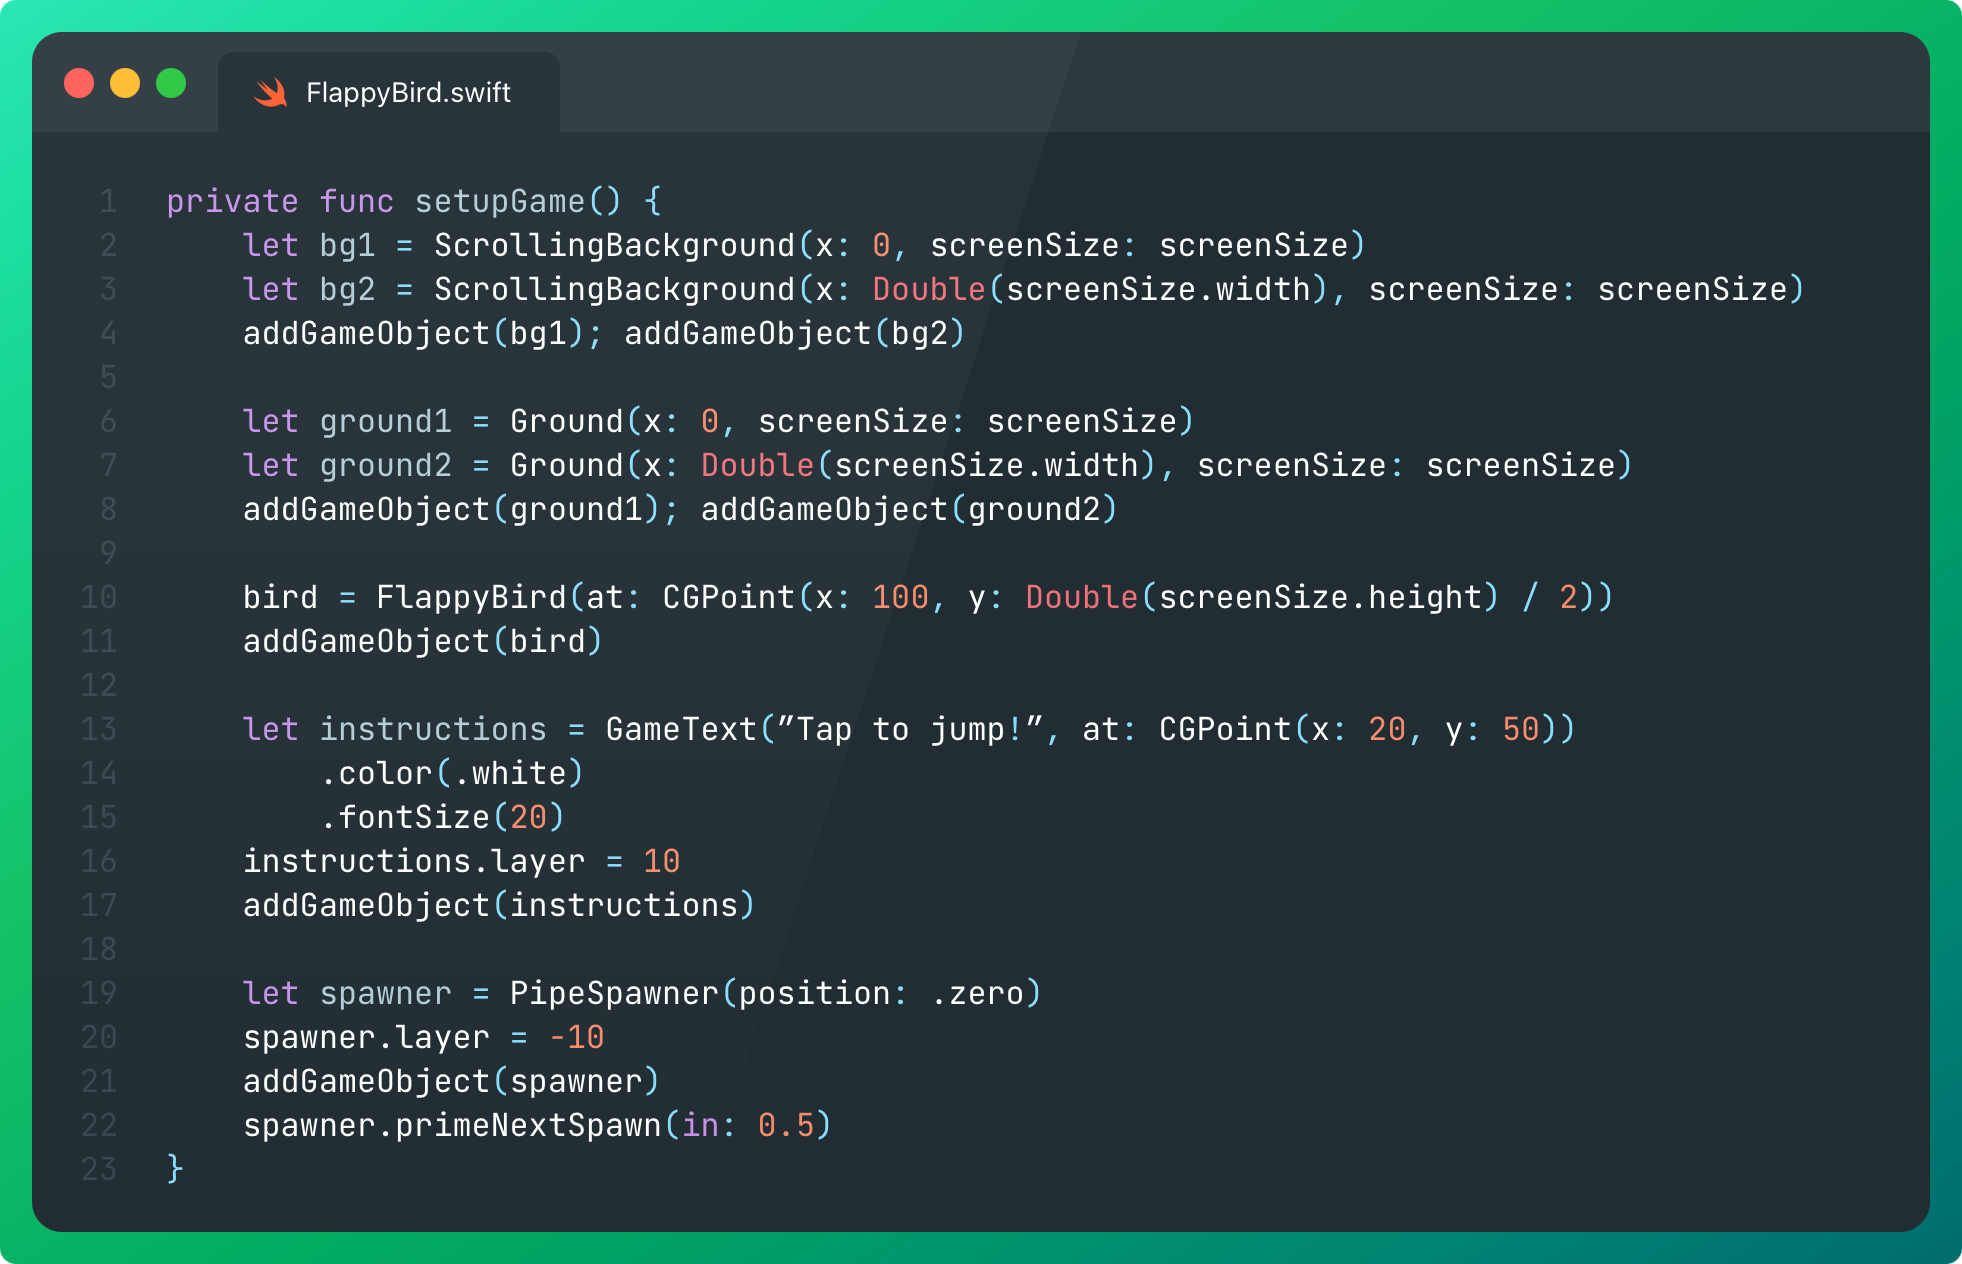
That’s the whole game. 300 lines of code.
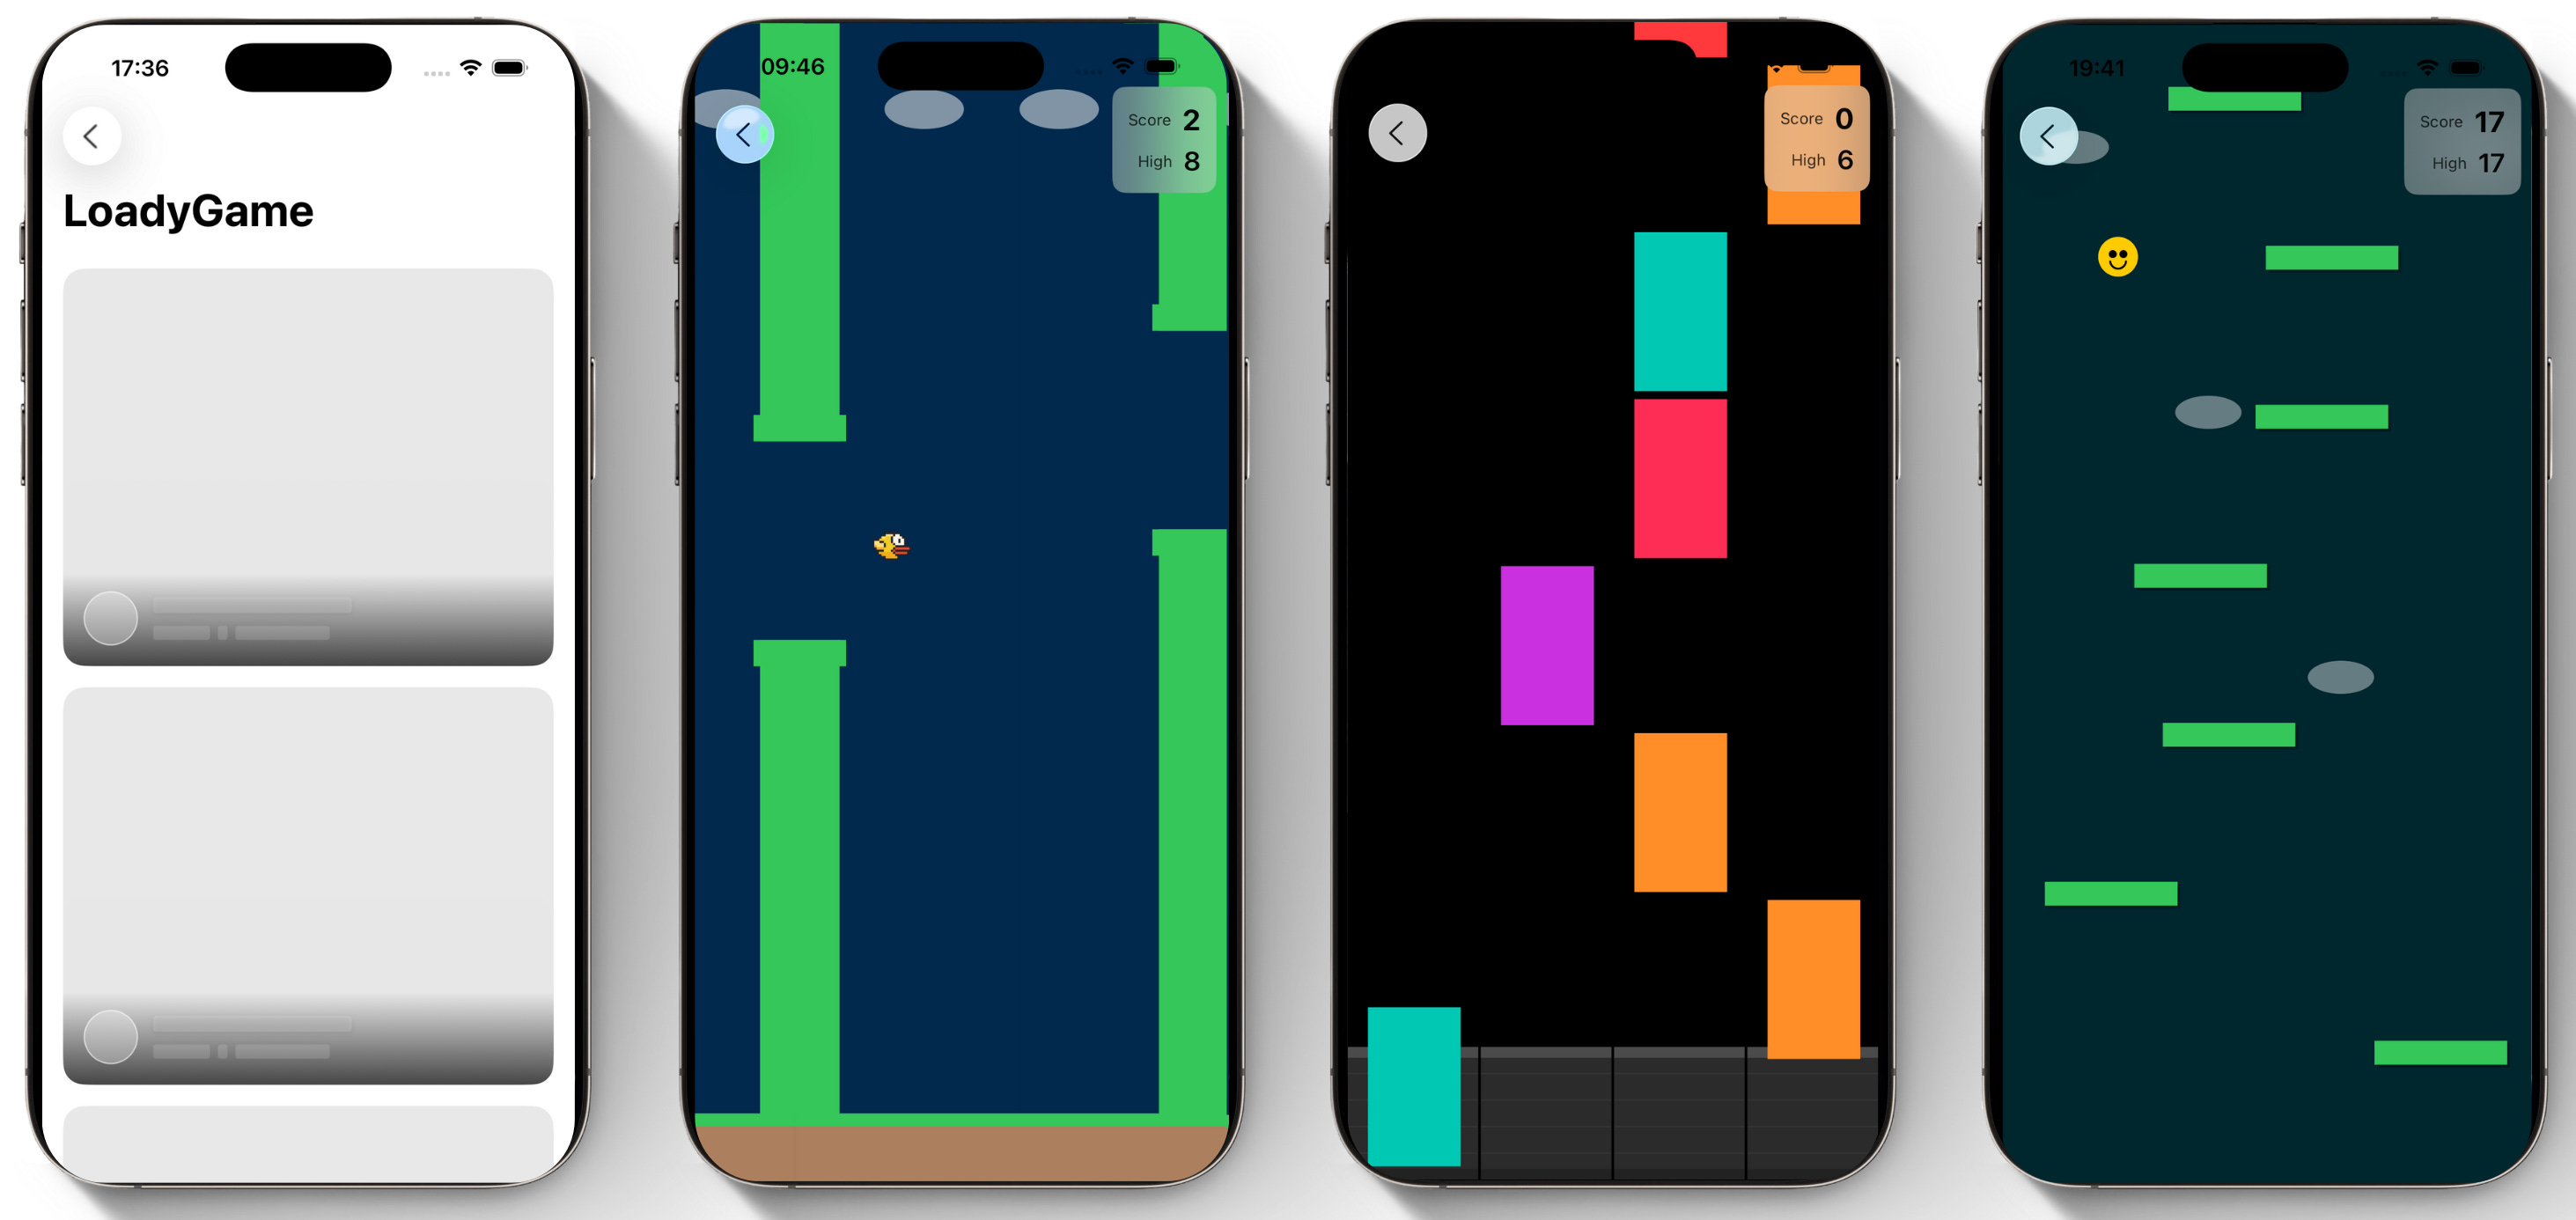
I actually built 3 games for this sample project:
SwiftUI Games in the Loading Screen
Now for the grand finale.
Here’s the sample app I created that uses these little minigames in lieu of a loading screen.
I have a simple feed of data that takes a few seconds to load. Many apps opt to using “skeleton loading” using the .redacted SwiftUI modifier, which helps the user perceive a faster load.
But we don’t need Psych 101 tricks anymore. Instead of hacking your user’s perception, we can just give them something interesting and fun.
The game scene kicks off while your content loads. If the user does nothing, they skip to the content when it’s loaded. If they tap, then they’re part of the game and can continue until game over.
Our customisable .loading view modifier can be configured to either redact the loading content, or kick off the SwiftUI minigame experience. High scores offer a small meta-game to get better every time you wait for loading.
Or go one better and hook these high scores up to a leaderboard on the server.
Conclusion
We’ve waited too damn long to popularise minigames in loading screens.
Today, I’ve taken you on a journey. We’ve learned what game engines are and how they’re built. Game engines live inside a window running a loop. This loop generates game ticks every frame. Each tick manages user input, updates logic over time, and renders the frame on-screen. These 3 core bits of functionality propagate down to each object in your game.
The engine optimises memory via the scene, determines what is rendered using the camera, and implements physics and collision detection. The tooling within SwiftUI, specifically TimelineView and Canvas, is a surprisingly ideal fit for these requirements.
Let’s crack on.
Let’s bring some gosh-darned whimsy into our apps.
There isn’t enough whimsy in the world. It begins with us, the developers.
I hope you enjoy implementing games in your apps as much as I will! I am excited to spend several evenings re-implementing the space shooter that I created when I was in school. And it’s been forever since a good tower defence game came out. This could keep me busy for years.
Install the Game Engine package here: https://github.com/jacobsapps/GameEngine
Copy my loading screen here: https://github.com/jacobsapps/LoadingScreenGames
Please show me what you can come up with, and I’ll repost it on my social channels!
> 2015.
>
> Gamers worldwide hold their breath. Bandai Namco’s patent on minigames in loading screens expires after 20 years of tyranny.
Wow, I actually had no idea, I knew they have a patent. Turns out they _had_. Awesome, great excuse to build something hehe.