
I trapped your soul in a trading card (with client-side AI)
My most elaborate side project yet!

This is my most elaborate article yet, covering my full journey building my new indie project, Summon Self, from conception to initial release.
This app turns you into a trading card, with personalised stats, graphics, typing, and rarity. You can trade these cards IRL to create a full collection of your friends.
I applied client-side AI models using MobileCLIP, CoreML, and on-device image classification to generate personalised stats from your own photos.
I combined these with Metal Shaders and the Vision Framework to turn you into a trading card, including graphical effects across 4 different card rarities: Common to Secret Rare.
I pulled everything together using SwiftUI, Swift Concurrency, and SwiftData.
Download Summon Self on the App Store today!
Share your favourite creations and your rarest cards, either in the comments or on the Twitter/LinkedIn/BlueSky threads!

As a 90s kid, I was the perfect demographic to get sucked into the early 2000’s Yu-Gi-Oh craze. I had a deep fascination with Pegasus*, the foppish creator of the card game, who possessed a magic eye that could trap people’s souls in trading cards.

Since watching the anime at age seven, I’ve been fixated on the feeling of power that trapping someone’s soul in a trading card must bring. Relentlessly. Like Kaiba, I mastered cutting-edge technologies in order to achieve my objectives.
Today, client-side artificial intelligence brings me all the tools I need to make this dream a reality.
I have a simple, beautiful, vision:
My app turns you into a trading card, with personalised stats, graphics, typing, and rarity. You can trade these cards IRL to create a full collection of your friends: a social trading-card binder.
Today we’re going to follow my journey bringing this vision alive: from concept, to POC, to MVP, to the App Store.
*Unfortunately, with Pegasus, I backed the wrong horse entirely. My wife, also a big millennial Yu-Gi-Oh fan, actually fancied Marik.

Subscribe to Jacob’s Tech Tavern for free to get ludicrously in-depth articles on iOS, Swift, tech, & indie projects in your inbox every week.
Full subscribers unlock Elite Hacks, my advanced tips series, and enjoy my long-form articles 3 weeks before anyone else.
The Concept
I keep my indie projects simple.
Three core features.
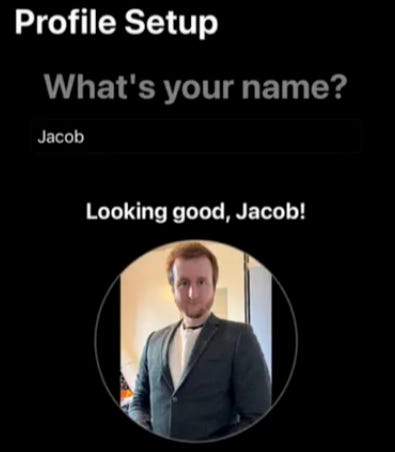
First, we take a photo of you to convert into a trading card stored on-device. The card has a personalised title and stat ratings based on your own attributes, detected on the image.
Second, we need some neat graphics so we can create a precious-looking rare trading card out of your photo and stats.
Finally, this card should be tradable with friends. This has to happen in person—you boof your iPhones together and get each other’s souls cards.
The build itself should be pretty straightforward: I’m putting together several moving parts that I’m already familiar with. The innovation is in the novel combination.
The important, boring, basics
Photos, persistence, and presentation are all bread-and-butter SwiftUI and SwiftData. Nothing special here, since I don’t plan to need more than 2 or 3 screens.
Stats
I want to upload the photo of my above Pegasus cosplay and be given a fitting title, such as Jacob the Creator, or Jacob the Illusionist.
Perhaps the stat-line will read:
Whimsy: 3000
Dapperness: 4600
Magic: 2100
Charisma: 4000
There is a way to deterministically generate stats like these and titles based on photos—this is a category of machine learning known as zero-shot image categorisation. Apple has created client-hosted AI models which we can customise with our own text categories, allowing us to scientifically create accurate stats:
Because it’s an ML model giving the stats, they must be true.
Looksmaxxing
I have a long-dormant idea in my head to make the cards look fantastic, rare, and shareable. I want to adopt the graphics tools used in this Pokémon CSS demo website and bring it into an app. I might host some custom CSS in an embedded browser, or perhaps I’ll roll my own SwiftUI Metal shaders.
There’s also something I plan with the iOS Vision framework. This is the second piece of client-side AI tech that will make these cards shine.

Catching ‘em all
Whoops, wrong franchise. This is the cherry on the cake that will make this the biggest viral hit since Pokémon Go. Ever since WWDC 2023 introduced SharePlay via Airdrop I’ve wanted to build a local P2P trading card game.
The concept is straightforward: boof iPhones together to set up a SharePlay session and trade Transferable card objects.
Now we’ve established the plan. It’s time to execute.
Implementing CLIP & client-side AI
I hope you’ll forgive me for skipping past the SwiftUI basics that are of interest to nobody. I vibe-coded the basic structure so we can get to the interesting stuff.
CLIP, or Contrastive Language–Image Pretraining, is an image classification model trained on both images and text. It involves 2 specialised models: an image model that converts images to vectors, and a text model that converts language into vectors. By multiplying these vectors, we work out which text categories are ‘conceptually closest’ to the image in vector space.
I’m going to do a separate deep dive on how to make your own CLIP models next week. The most important thing to know is I’m using MobileCLIP BLT, a CLIP model trained, bundled to CoreML, and open-sourced by Apple.
Embeddings
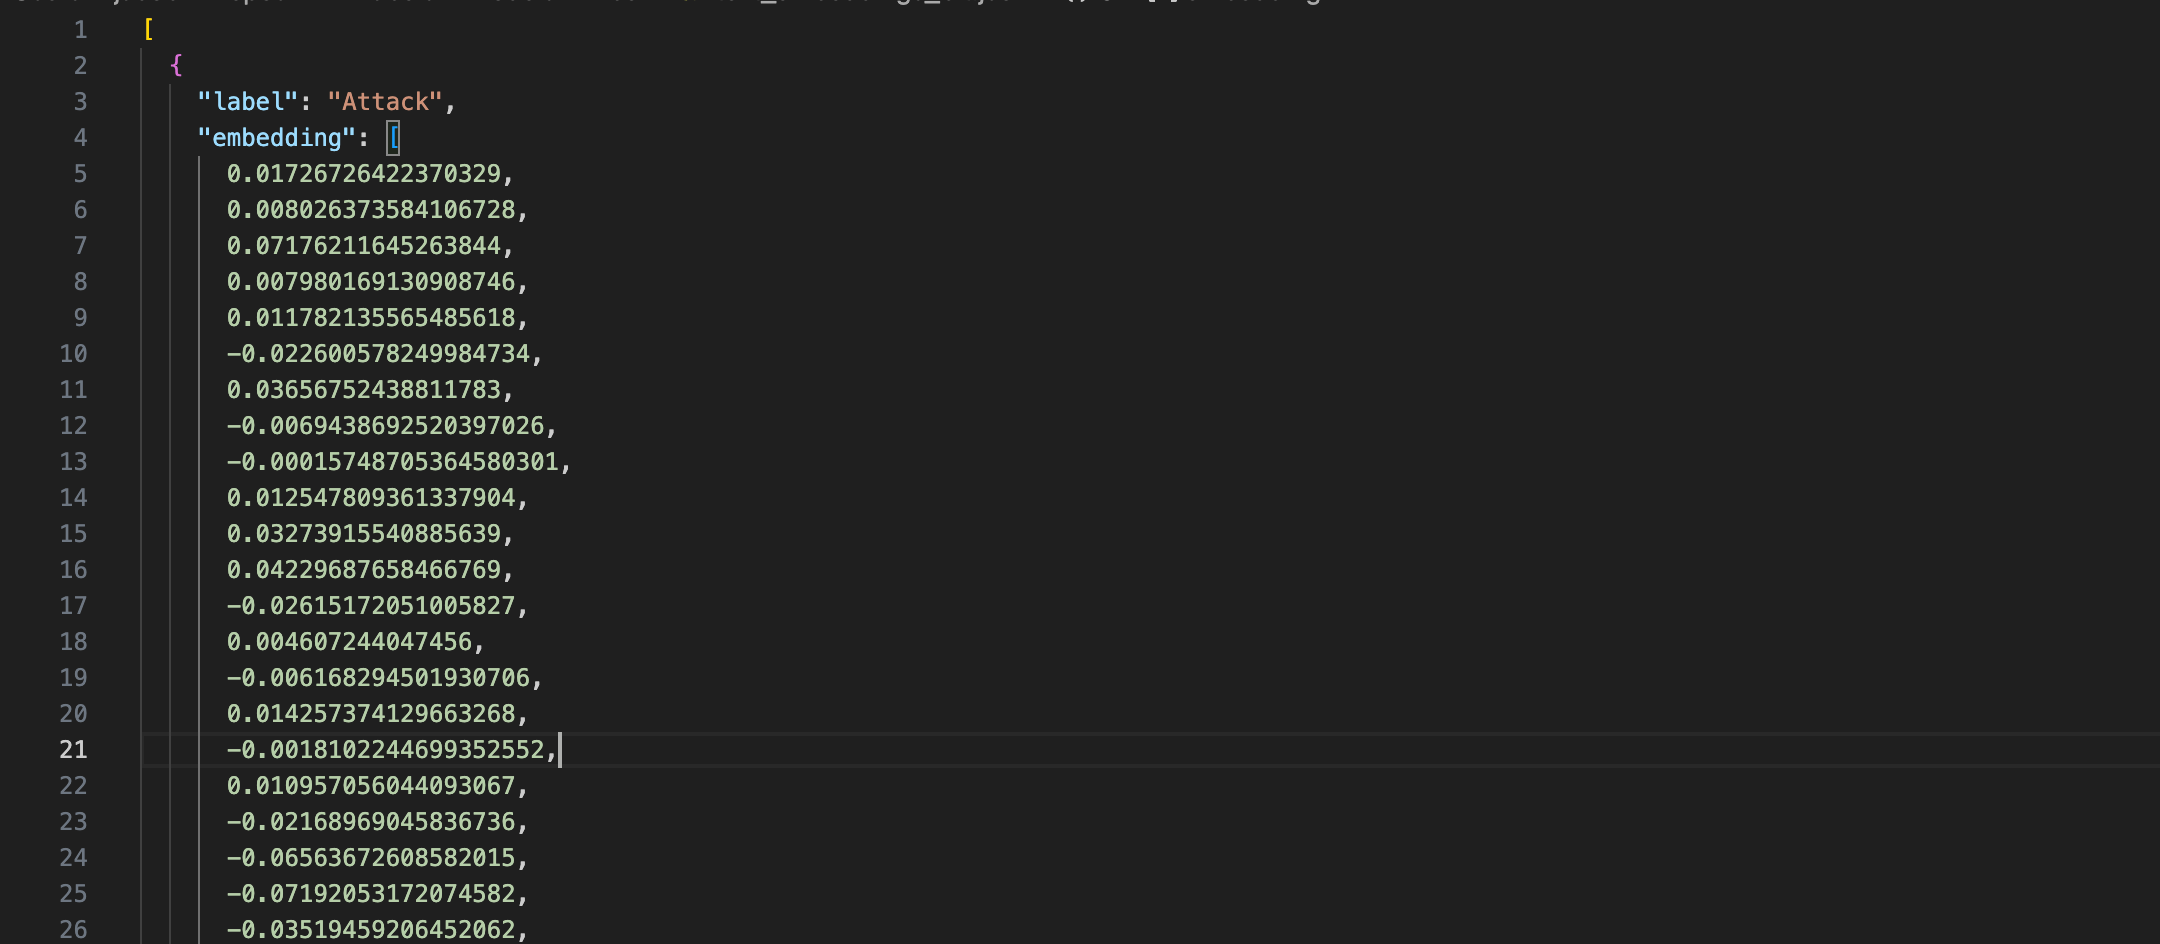
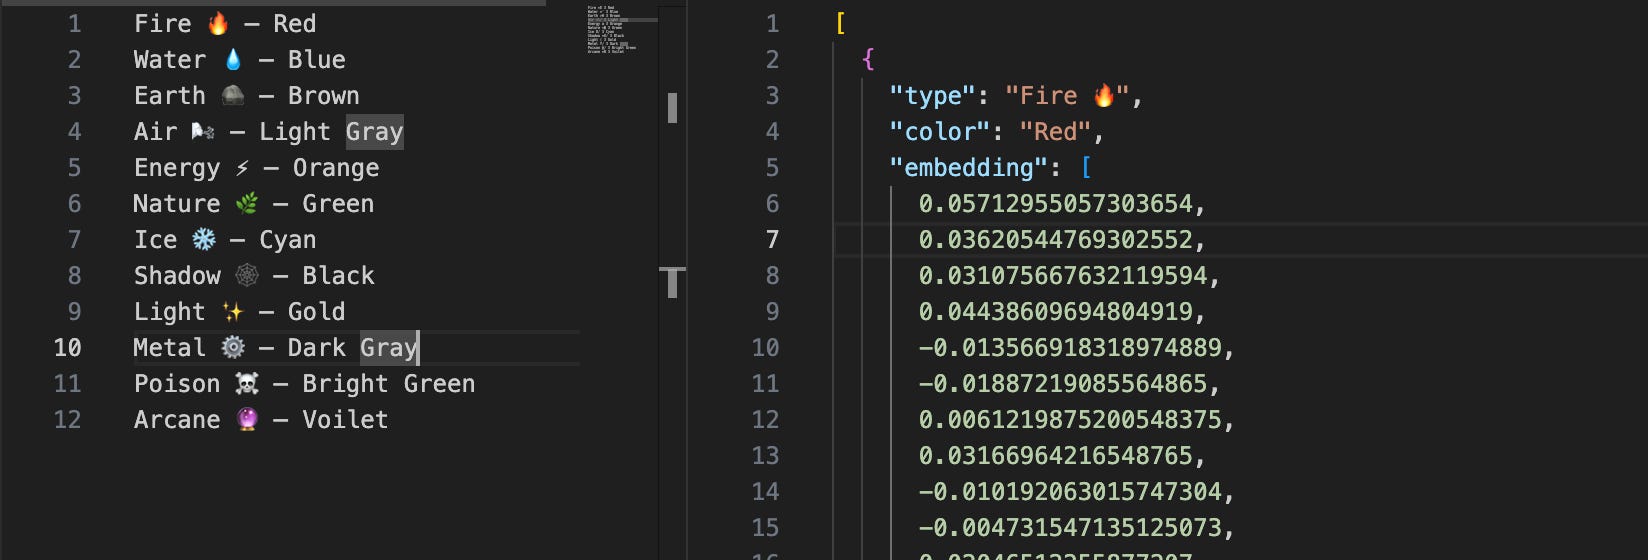
I ran a Python script running on the MobileCLIP text model to generate embeddings for all possible stats and titles. These are 500-item arrays that contain a representation of the image, or piece of text, as a point on 500-dimensional vector space.
Here’s the vector embedding for the Attack stat.
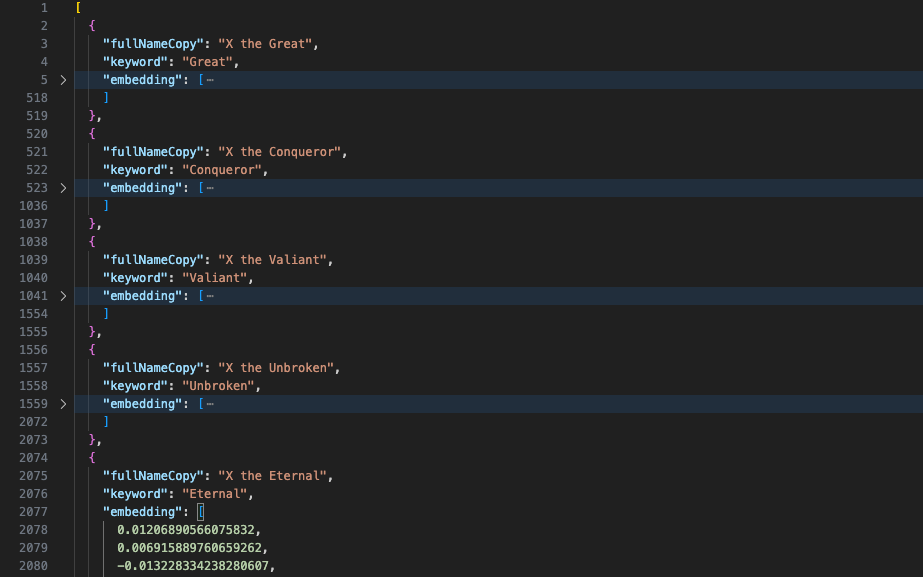
And here’s some of the vector embeddings I’ll use for card titles.
Now that I have the embeddings, I don’t need to bundle the text model, since the only variable is the image you upload. I can just bundle the image model and generate the required image embeddings.
CoreML and Image Processing
In my code, we can use the Vision framework to handle the CoreML image model on our iDevices. First we load in the bundled models and embeddings:

To make things less verbose, I am redacting the code a little and force-unwrapping everything. I have tons of error handling in the real version, Knight’s honour 🤞
Next, we can process images with Vision and this CLIP model:

Finally we make predictions using the CLIP model and text embeddings:
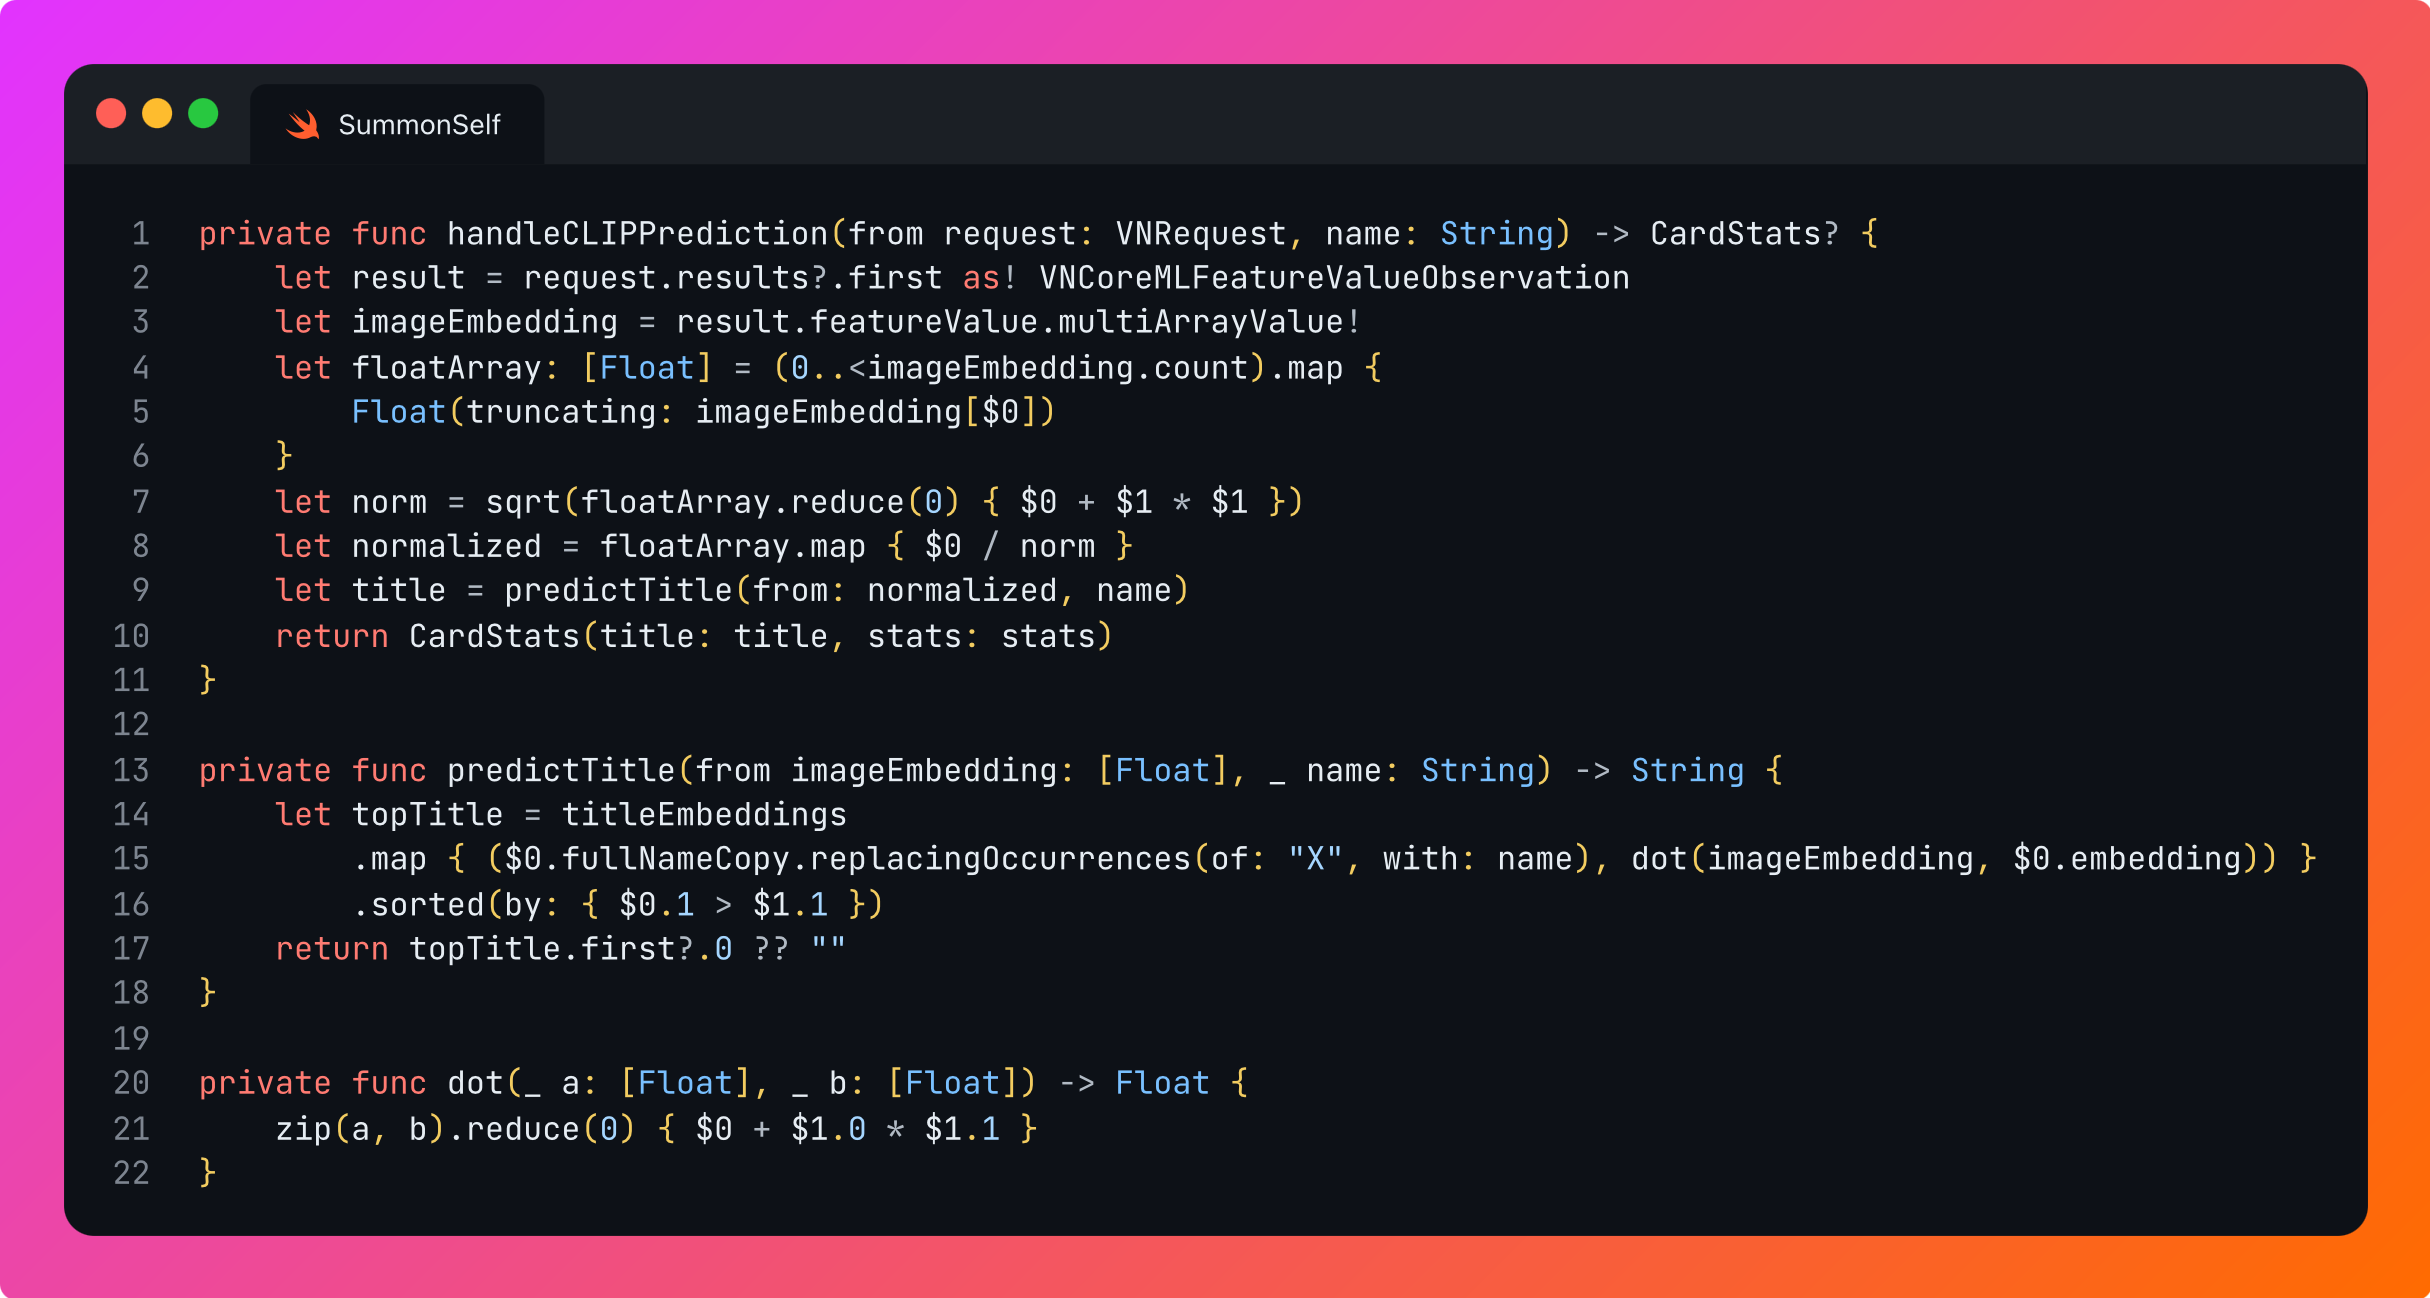
We multiply each title embedding vector with the image embedding to return a confidence number. Whichever number is highest is the closest “match” to the image.
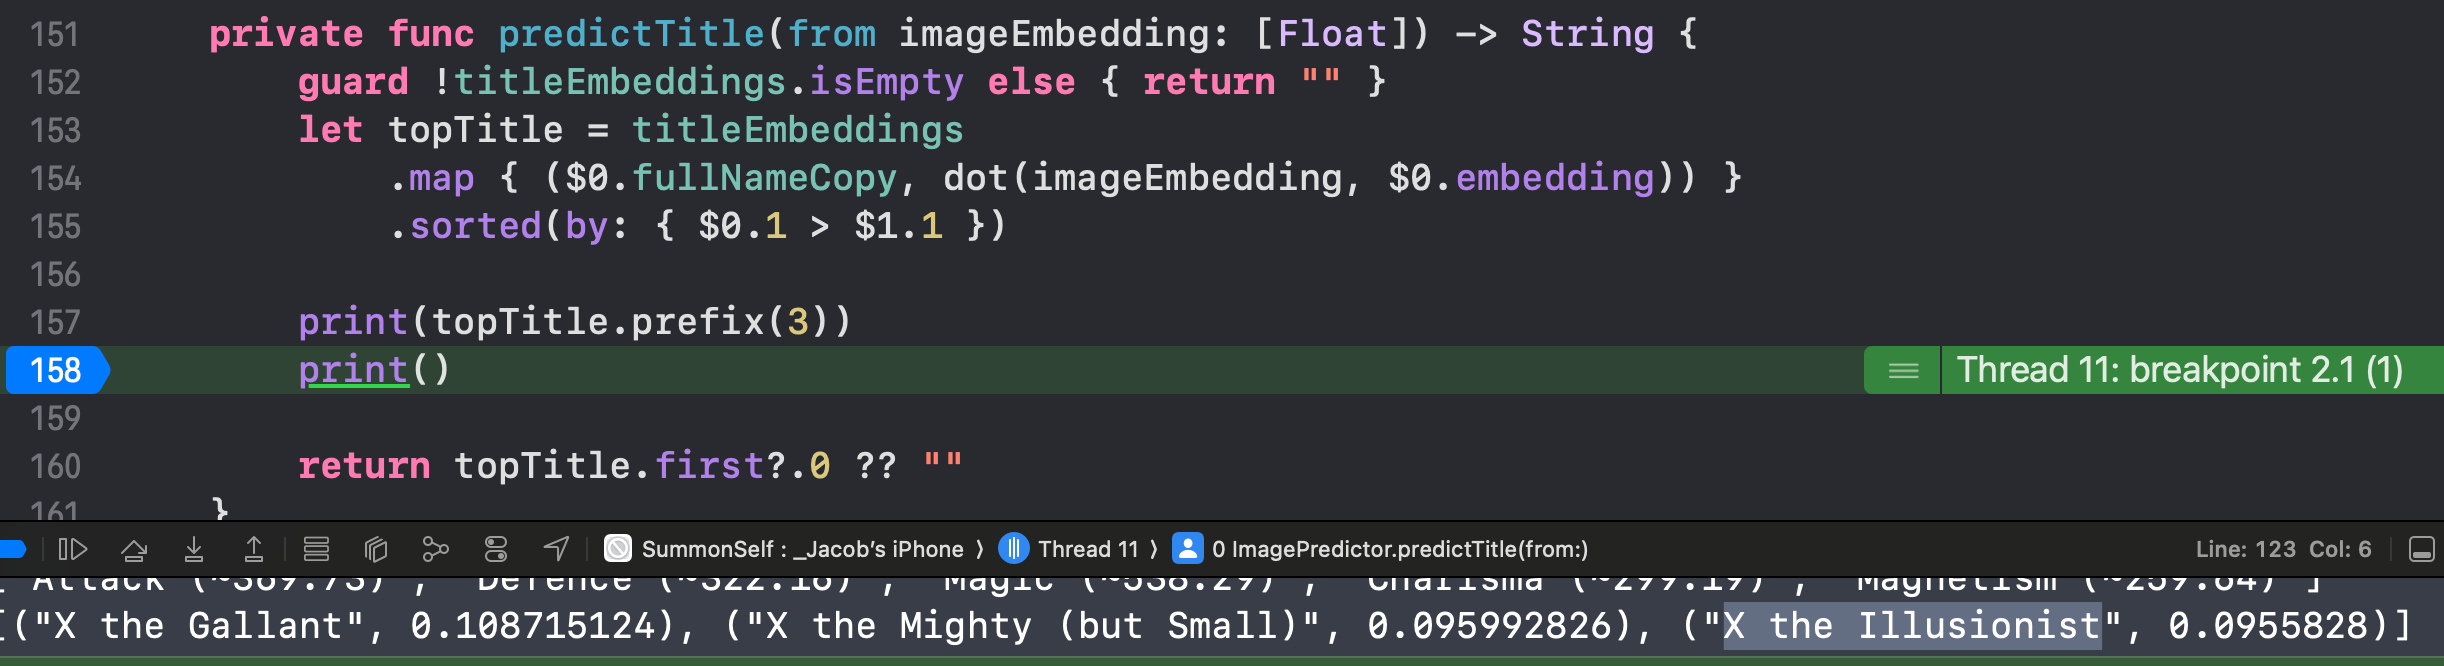
This name is the user’s entered name, and the title embedding JSON literally uses “X the great”, so we simply replace X with the name. Jacob becomes Jacob the Total Chad*
*I’ve unfortunately not yet found a CLIP model that reliably rates me a chad
We do the same for stats, and pick the highest few, to generate a fully customised stat-line. This uses the actual confidence numbers from our vector dot-products here to give a number for each stat that users can compare with each other.

Remember the law of large numbers:
Large numbers are cool.
Therefore I’ll multiply all these normalised numbers by about 10,000 to transform our ratings from Attack: 0.7400 to Attack: 7,400.
As well as their top custom stats, everyone gets the trading card staples of attack, defence, and magic.
The Proof-of-Concept
The best part of all this CLIP image classification? This is all deterministic!
Therefore the same photo will return the same results every time. Even better, since the image and text models are trained together in conceptual space, similar images will give similar results!
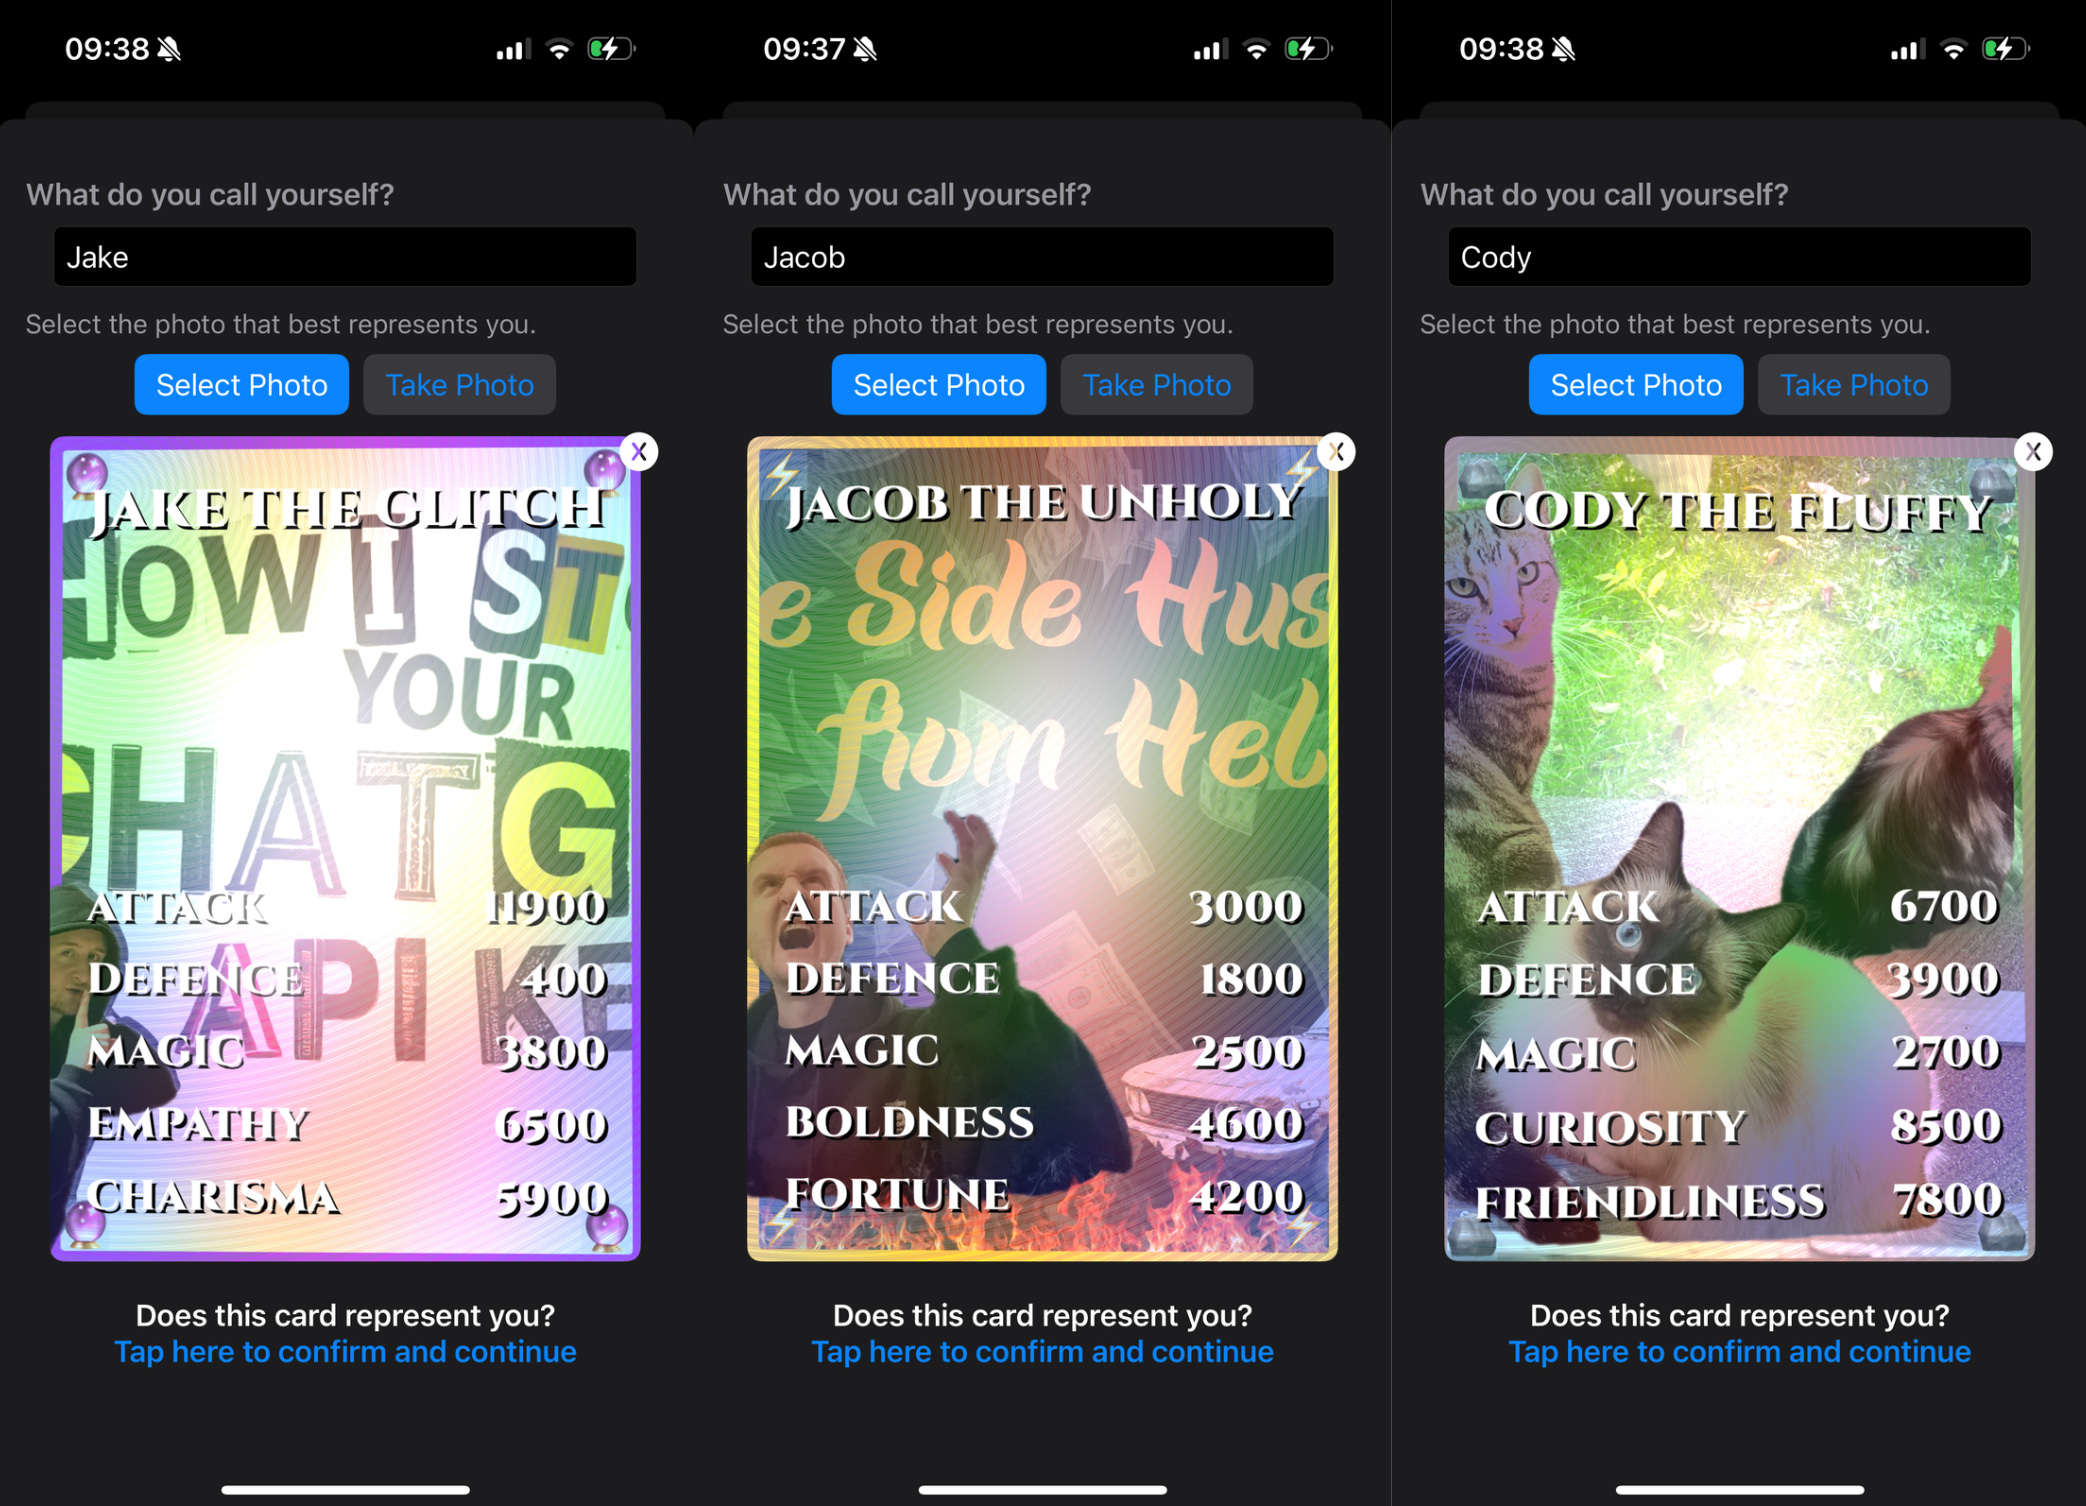
We now have enough to trial a proof-of-concept.
The numbers could do with some tweaking, but the names and stats fit.
This works.
It’s pretty fun already, and me and my friend were playing with it all evening. There’s a spark here. Now let’s make it sparkle.
Trading Card Graphics
We’ve got our cards, our titles, and some stats.
It’s time to play around with the view to make it into a tradable, shareable, shiny, rare trading card.
The inspiration for this came heavily from this Pokémon card CSS demo, which I’ve jealously played with for years.

I want to present you as a beautiful holo-foil rare card.
For a pre-proof of concept, I cheekily inspected the HTML on the page to paste in my own photo. It looks great!
But the holographic radiant effect on tilting the image doesn’t quite fit, since it’s customised for the original photo. I need to be cleverer with masking. But the Vision framework has a solution.

My original plan was to fork this repo, place your card in a web-view, and present your image via a filepath. However, the copy-left license and lack of accelerometer data made this a little awkward, so I looked for an iOS library that might serve as a starting point.
Sticker
Fortunately, the Sticker library by bpisano is MIT-licensed, SwiftUI-native, and very promising. It uses Metal shaders and accelerometer data to apply card-style effects to your views.

Colour me impressed. 10 minutes in and I think we’re 80% there.
To apologise for Substack’s video compression, and because video players don’t work via email, I’m going to share a single screenshot alongside the video.

To make this pop, I want to utilise another piece of client-side AI.
The Vision Framework
I’ve been excited to do this for months. Vision has an API called VNGenerateForegroundInstanceMaskRequest.
I know, cool name.
This processes the image to determine the main foreground objects in the image. Then it produces a mask that allows you to make a cutout of this foreground object.
This is ostensibly for removing the background of an image, MS Paint-style, but I can use this to layer different Sticker effects on the different parts of the card!
Here, we process the image and layer it on top of our existing image view.

It worked even better than I could have imagined. This app is going to pop.

Now the core visual concept is working, let’s fine-tune the graphical effects to get closer to my vision.
Fun with Shaders
The Sticker library gives us some awesome customisation, but I want to get a little closer to the Metal and put my own mark on the custom holo-foil effects.
Therefore, I forked the library, with 2 goals in mind:
Add a ‘no pattern’ effect I can apply to the cutout (that still rotates).
Implement a 3D circular foil effect for that textured rare card.
If you aren’t familiar with Metal shaders, be warned they are an endless pit you can sink time into, and I have barely 20 minutes a day to work on this.

This was lots of distracting fun, and I made a fun discovery about ChatGPT and Cursor. They truly suck at editing shader effects.

Nonetheless, they are better than me. So essentially I'm getting it to try random stuff until I get the effect I want.
A bit more frustrating vibing, and I am pretty happy. We have something unique that I think people will enjoy playing with.

Putting the Pieces Together
We can combine these Metal shader graphics with our previous work on the CLIP model stat generation, to mint our first trading cards.

We have everything required by our first phase.
The proof-of-concept is complete, and it works.

A little coat of polish and this bad boy will be ready for production.
Putting Together the MVP
This proof of concept is solid. It works. It’s fun. I want to keep playing with it.
But it’s still a little rough around the edges. Let’s add some polish and quality of life improvements before sharing it with the world.
Photos
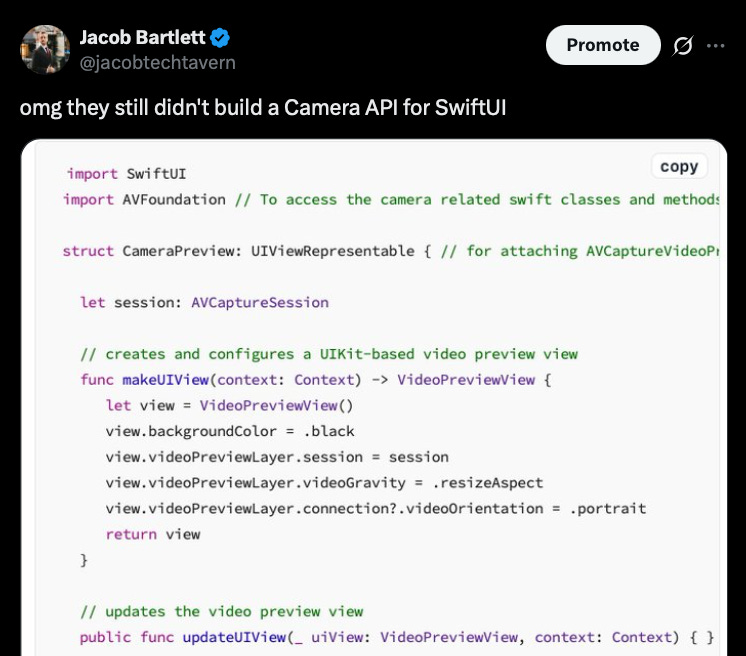
As well as image selection, I added a quick option to snap a photo directly for the card. This unexpectedly inspired another absolute banger of a Tweet.
User Testing
I roped in my friend to play with it, and was pleasantly overjoyed to find they also loved it, and kept sharing trading cards with it.
I didn’t realise this app could expand into the pet, kid, or inanimate object markets.

I also got a bit of usability feedback.
The photos look nice, but don’t look much like trading cards.
Some names come up way too frequently.
Making them look like trading cards
My initial idea was to add a coloured border, but then I realised we were missing a trick: typing!
This is a job for an additional CLIP model.
This produces a more trading-card-esque design, way more colour, plus another degree of deterministic variation between everyone’s cards. A win-win-win.
Tipping the Scales
While our client-side AI models are nicely deterministic, they have a serious downside: we don’t have a clue how they work under the hood.
We don’t know what causes the embedding for your photo to be closer to Arcane type than Lightning type. We just know that Arcane type comes up way, way, way too often.

This happens for a few results, but mostly they’re no big deal. Pets just happen to be fluffy (The Fluffy Cody), babies are unusually cuddly (Luca of Cuddles), and Japanese food is exceptionally noodly (The Noodly Teriyaki).
It’s cool having some names or attributes be rarer than others, but typing has an outsized effect on our card UI. It’s just not as fun if Arcane type comes up 60% of the time and we never see Shadow type.
Let’s tip the scales a tiny bit. And let’s slay the sacred cow of determinism.

Making The Collection
The core works. It’s good. But this isn’t an app until we can store and view all our cards. We need a Card Collection screen to store our virtual binder, then begin persisting the cards between sessions.

Erm, it’s not quite there yet.

Give me a minute.

I messed about with the CardView to create a small size variant. This variant has the Metal shaders switched off, to avoid killing our CPU when rendering dozens on-screen.
Now try.

To keep hold of our collection, let’s whip out some SwiftData magic.
First, the models:
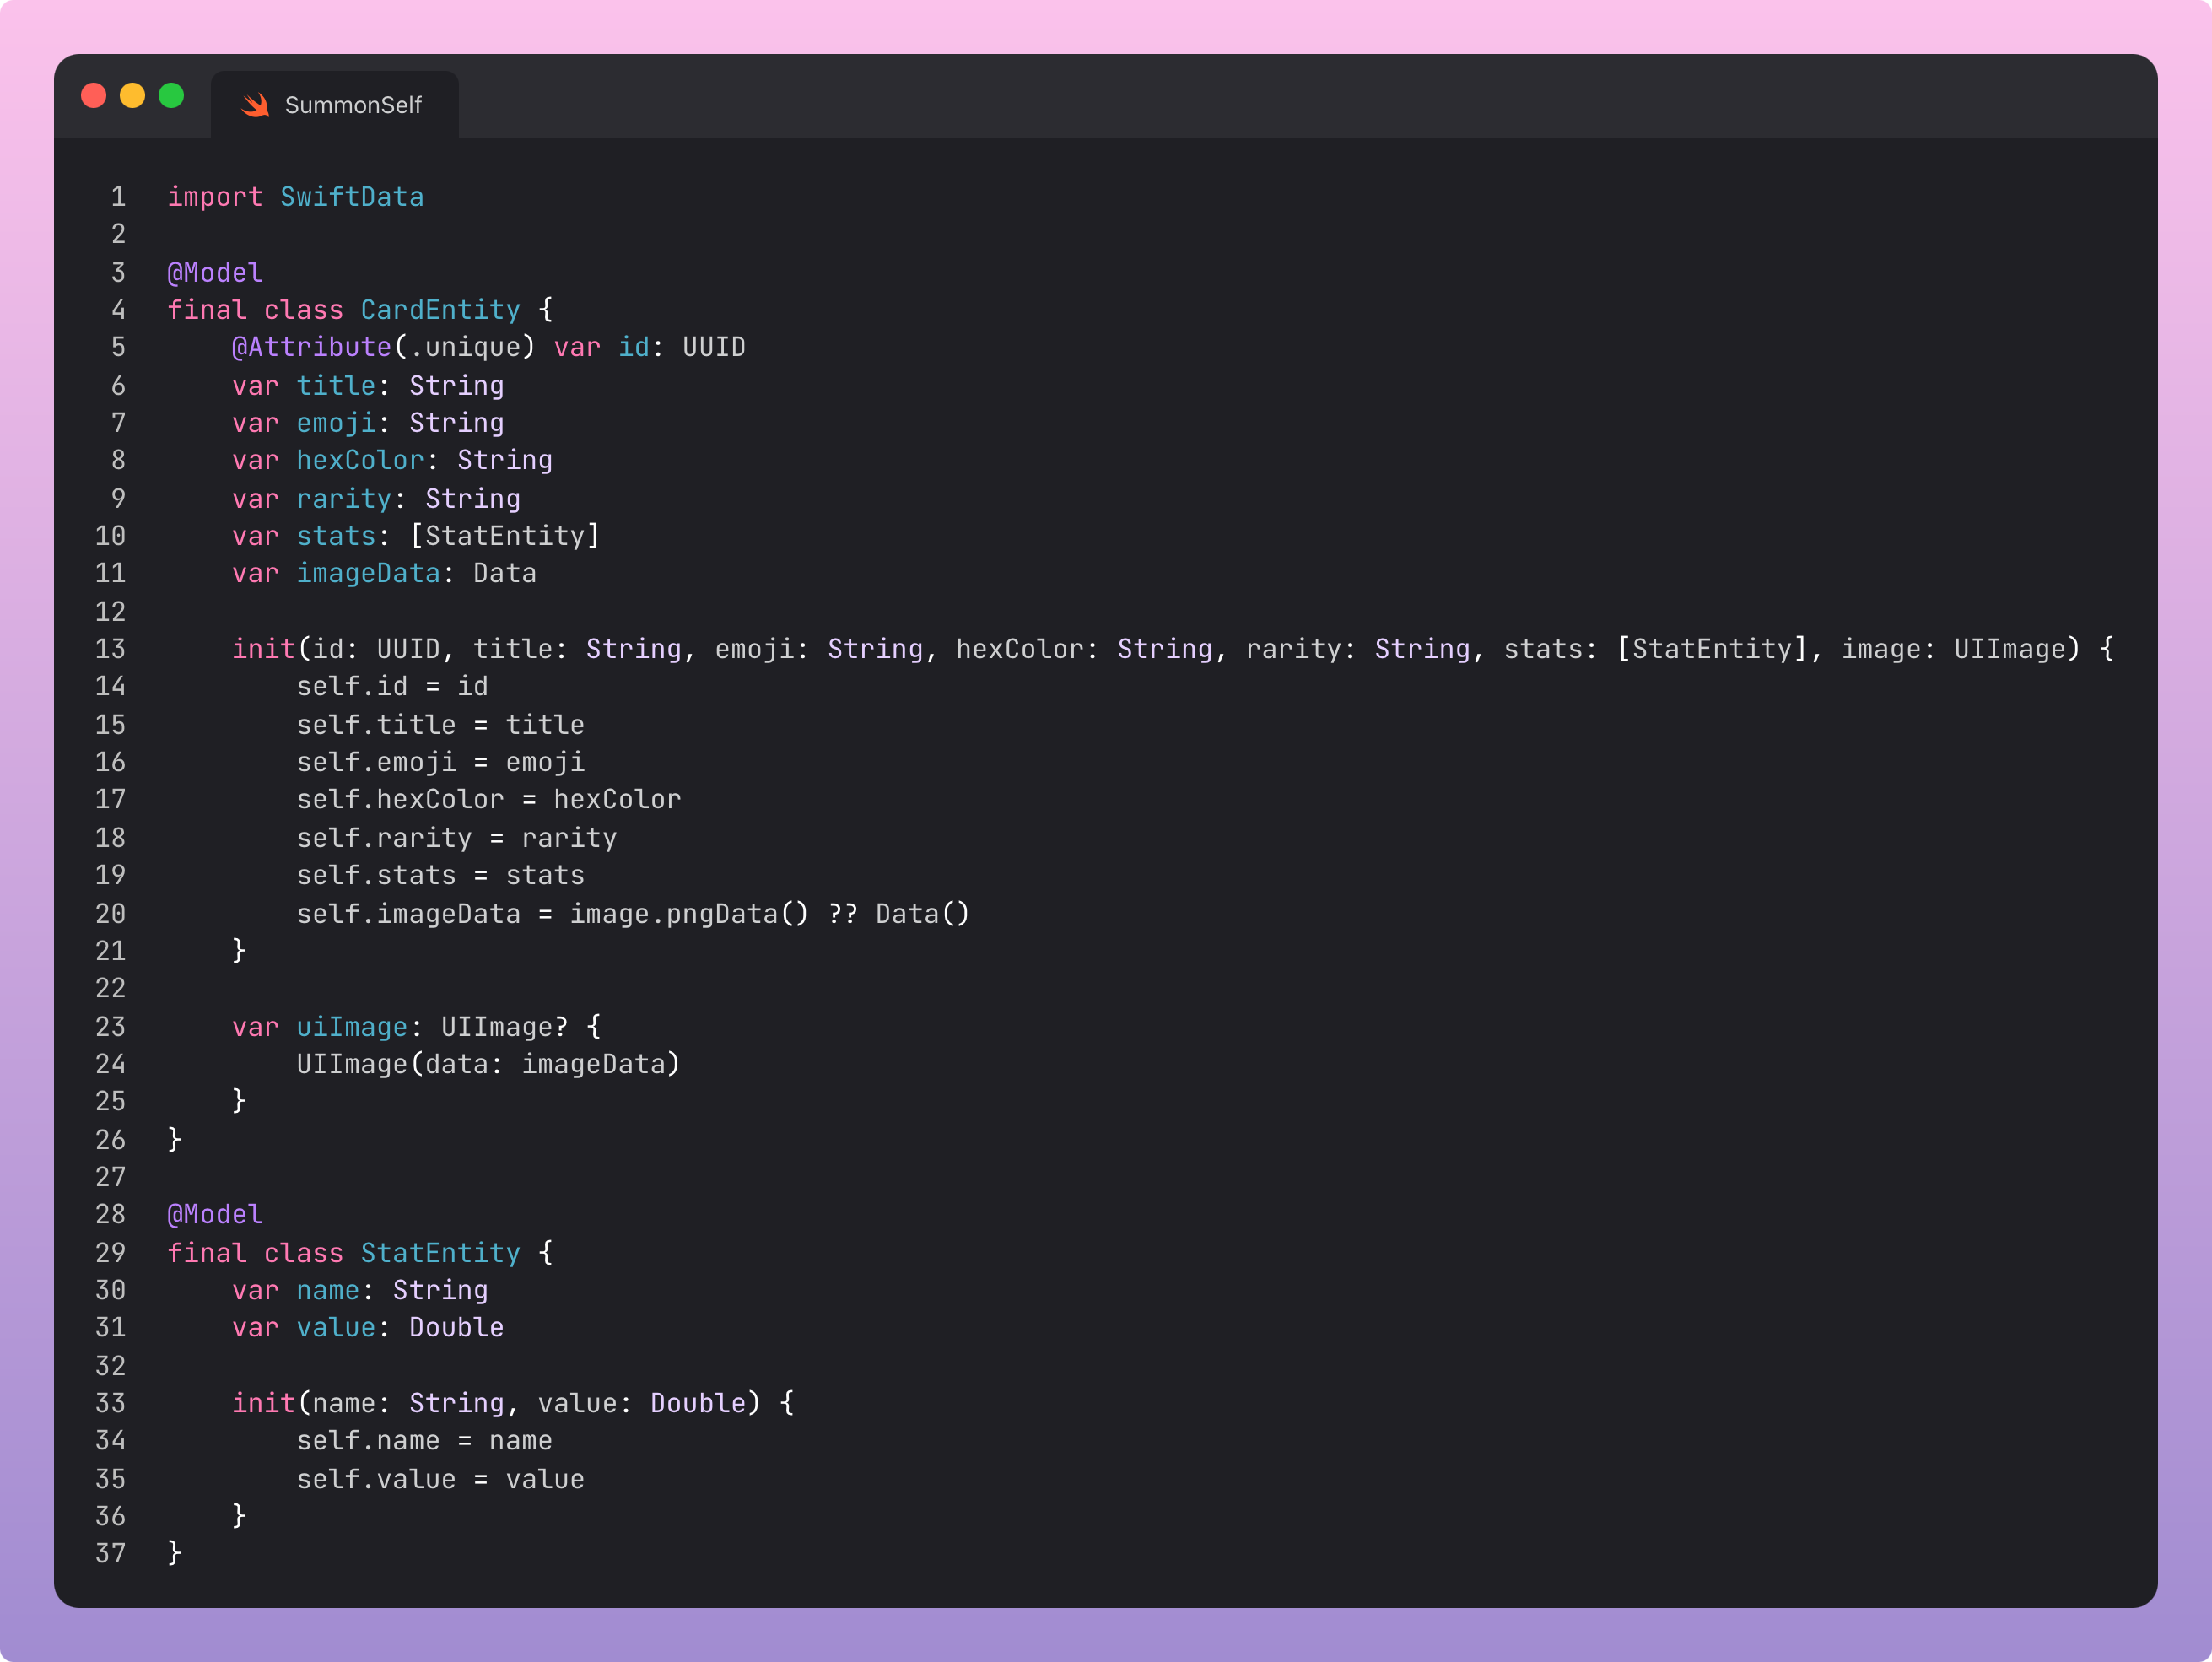
Next, we map our existing UI models to and from SwiftData:

Then, configuring our app to use the models in SwiftUI:

And finally implementing the retrieval and saving of our models in SwiftUI:


Our collection is ready.

MVP to Production
The app is ready for prime-time… buuuut… I can never resist a few last-minute improvements to pad out the word count.
Sh*thead Monetization
At this point, I considered introducing in-app purchases to allow you to save more than 3 cards, but fortunately I am more lazy than I am avaricious. But it did give me an idea for a new article, Sh*thead Monetization. Watch this space!
Whimsical Animations
Let’s introduce some more polish, and whimsy, with Pow, a fun animation library that I don’t use often enough.

Who ever said deleting data* couldn’t be fun?
*I’m lowkey devastated I didn’t find a way to implement the iOS 6 Shredder animation.
SwiftUI Hero Transitions
I couldn’t resist also adding the new SwiftUI navigation transitions to help your collection pop.
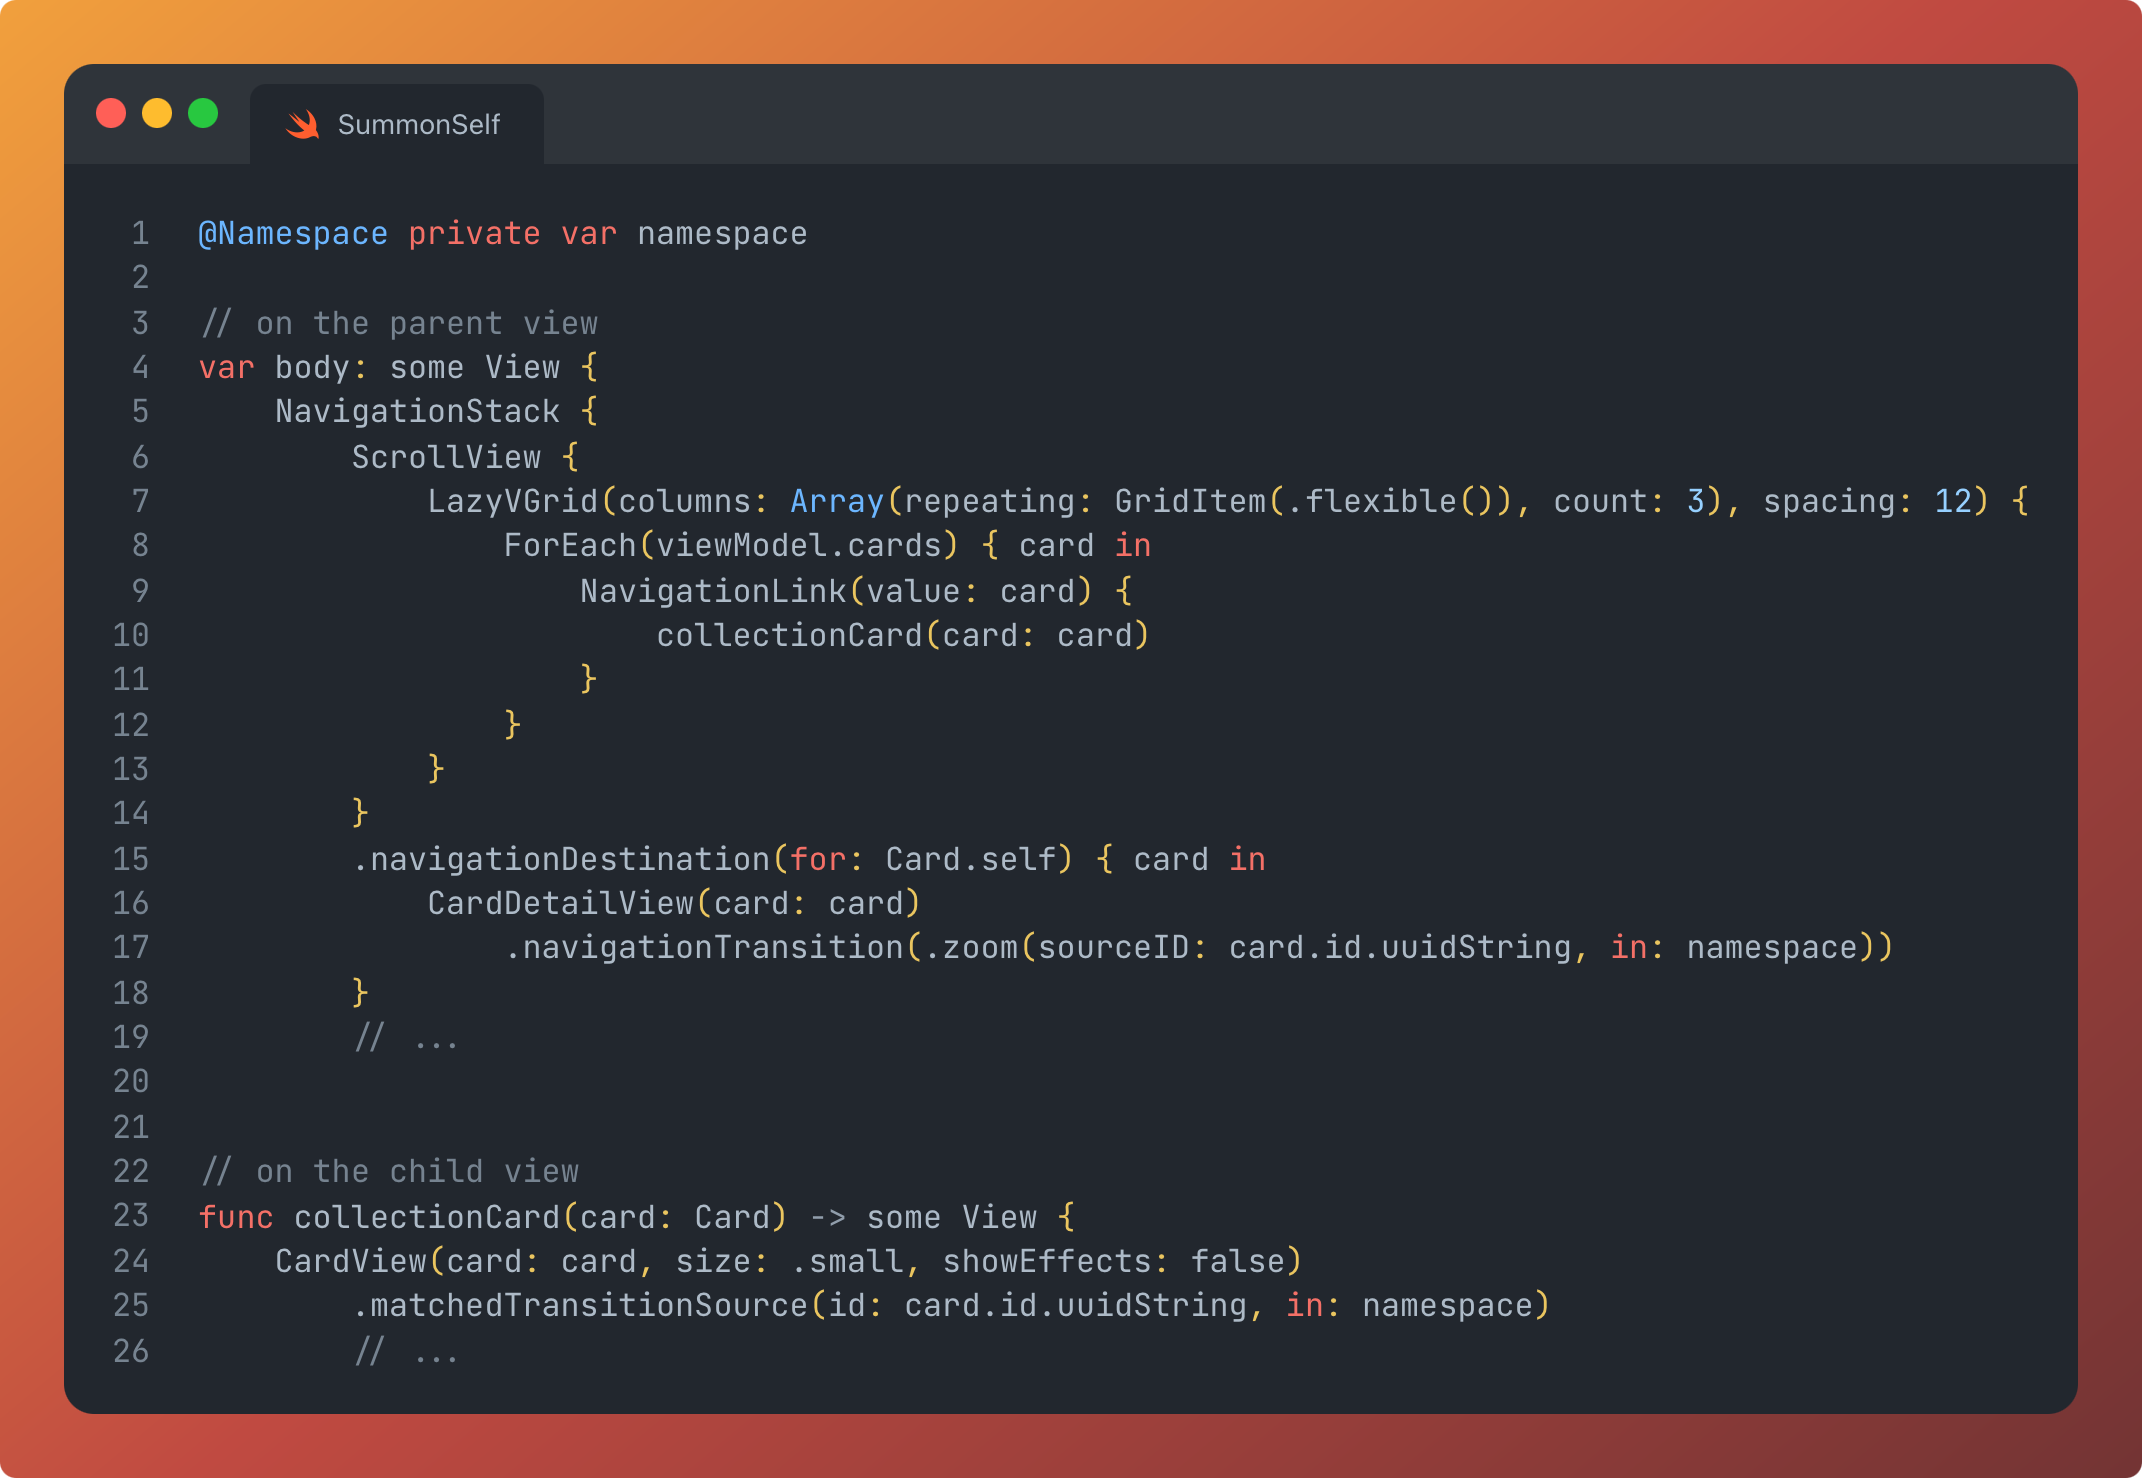
Seeing the transitions in action, I can’t imagine how I ever lived without them.
Adjusting Card Rarity
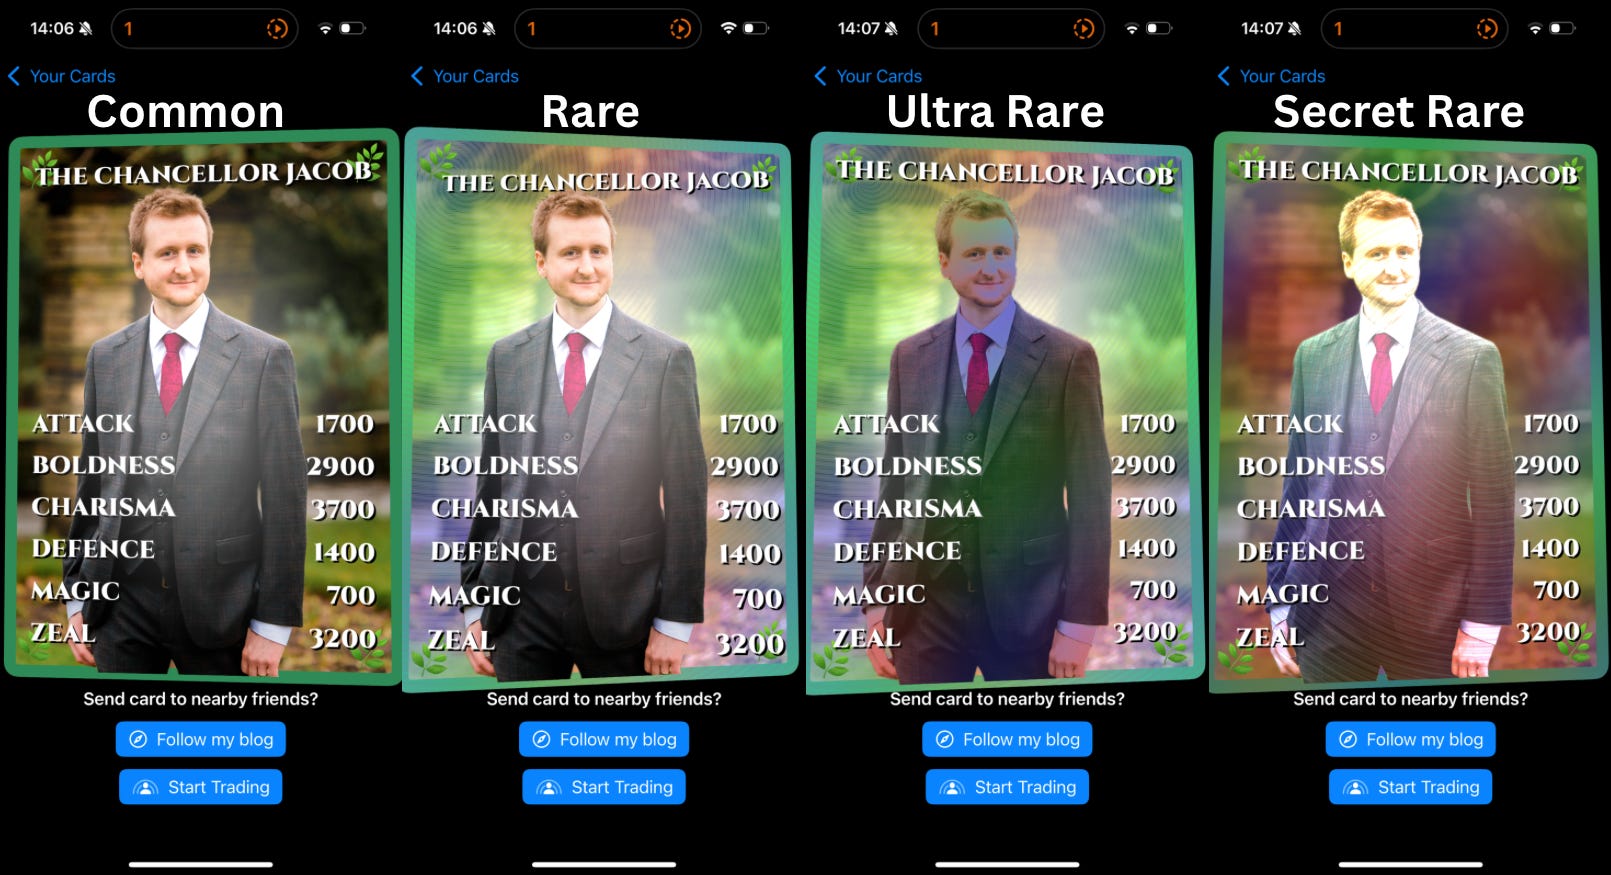
One last lick of paint before we publish. I want to add more varied card effects. The key here is random but deterministic.
I want to recreate the feeling of opening a booster pack, and seeing whether you got a rare card, an ultra-rare, or even the fabled secret rare card. First, an enum to live on my Card models.

To make this random, yet deterministic, I did something novel. The image embeddings we create with our CLIP model are already a virtually random collection of thousands of numbers. We only need one.
For example, the first vector in the embedding might read 0.004850730021412416.
Perhaps we just take the last digit of this number—virtually guaranteed to be randomly distributed between 0 and 9—and return 6. We can then apply these deciles to rarity.

We can now make the UI work with just a few combinations of effects on the background and cutout layer.

I know the
ifmodifier isn’t considered great SwiftUI, but the value of Rarity is fixed and so it shouldn’t cause performance problems in this instance.
Let’s look at our beautiful sequence of rarity.
Release
Okay, enough dilly-dallying. Let’s release this bad boy.

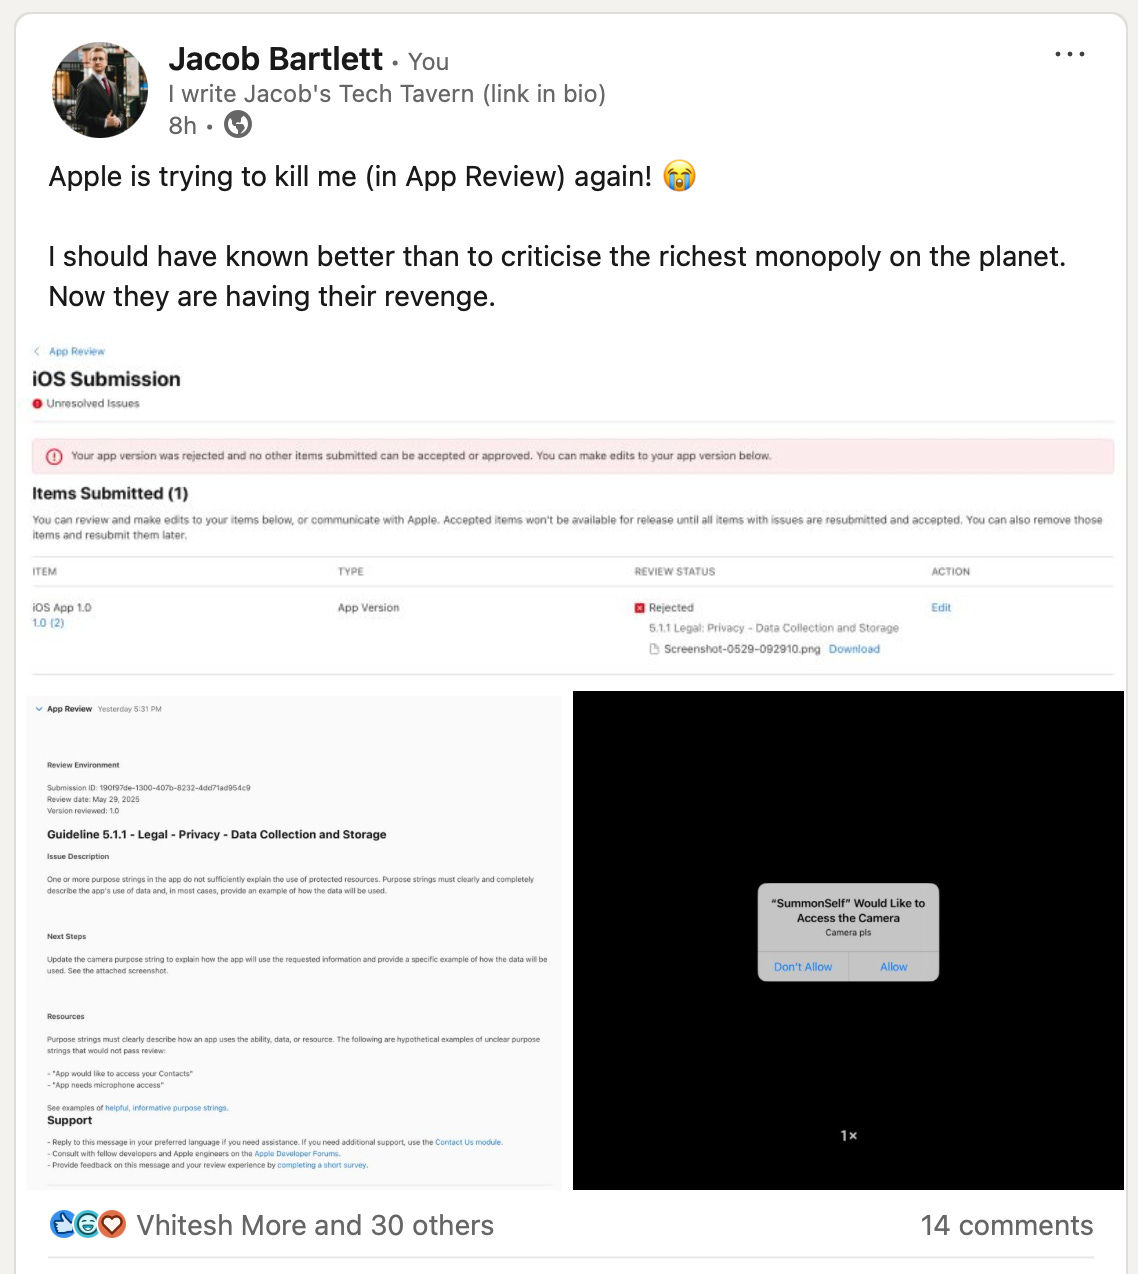
Erm, I got rejected.
But I never turn down an opportunity for a good post.
Erm, maybe I need to fire my QA guy.

Second time lucky! And a photo finish to get this article published today (screenshot taken at 11am).

Last Orders
I love getting stuck into a side project. This one pulled together so many tools I’ve been playing with over the last year that I couldn’t fit everything into the one article.
Using CLIP, a client-side AI model, to generate custom names, stats, and typing for your trading cards.
SwiftUI Metal shaders and the Vision Framework for graphical effects across multiple rarities.
SwiftUI, SwiftData, and a bit of Swift Concurrency tied all tools together into a cohesive, fun, app.
Watch this space for articles on optimising your SwiftData apps, customising your own CLIP models, trading cards using SharePlay over Airdrop, and potentially even a sequel to my SwiftUI Metal Shaders piece.
Download Summon Self on the App Store today! Please comment your cards and share where you can. Once I implement P2P trading, by summer this could be a viral hit: the Pokémon Go for 2025!
Who knows, maybe I’ll make it into a playable game if it gets popular.
Thanks for reading Jacob’s Tech Tavern! 🍺
Full subscribers to Jacob’s Tech Tavern unlock Quick Hacks, my advanced tips series, and enjoy my long-form articles 3 weeks before anyone else. Please consider supporting me.