
Real-time systems with Combine and WebSockets
Three real-world examples

I always felt like WebSockets were the final boss of software engineering.
Back when I was very junior, I made an app with my friend. Me on the front-end, him on the server. But I couldn’t understand how to get his APIs to work, so he built my networking code for me.
Neither of us really had a clue what we were doing—he’d created a WebSocket server to deliver static JSON. His networking code was littered with Ancien Régime CoreFoundation invocations such as CFReadStreamRef and CFWriteStreamRef.
Back in the day, this was the only way you could do WebSockets. Today, Apple offers us much cuddlier APIs.
I was a mid level developer with a chip on my shoulder when Combine came out in 2019. This was the perfect time for me to enthusiastically apply FP-style operator chains over every API surface I could. If you asked me, I’d insist it was neater. Maybe I even believed it. But we all know the truth: I had to make it more complicated to show I was smarter than everyone.
Nevertheless, Combine (when used appropriately) is one of the best ways to design reactive systems. When used alongside WebSockets, they produce a beautiful harmony. Real-time networking on the backend; reactive UX on the frontend.
Today we will look at my sample project containing three realistic use cases for real-time systems. I set up a local WebSocket server that and 3 simple SwiftUI features. Everything on the iOS side from networking to UI will be powered by Combine.
As always, feel free to check out the example project with all the code here.
Also, there’s several videos in this post which don’t work great in email, so I’d recommend reading the article in your browser.
Subscribe to Jacob’s Tech Tavern for free to get ludicrously in-depth articles on iOS, Swift, tech, & indie projects in your inbox every week.
Full subscribers to Jacob’s Tech Tavern unlock Elite Hacks, my advanced articles, and enjoy my free content articles 3 weeks before anyone else.
What are WebSockets?
WebSocket is an application-layer networking protocol, similar to HTTP. Both protocols sit on top of the TCP/IP networking stack. WebSocket connections are persistent and enable 2-way communication between a client and a server.
WebSockets are a great fit for anything real-time, since data continuously flows through the connection without much overhead. This is far more efficient than HTTP polling that requires separate connections and separate overhead for each request.
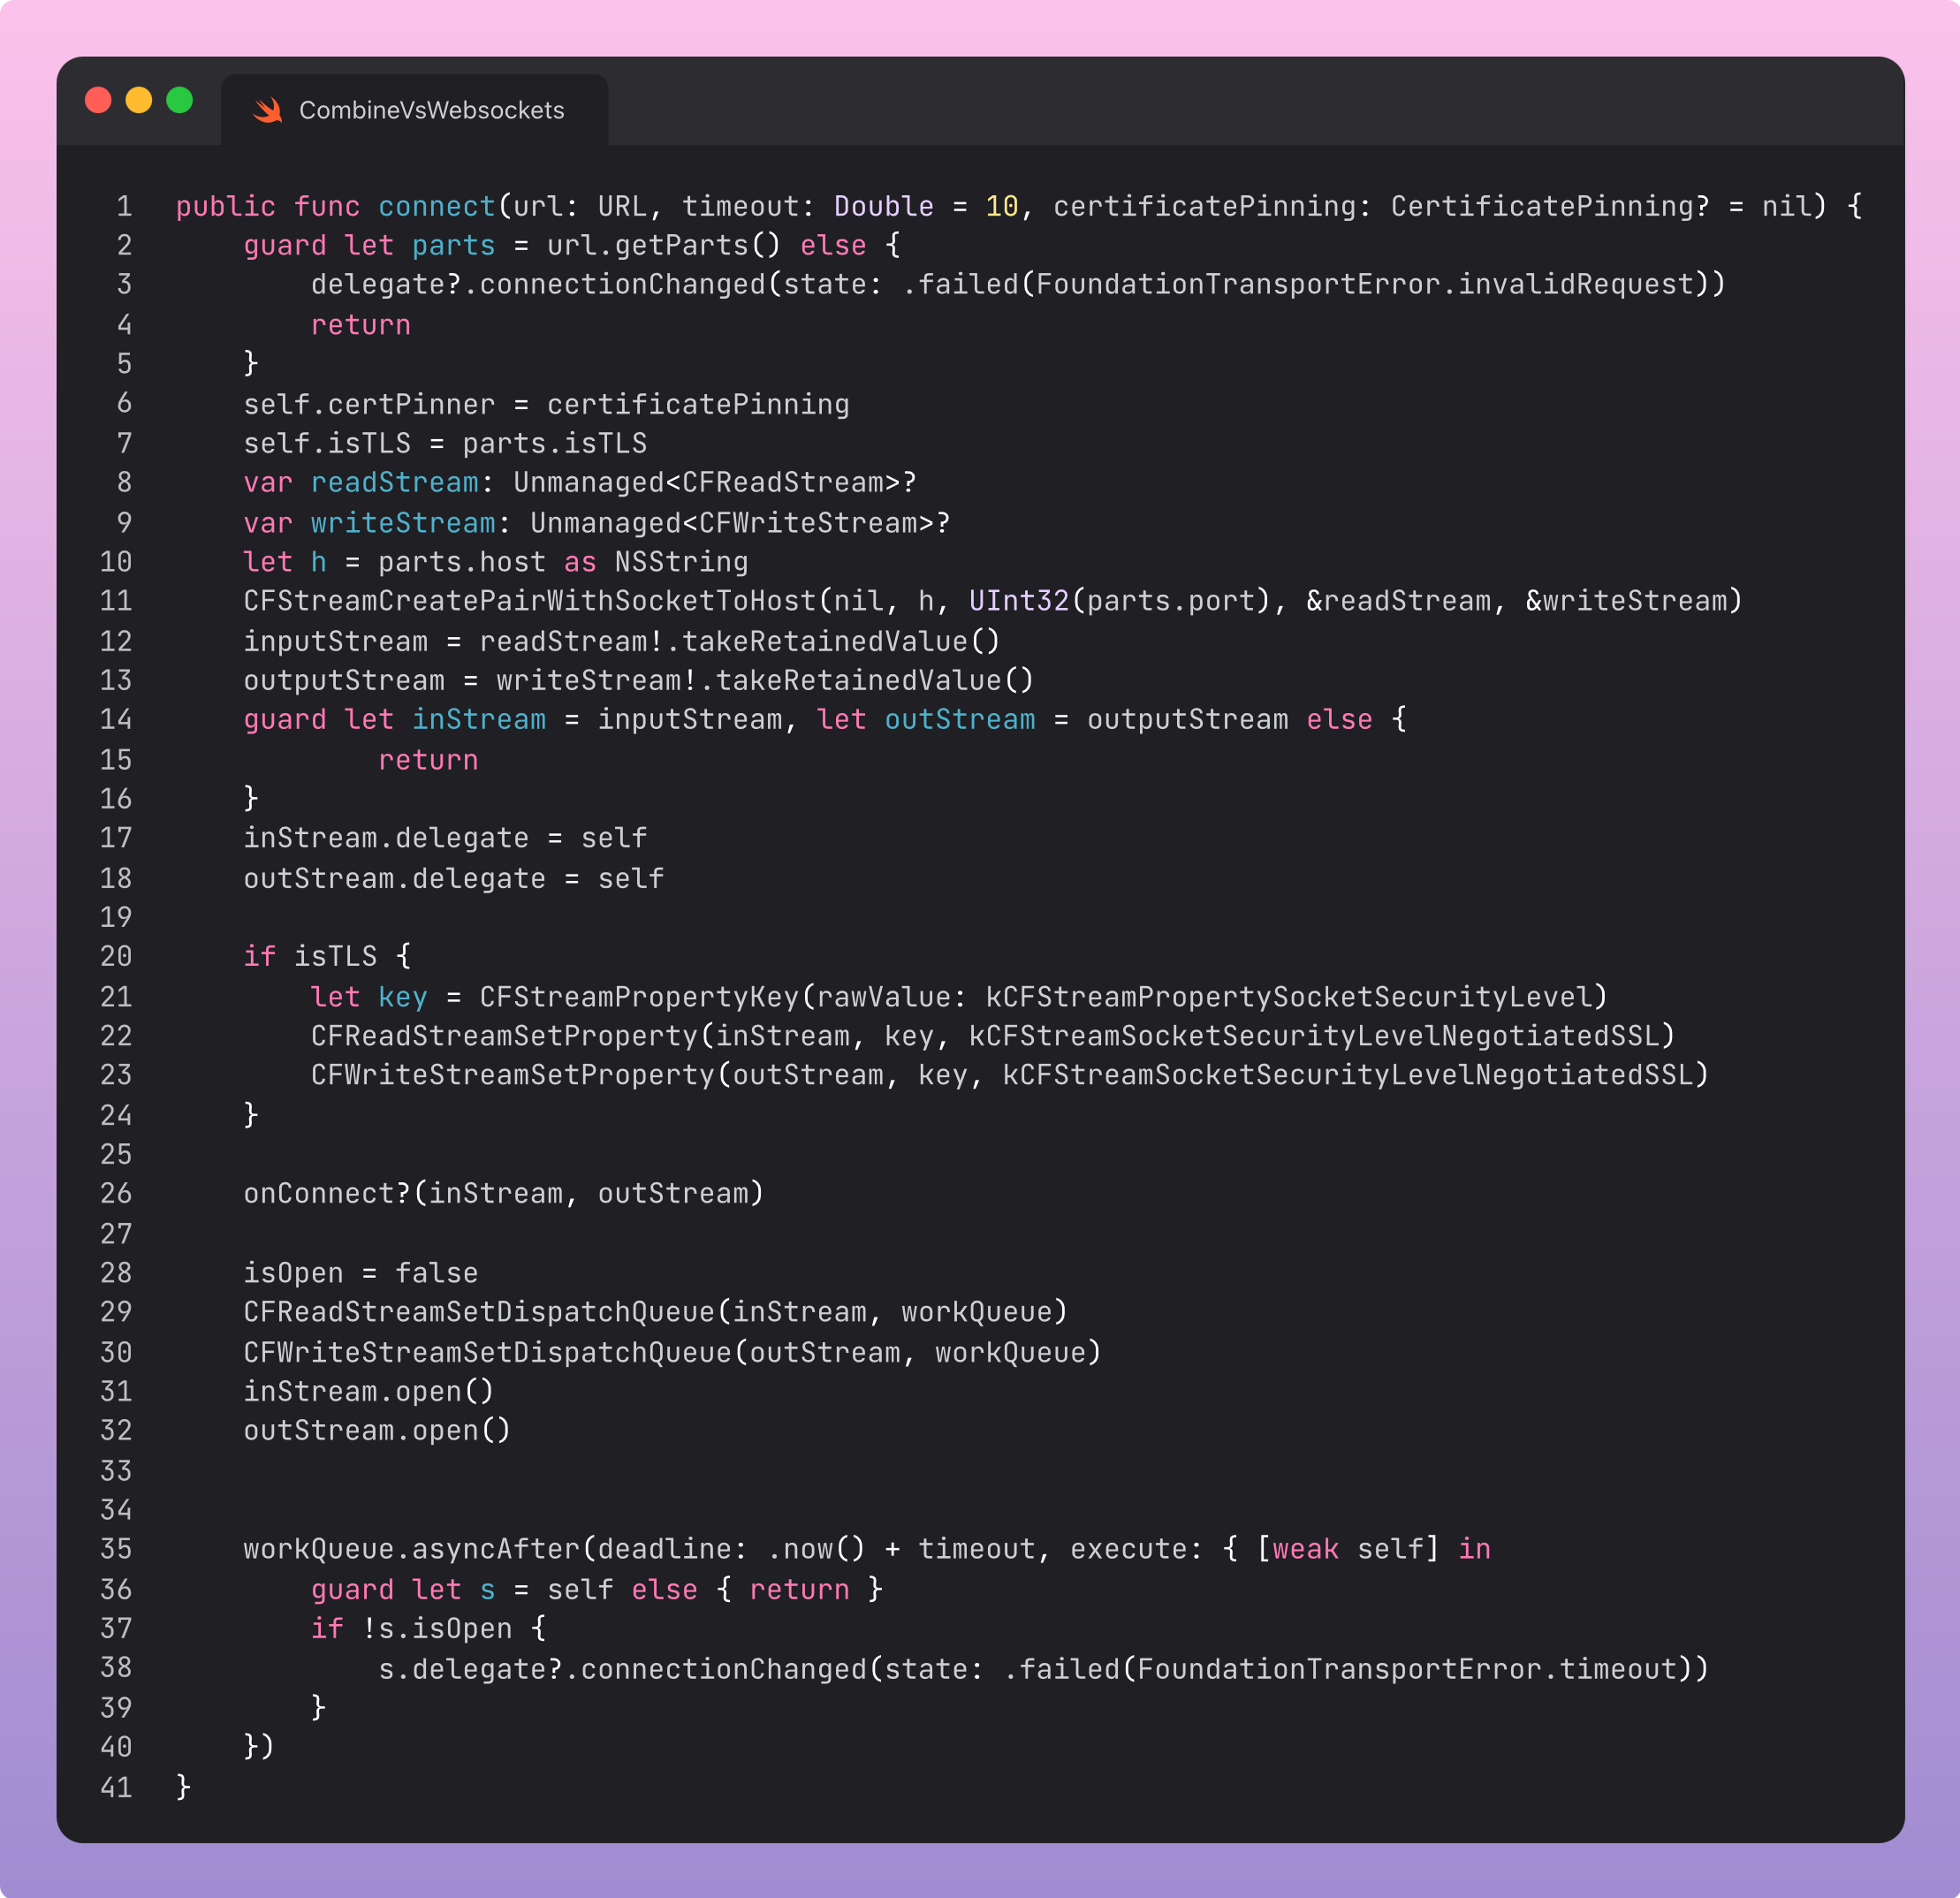
Until 2019, the only way to set up WebSockets on iOS was handling data using ancient CoreFoundation entities such as CFReadStream and the now-deprecated CFStreamCreatePairWithSocketToHost to instigate the connection. In practice, you’d be using a networking library like Starscream to manage this boilerplate for you:
Since 2019, we can use the modern URLSessionWebsocketTask API to create and manage WebSocket connections.
On the server side, to make my sample code work, I vibe-coded a simple local WebSocket server with Python and the FastAPI library. This sent a stream of mock data across a few endpoints, one for each of my real-time features.
Our App’s WebSocket Service
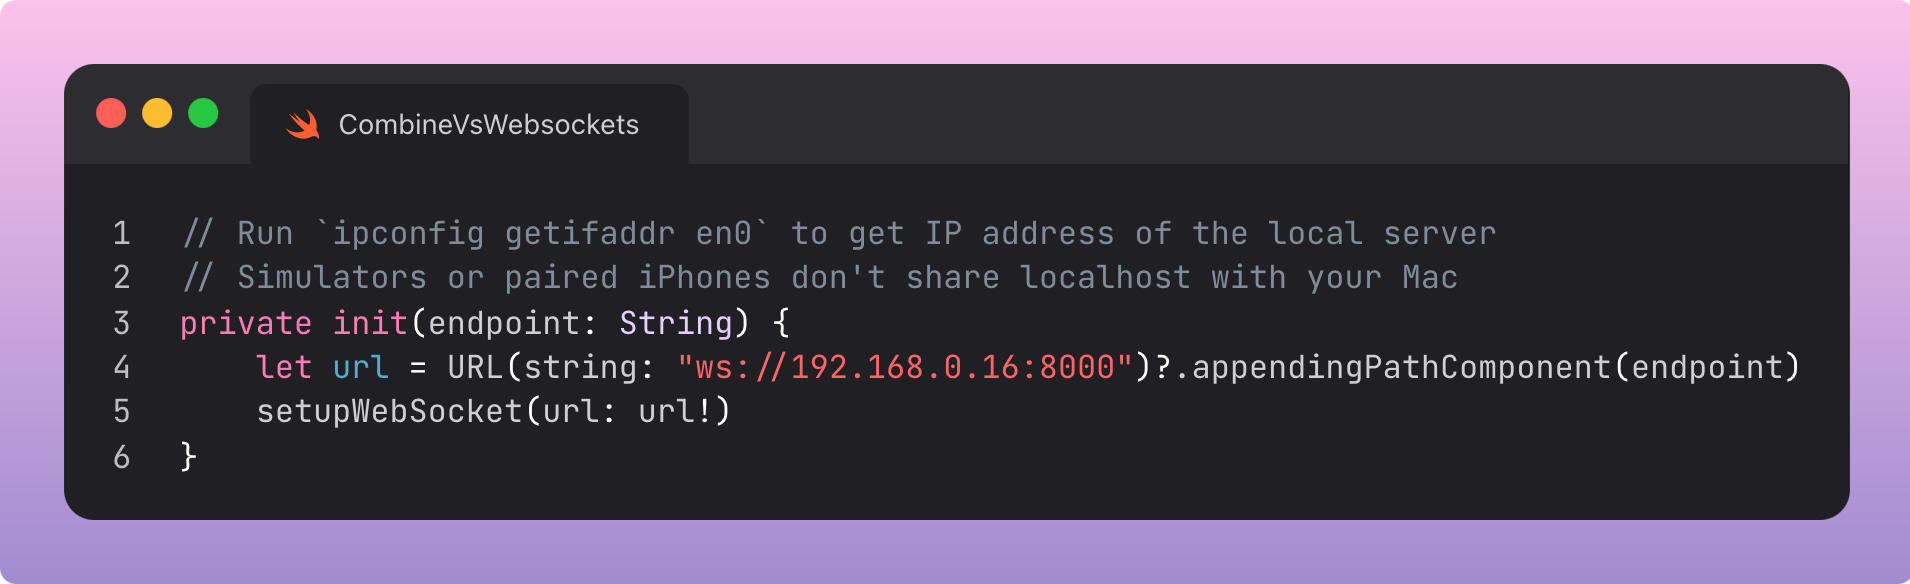
To set up the WebSocket listener, we first create an instance of the service for a specified endpoint. Here, since we were running the simulator and listening to a local server, we used a hardcoded local URL. Since it’s a WebSocket URL, it uses the ws:// protocol instead of HTTP.
URLSessionWebSocketTask is an instance property on our service, and we set it up using URLSession. This high-level interface handles all the TCP connection logic and data streaming for us.

URLSessionWebSocketTask gives us each message one by one, so we need to run an infinite loop to continue reading these messages. Since we use try, the while loop breaks if there’s an error in the WebSocket task or the socket disconnects.
We have some cleanup logic in the deinit to ensure we don’t risk an infinite loop when we drop a connection.
To receive the message, we simply call the async receive() method on webSocketTask.
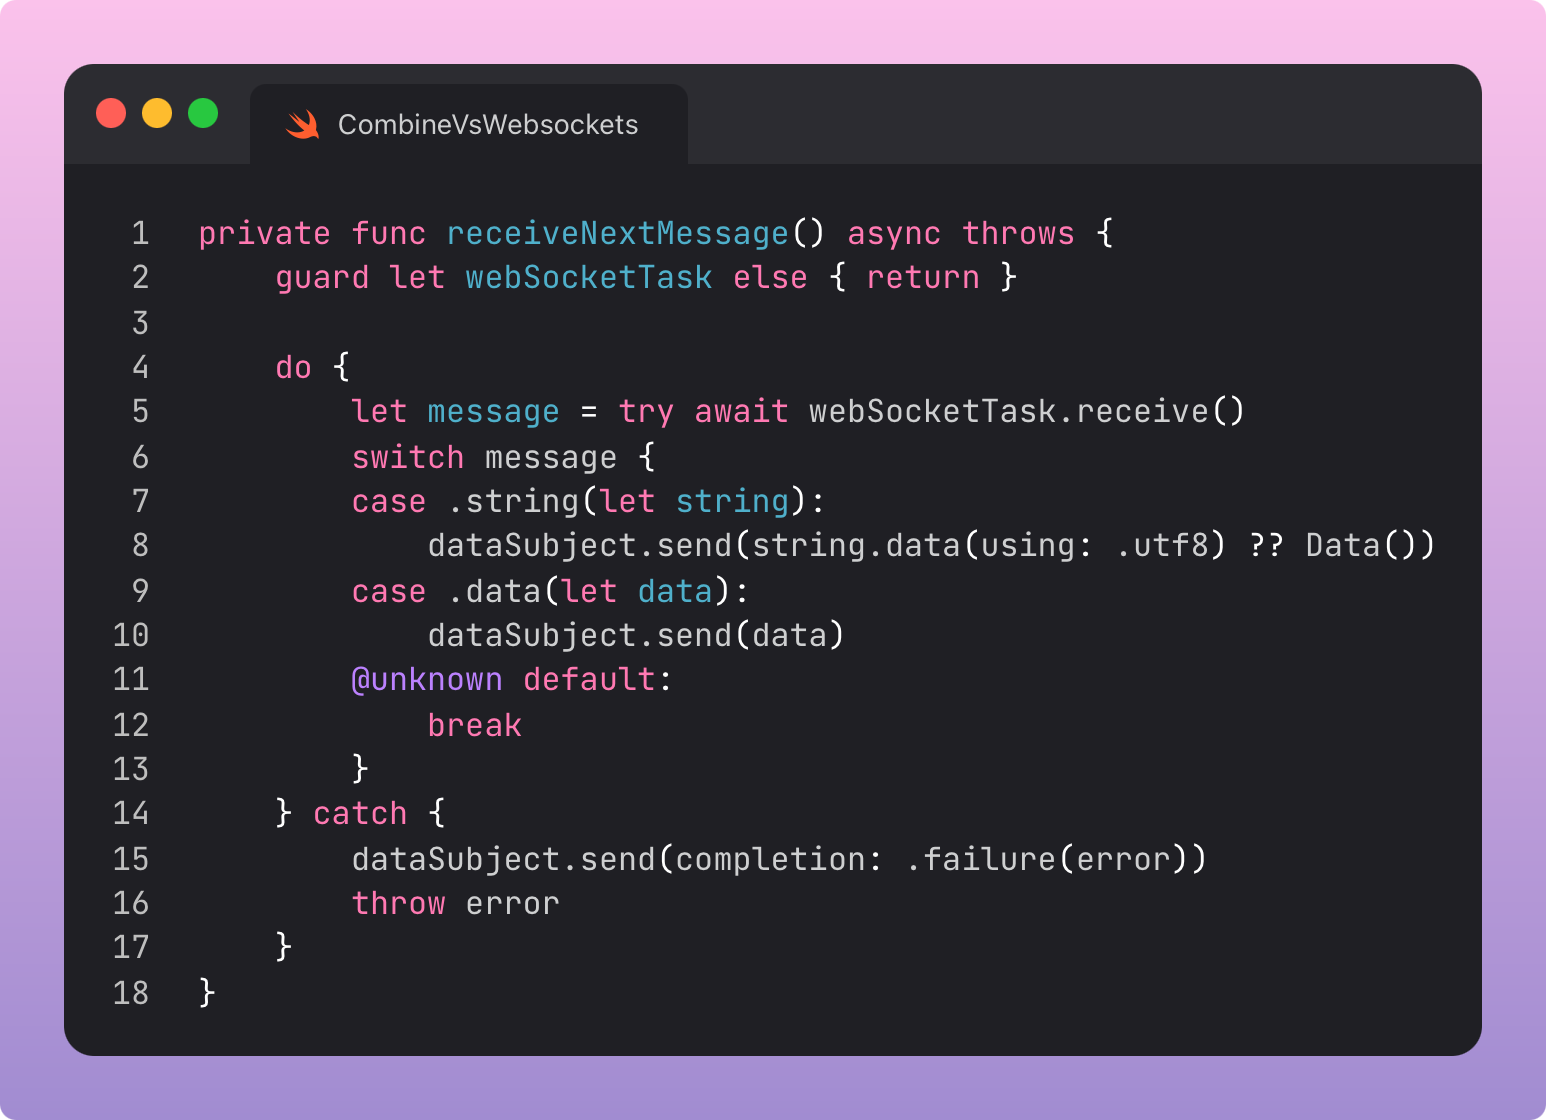
We’re taking data streamed from the WebSocket and passing it to dataSubject, our first Combine entity: a PassthroughSubject.
private let dataSubject = PassthroughSubject<Data, Error>()In Combine, data flows from Publishers (like these Subjects), through chains of Operators, down to Subscribers which handle the values.
PassthroughSubject (and its glamorous twin, CurrentValueSubject) are two of the most important entities in Combine. You send values through them, which are passed downstream to any operators and listeners. Both stream values to your subscribers, but CurrentValueSubject also caches the most recent value.
These Publishers have broadcast capabilities—that is, each of their listeners receives the values they publish. This is stark contrast to AsyncStream where your code crashes if you try to consume values from more than one place.
You’ll notice this dataSubject is private—it’s an implementation detail. We have a computed publisher property that type-erases this PassthroughSubject to AnyPublisher.
var publisher: AnyPublisher<Data, Error> {
    dataSubject.eraseToAnyPublisher()
}
This type erasure becomes important once you start chaining operators together. Even with a short chain of a few operators, you could end up with a monstrosity like:
Publishers.Debounce<
    Publishers.CombineLatest<
        Publishers.Map<
            PassthroughSubject<Data, Error>,
        ...>,
    ...>,
...>
eraseToAnyPublisher() squashes this chain down into:
AnyPublisher<Data, Error>This is the same thing SwiftUI does with some View. It hides the huge complexity of the nested types in the view hierarchy to make life simpler for developers.
Now let’s look at using this WebSocket data.
Connected Thermostat
This endpoint mimics a real-world device, such as a thermostat or a connected door-lock. That’s right, we’re back to the 2016 internet of things craze, before everyone discovered it was actually quite annoying to add latency onto physical things in your house.
The real-time WebSocket connection ensures that changes made to the physical peripheral are synchronised with the app, or vice versa.

The message returned from the WebSocket looks a little like this, many times a second.

For this sample project I went out of my way to structure the screens using MV, eschewing any view models. Therefore, to prevent re-creating the service instance whenever DialView re-inits, we give it a singleton instance of WebSocketService.

Then we have a few operators in the chain to apply the data:
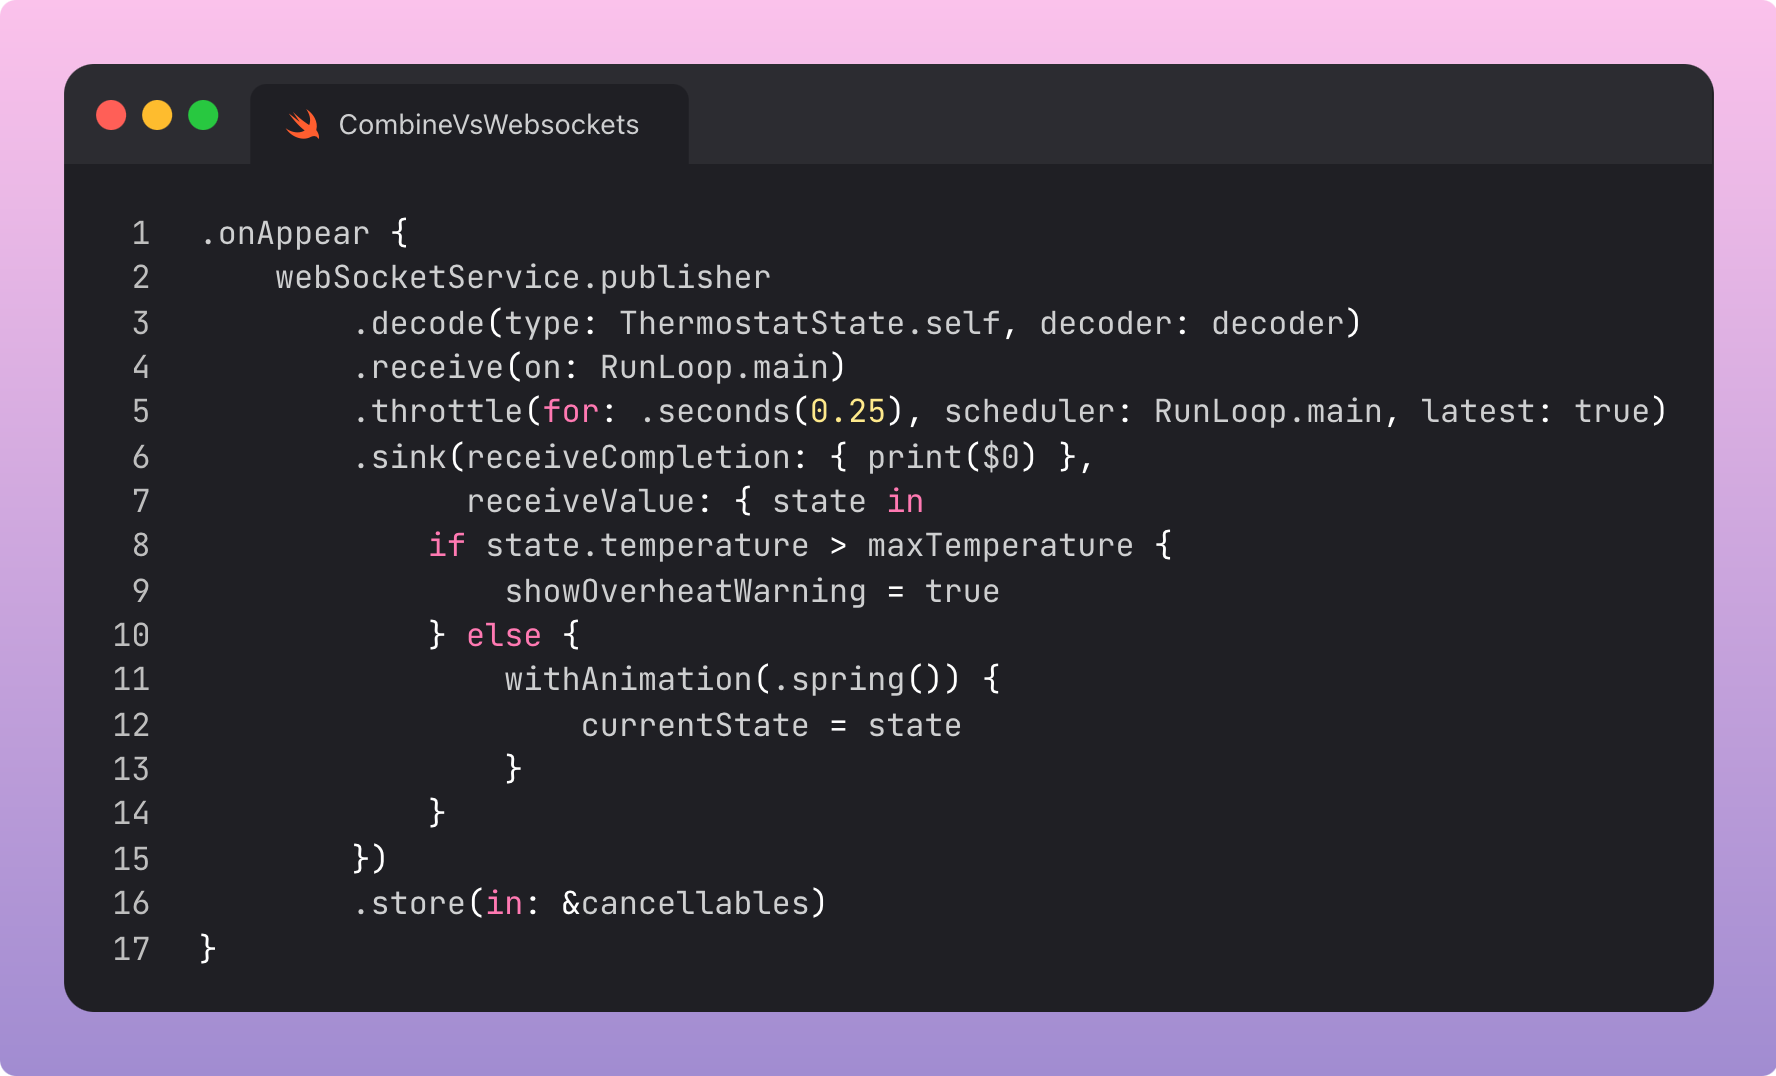
First, we decode the streamed WebSocket data using a handy decode operator, allowing us to convert the JSON into the ThermostatState type. Since we are going to update our UI, we use the receive(on:) operator to move to the main thread.
Since we get a huge number of messages per second, we can reduce the load on our CPU with throttle to slow down the stream.
Finally, we come to the subscriber, sink. Our data lands here and we can apply the transformed data to our view. Here, we’re also setting a max temperature to show a warning to the user. This logic can happen inside the receiveValue closure.
To keep a reference to this chain alive, we store the whole operator chain in our cancellables set. Without retaining the subscription like this, it is immediately cancelled and we won’t receive any updates to our thermostat state.
Live Auction
At my last company, we used WebSockets to run live auctions. This was phenomenal for engagement, and Combine was the perfect tool for the job, ensuring everything was reactive and responsive to the second.

At first glance, this is a fairly straightforward “take data from an API and display on-screen”. However, when setting up pipelines in Combine, we just perform setup once, then we can watch the whole auction play out as WebSocket data streams data directly to our View.

Quick side-bar—we can use something like this to debug the data published by the WebSocket service without interrupting the pipeline:

Now we see the bid data being passed to our view:

When the view appears, we set up our full Combine pipeline to handle incoming bids:

In high-traffic situations—perhaps we’re selling a Switch 2—it’s easy to emit updates to the client faster than it can handle. Before you ask why we aren’t throttling on the backend; our backend guy said it would help me contrive an example. This back-pressure can hit performance or even lose data.
We can mitigate this using the buffer operator. It can hold the most recent bid(s) in memory, discarding data if it gets full. This keeps our UI up-to-date with the latest bids without overwhelming our system with updates. We can specify how it populates the buffer and what it does when full.
To decode the stream, we’re manually decoding JSON inside compactMap, which won’t send a nil value downstream. This gives flexibility inside the closure to perform logging, handle errors, or other transformations. To avoid side effects, however, it’s usually cleaner to do everything using operators in the chain.
The scan operator accumulates state with each event, allowing us to maintain a full bid history and create a nifty Swift Chart showing price progress.
Finally, as before, we receive the data on the main thread, assign the latest data to our @State properties in the View, then store the whole operator chain in our cancellables.
Real-time Gaming
Gaming is the final boss of WebSocket applications. More specifically, online gaming. Every online game you know and love works using WebSockets, keeping you and your enemies connected in real time (minus the ping).

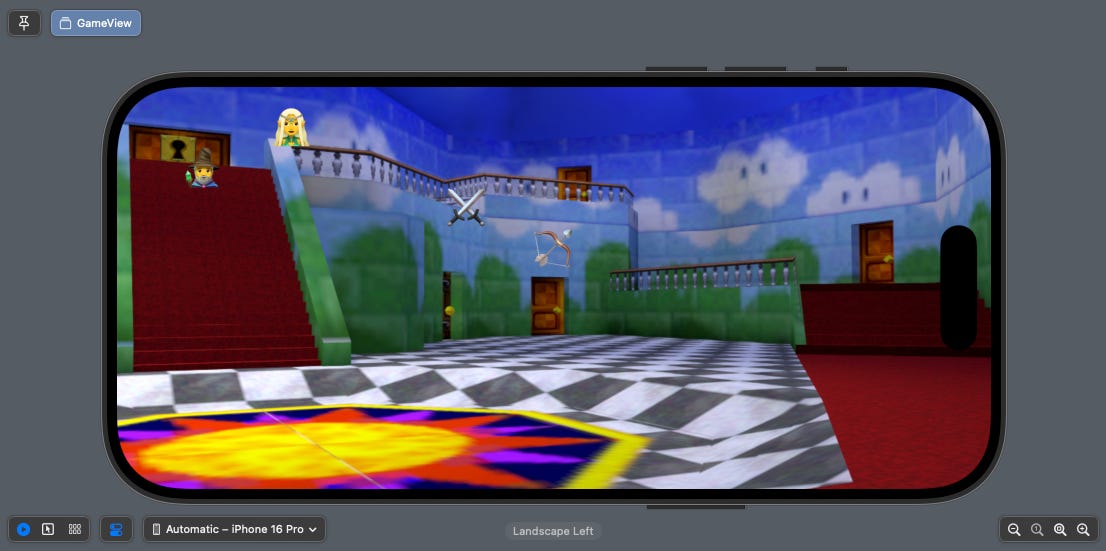
This example shows some characters moving across the coordinates on a game map in real-time.

As before, we set up the View with our WebSocket service “game” endpoint.

Our Combine operator chain should feel like a friend by now: JSON decoding, receipt on the main thread, subscribe with sink, update the view.
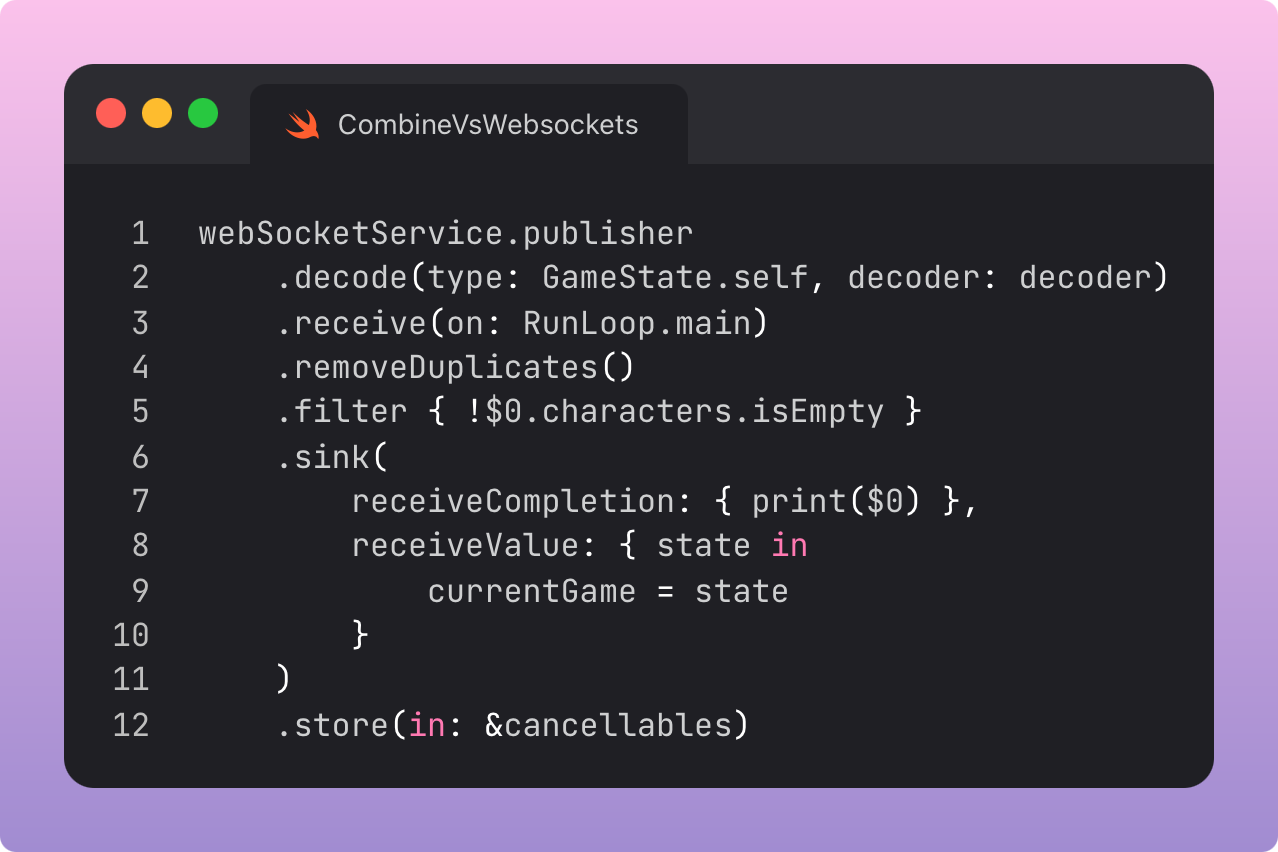
This chain also includes a couple of new operators.
The removeDuplicates operator won’t publish an element downstream if it matches the previous element, saving processing if nothing’s changed on the backend.
The filter operation works much like its counterpart in the Swift standard library. Here, we‘re not trying to publish anything if there are no characters sent by the backend.
This view takes a generic WebSocketService protocol in the initialiser, to help facilitate testing the view: We can make a mock WebSocketService conforming to the same protocol and publish mock data.

The Just publisher wraps our data—or any type we choose—in a Combine Publisher, meaning we can create a pipeline starting from hardcoded data.
This raw publisher isn’t compatible with our protocol yet, so we need to do a couple of transformations: setFailureType to artificially change the type to Result<Data, any Error>.Publisher. We can modify it to use a specific error (or Never!) if we like.
Finally, we use eraseToAnyPublisher again to make our Publisher the generic AnyPublisher<Data, any Error>, making it compatible with our protocol.
Now, we can initialise our SwiftUI preview for this view using the mock service.

The resulting canvas gives us a live preview of our game UI without a single network call.
Last Orders
WebSockets I’ve always had a healthy respect/fear for. I think I was mostly projecting onto my friend, who used to generate extreme impostor syndrome in anyone who saw his code.
Combine has always been my pal. My best pal. I built my entire networking stack with it at my first startup, Swift Concurrency be damned. No regrets—it’s still one of the best options for creating real-time reactive experiences in your apps.
Today, wielding Combine and the power of friendship, I defeated the final boss and overcame impostor syndrome.
Thanks for reading Jacob’s Tech Tavern! 🍺
Don’t forget to play with the sample code.
If you want to learn about another reactive, asynchronous, shiny new toolkit provided by Apple, check out Migrating Combine to AsyncAlgorithms.
Migrating Combine to AsyncAlgorithms

I had a chip on my shoulder after missing the RxSwift bandwagon. Therefore, when Combine came out in 2019, I got serious shiny-object syndrome and used it wherever I could. Then, in 2021, Swift Concurrency (finally) released, with ergonomics which drastically outclassed Combine for many simple use cases. Combine still held a cherished place in my heart. I’d built my whole network stack with the framework, and came up with all manner of excuses to resist transitioning.