My Toddler Loves Planes, So I Built Her A Radar
An adorable side project featuring SwiftUI, MapKit, and open-source APIs
This is a tale of inspiration, of a vision taking shape, and of rapid feedback from that most discerning of customers: a 2-year-old girl. Keen to skip ahead to the final product? Go ahead and download Aviator — Radar on your Phone from the App Store now!
Subscribe to Jacob’s Tech Tavern for free to get ludicrously in-depth articles on iOS, Swift, tech, & indie projects in your inbox every week.
Full subscribers unlock Quick Hacks, my advanced tips series, and enjoy exclusive early access to my long-form articles.
Inspired
I took my toddler abroad this summer.
She was so excited. But, in order to make sure she could handle the 3-hour flight, my wife and I made sure to hype up the airplane journey. So much so, that my toddler was shocked when we had to get into a cab for the airport — she expected to walk straight from our house onto a plane.
Once we boarded the flight, things took an incredible turn — it turns out, if the crew spots you with a cute plane-obsessed toddler, they invite you in to check out the cockpit.
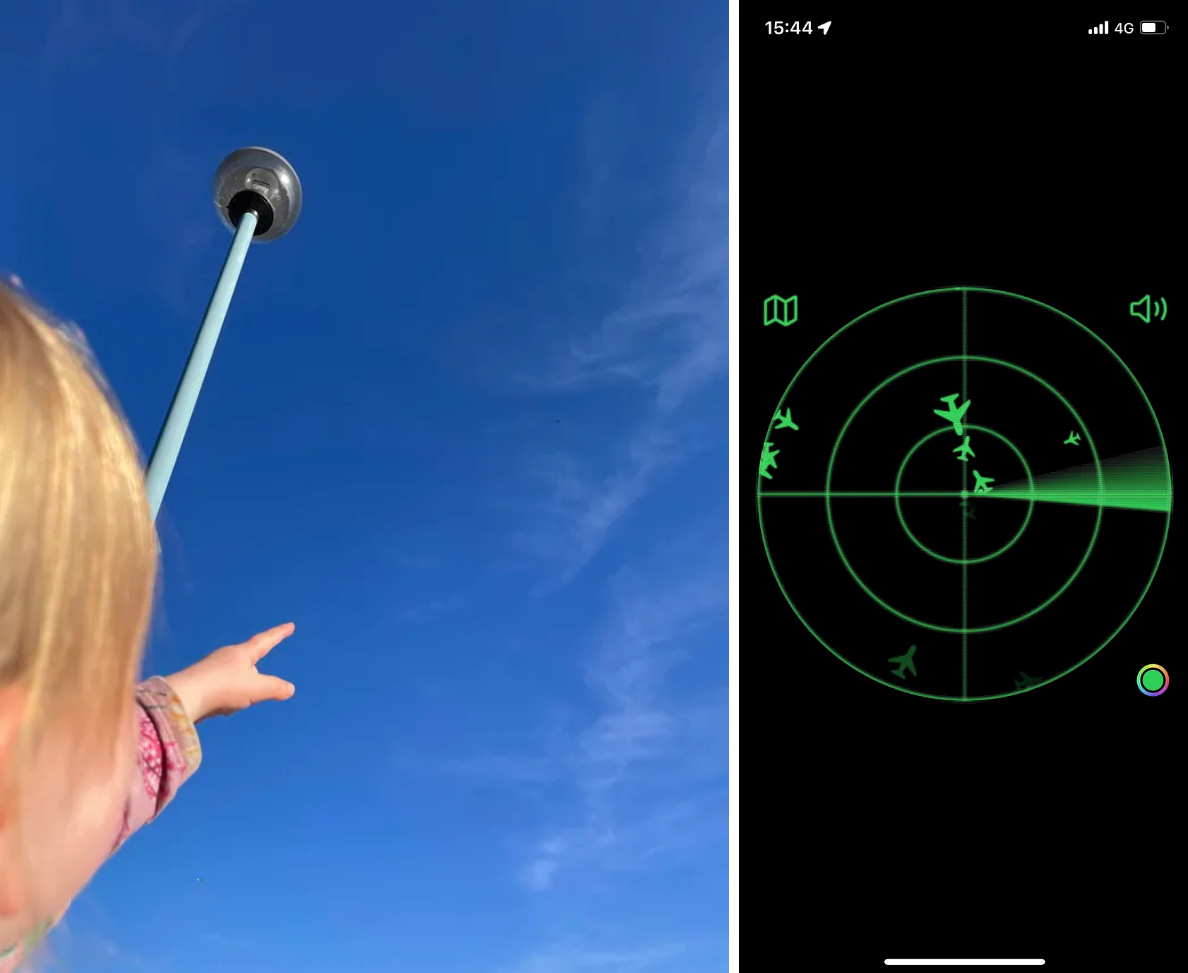
This kindled my daughter’s obsession with airplanes. She keeps adorably asking me to find planes for her in the sky, and becomes delighted when I spot one for her.
Last week, we spent an hour in the garden, with her on my shoulders, spotting planes twinkling in the evening sky, one after the other.
A Problem Statement Emerges
While it’s always great to play with one’s daughter, I knew we could be applying a more efficient approach.
I found FlightRadar24, which shows the positions of planes overlaid on a map. It worked pretty well, but it was a little annoying to have to orient myself to work out where to look in the sky.
It’s also pretty tough to spot aircraft on a 2-dimensional plane (pun intended). A Learjet at 40,000 feet shows up the same as an AirBus that just took off at London City Airport, however it’s a lot easier to spot the jumbo jet in the real sky.
Finally, and most importantly, my toddler doesn’t really understand or care what a map is. She just wanted to look at planes.
So we have our problems.
Orientation.
Sizing.
Usability.
As a mobile tech lead, I don’t exactly have a Schwarzenegger physique. I wouldn’t know where to start building my kid a rocking horse. But nothing was going to stand in the way of me making her a cool app.
A Vision Takes Shape
We had the idea for our app:
Show nearby flights on a radar.
In keeping with the requirements we’d created via our research:
The app needs to remain oriented correctly, rotating with the device so that it shows airplanes in the correct direction.
The app has to show aircraft as bigger or smaller depending on how high they are.
The app must be fun, and feel more like a retro kid’s toy than a serious business app.
These requirements led to a few moving parts which form the proof of concept:
Maintaining Orientation is a core differentiating product requirement, since this is missing from the existing solutions. I’m not in the business of detailed flight information — I just want to make a cool radar! The iOS Core Location API has us covered, offering a delegate callback every time the user re-orients their device.
The most important component, of course, is a Flight Data API. OpenSky Network has exactly what I need. A simple REST API, free for non-commercial use, with live data of flights in an area. We’d want to ping this endpoint every few seconds for realistic radar sweeps.
To call the API, we need some Location data. Core Location has us covered again — to get a good number of nearby flights, we could query +/- 1 degree of latitude from the user’s location, with a precision of 0.1 degrees (about 10km) to ensure a user’s location is sufficiently obfuscated. We also only need to fetch this data once per session.
Finally, and like most difficult, we need to dust off our Trigonometry skills to compare flight location data with our own, oriented, coordinates. This will allow us to draw nearby aircraft to the screen in the correct place, according to their relative position from us in the sky.
Since I don’t intend to build a business atop this app — again, the OpenSky Network API is restricted to non-commercial use — I’ll probably use the dead-simple MV architecture for SwiftUI. I’ll leave a bit of business logic in the views, rely on SwiftUI’s built-in APIs for the heavy lifting, and factor out core services such as API and Location.
Once I prove the concept, I can get to work on the really fun part — turning it into a cool radar and testing it with my toddler!
The Proof of Concept
First things first.
For the mascot, I’m picturing a cartoon of my daughter in a cute aviator hat. So we have our app name already: Aviator.
Drawing on my infinite willpower, I’m not going to waste time with an app icon until the MVP is complete. But I now have a project name with which to get started.
Orientation
The first of my key differentiating product requirements is maintaining orientation — to be useful, the objects on-screen need to correspond to their real-life location. Therefore, When the user rotates, the screen itself rotates and keeps pointing North.
Ignoring the template files for AviatorApp and ContentView for now, I whip up a singleton LocationManager and wire up the didUpdateHeading method from CLLocationManagerDelegate.
In navigation, the Heading is the compass direction in which a vessel — or in this case, an iPhone — is pointed.
My LocationManager also handles the initial setup of requesting location permissions, setting the delegate, and telling Core Location to start sending orientation info.
final class LocationManager: CLLocationManager, CLLocationManagerDelegate {

    static let shared = LocationManager()

    private(set) var rotationAngleSubject = CurrentValueSubject<Double, Never>(0)

    override private init() {
        super.init()
        requestWhenInUseAuthorization()
        delegate = self
        startUpdatingHeading()
    }

    func locationManager(_ manager: CLLocationManager, didUpdateHeading newHeading: CLHeading) {
        rotationAngleSubject.send(-newHeading.magneticHeading)
    }
}
To make things play nicely with a SwiftUI view, I’m going to send the orientation information via a Combine publisher, rotationAngleSubject. This means I can reactively handle it in my view with .onReceive, and set a local @State property, rotationAngle.
In my view, to get a nice compass effect, I draw a set of rectangles that vary with this rotationAngle.
@State private var rotationAngle: Angle = .degrees(0)

var body: some View {
    ZStack {
        ForEach(0..<36) {
            let angle = Angle.degrees(Double($0 * 10)) + rotationAngle
            Rectangle()
                .frame(width: $0 == 0 ? 16 : 8, height: $0 == 0 ? 3 : 2)
                .foregroundColor($0 == 0 ? .red : .blue)
                .rotationEffect(angle)
                .offset(x: 120 * cos(CGFloat(angle.radians)), y: 120 * sin(CGFloat(angle.radians)))
                .animation(.bouncy, value: rotationAngle)
        }
    }
    .onReceive(LocationManager.shared.rotationAngleSubject) { angle in
        rotationAngle = Angle.degrees(angle)
    }
}
Testing on my device, it looks pretty good, and responds perfectly to my real-world location!
You’ll notice a funny visual glitch due to the animation logic treating 0 degrees and 360 degrees as separate numbers — all the rectangles decide to spin around when I go past true North — but it’s fine for the PoC (as I’m unlikely to actually keep this UI anyway).
Flight Data API
Now my warm-up is over.
The really important piece is next: Parsing out data from the OpenSky Network API.
It allows you to specify a range of latitude and longitudes, and returns an array of local flights in that range via a simple GET request — meaning you can simply paste this into your browser to find out what flights I can see overhead:
https://opensky-network.org/api/states/all?lamin=51.0&lamax=52.0&lomin=-0.5&lomax=0.5The REST API is documented well, but has an un-keyed structure, meaning the data is presented as a list properties in order.
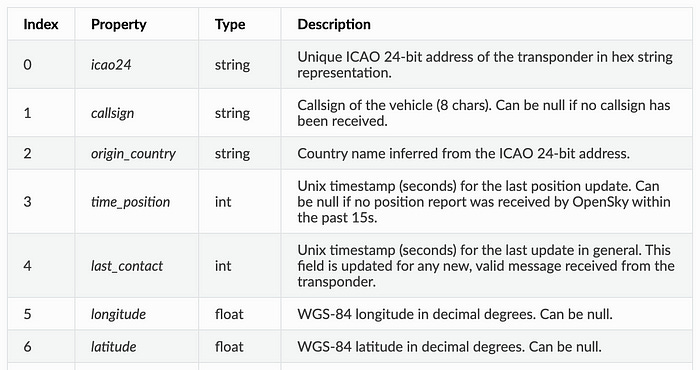
We need to use an UnkeyedContainer to decode it, which is designed to parse out fields from the JSON response in order.
struct Flight: Decodable {

    let icao24: String
    let callsign: String?
    let origin_country: String?
    let time_position: Int?
    let last_contact: Int
    let longitude: Double
    let latitude: Double

    // ...

    init(from decoder: Decoder) throws {
        var container = try decoder.unkeyedContainer()
        icao24 = try container.decode(String.self)
        callsign = try? container.decode(String?.self)
        origin_country = try container.decode(String.self)
        time_position = try? container.decode(Int?.self)
        last_contact = try container.decode(Int.self)
        longitude = try container.decode(Double.self)
        latitude = try container.decode(Double.self)

        // ...
    }
}
We can write a simple API that performs a GET request based on the user’s location coordinates.
final class FlightAPI {

    func fetchLocalFlightData(coordinate: CLLocationCoordinate2D) async throws -> [Flight] {

        let lamin = String(format: "%.1f", coordinate.latitude - 0.25)
        let lamax = String(format: "%.1f", coordinate.latitude + 0.25)
        let lomin = String(format: "%.1f", coordinate.longitude - 0.5)
        let lomax = String(format: "%.1f", coordinate.longitude + 0.5)

        let url = URL(string: "https://opensky-network.org/api/states/all?lamin=\(lamin)&lamax=\(lamax)&lomin=\(lomin)&lomax=\(lomax)")!
        let data = try await URLSession.shared.data(from: url).0
        return try JSONDecoder().decode([Flight].self, from: data)
    }
}
You might notice that I used a range of 1 degree of longitude, but only 0.5 degrees of latitude in this API call. That’s because at my latitude, the UK, a 0.5 latitude by 1 longitude rectangle shows up, approximately, as a square.
Now we’re getting somewhere!
The flight data is nicely parsed into an array of in-memory Flight objects which are now nice and easy to deal with.
Drawing Airplanes
It’s pretty trivial to amend my LocationManager to listen for significant location changes and send these coordinates via a publisher.
Again, in pure MV architectural style, my view listens to coordinates via .onReceive and calls my new FlightAPI with these coordinates. The result? Data about the overhead airplanes in your local slice of sky.
Now, we arrive at the hardest part of my initial proof of concept: actually displaying the airplane icons in their correct locations, relative to my own location.
My first iteration was a blunt instrument: I multiplied the relative lat and long by a hardcoded on-screen points value.
@State private var coordinates: CLLocationCoordinate2D?
@State private var flights: [Flight] = []

private var airplanes: some View {
    ForEach(flights, id: \.icao24) { flight in
        let latDiff = coordinate.latitude - (flight.latitude ?? 0)
        let lngDiff = coordinate.longitude - (flight.longitude ?? 0)
        Image(systemName: "airplane")
            .resizable()
            .frame(width: 20, height: 20)
            .rotationEffect(.degrees(flight.true_track ?? 0))
            .foregroundColor(.red)
            .offset(x: 250 * latDiff, y: 250 * lngDiff)
    }
}
There was, of course, no way this would be accurate, since the absolute distance of a degree of latitude or longitude varies with your geolocation. But again, it’s a good place to begin.
Initial Results
How do I actually test the accuracy of my airplane drawings?
I could draw a map underneath everything!
Now my AviatorView has 3 layers: The compass on top, airplanes drawn to the screen, and an unadorned SwiftUI Map view under it all.
@State private var cameraPosition: MapCameraPosition = .camera(MapCamera(
        centerCoordinate: CLLocationCoordinate2D(latitude: 51.0, longitude: 0.0),
        distance: 100_000,
        heading: 0))

var body: some View {
    ZStack {
        Map(position: $cameraPosition) { }
        airplanes
        compass
    }
}
Here’s the result of my first late-night hackathon, compared against the FlightRadar projection as a source of truth.
I’m certainly on to something, since the number and clustering of airplanes in the sky looks about right — however the positioning is pretty far off.
Suddenly, another flash of inspiration. It’s so simple. I can’t believe I didn’t think of it before.
I need to draw the airplanes on the map using annotations!
The MVP
The idea has been brewing all day: we’ll use a Map, and draw aircraft-shaped annotations on top at their precice geolocations.
Eventually, I want to find a way to hide the actual map, and only display the airplanes as markers on the radar position. This should get us the cool, fully-oriented radar effect we’re aiming at.
Map Annotations
In iOS 17, which I intend to target, drawing annotations on a map is a breeze. Let’s refactor out a FlightMapView.
import MapKit
import SwiftUI

struct FlightMapView: View {

    @Binding var cameraPosition: MapCameraPosition

    let flights: [Flight]

    var body: some View {
        Map(position: $cameraPosition) {
            planeMapAnnotations
        }
        .mapStyle(.imagery)
        .allowsHitTesting(false)
    }
}
Here, for the purposes of a radar, we want to prevent hit-testing — i.e., we don’t want the map to be interactive. In our ideal world, the map is invisible, and the user just sees flights and their positions.
Airplane Scaling
After orientation, sizing was the next core issue which the existing solutions simply didn’t handle that well.
I added some simple log scaling to the map annotations using the altitude of the flight so higher up aircraft appear larger on-screen.
Additionally, I used the aircraft’s true_track property, combined with the user’s orientation from Core Location, to show the plane facing the correct direction.
@State private var rotationAngle: Angle = .degrees(0)

private var planeMapAnnotations: some MapContent {
    ForEach(flights, id: \.icao24) { flight in
        Annotation(flight.icao24, coordinate: flight.coordinate) {
            let rotation = rotationAngle.degrees + flight.true_track
            let scale = min(2, max(log10(height + 1), 0.5))
            Image(systemName: "airplane")
                .rotationEffect(.degrees(rotation))
                .scaleEffect(scale)
            }
        }
        .tint(.white)
    }
}
User Research
Now’s the time for the ultimate test to find out if my MVP actually works.
I’m going to go plane-spotting with my daughter.
We’ve got real map annotations, and show the user’s location and direction on the map.
Most importantly, it accurately finds the airplanes!
The MVP was a smashing success, since my daughter and I spotted a plane which was visible on the app!
This initial test also yielded 2 pieces of important information.
Firstly, my scaling logic is backwards — see the tiny plane on the ground at London City Airport. Since the point of the app is locating aircraft in the sky, we need to reverse the scaling. Lower-down planes must show up as larger, since we’re using our eyes to spot them.
Secondly, my toddler does not care about maps, just airplanes. I needed to remove the map if I wanted to clear out the noise and focus on spotting aircraft. And start to build my radar!
Updated scaling logic
I handily fixed the scaling logic for the aircraft.
After some trial and error — to see both what looks good on-screen, and gives a reasonable spread of sizes, I landed on this for the scaling:
min(2, max(4.7 - log10(flight.geo_altitude + 1), 0.7))These scalings came out of my local overhead scan:
Scale:  1.0835408863965839
Scale:  0.8330645861650874
Scale:  1.095791123396205
Scale:  1.1077242935783653
Scale:  2.0
Scale:  1.4864702267977097
Scale:  0.7
This distribution works pretty well — aside from the NOx, it’s turning out quite useful living in an air travel hub.
Creating The Radar
I was nearly ready to build the radar I was envisioning. But there was a problem.
API Robustness
The open-source OpenSky API kept timing out, returning 502 bad gateway errors, and sometimes simply yielding a 200 response with with null data.
Franky, that’s fine by me — this isn’t a corporate business app and this great API costs me nothing. They have no SLA and I don’t feel entitled to one.
To help improve robustness on the client-side, I implemented some basic retry logic in the API call.
private func fetchFlights(at coordinate: CLLocationCoordinate2D, retries: Int = 3) async {
    do {
        try await api.fetchLocalFlightData(coordinate: coordinate)

    } catch {
        if retries > 0 {
            try await fetchFlights(at: coordinate, retries: retries - 1)
        }
    }
}
The next day, the API was working fine all day—it seems like it’s mostly good apart from certain high-traffic periods.
Covering The Map
The most important noise-reducing task is to make the actual map invisible. The radar won’t work without this.
I was able to do this using a flat-coloured MapPolygon — ostensibly designed so you can place overlays to highlight sections of a map. But I wanted to use it to hide everything except our annotations.
struct FlightMapView: View {

    var body: some View {
        Map(position: $cameraPosition) {
            planeMapAnnotations
            MapPolygon(overlay(coordinate: coordinate))
        }
        .mapStyle(.imagery)
        .allowsHitTesting(false)
    }

    // ...

    private func rectangle(around coordinate: CLLocationCoordinate2D) -> [CLLocationCoordinate2D] {
        [
            CLLocationCoordinate2D(latitude: coordinate.latitude - 1, longitude: coordinate.longitude - 1),
            CLLocationCoordinate2D(latitude: coordinate.latitude - 1, longitude: coordinate.longitude + 1),
            CLLocationCoordinate2D(latitude: coordinate.latitude + 1, longitude: coordinate.longitude + 1),
            CLLocationCoordinate2D(latitude: coordinate.latitude + 1, longitude: coordinate.longitude - 1)
        ]
    }

    private func overlay(coordinate: CLLocationCoordinate2D) -> MKPolygon {
        let rectangle = rectangle(around: coordinate)
        return MKPolygon(coordinates: rectangle, count: rectangle.count)
    }
}
Tapping my dwindling reserves of my good luck, this approach worked a treat! We could now see the airplanes, but no map, just like we wanted!
Critically, Apple has designed the overlay to place on top of the map but underneath the annotations. Had they done it any other way, my daughter’s new toy would be hobbled.
Drawing The Radar
The final piece of my core requirements was a radar view.
This was essentially a set of lines, concentric circles, and 20 degrees of rotating angular gradient. For a SwiftUI aficionado like myself, this was simples.
Late-night cross-check
Look how far we’ve come.
With today’s core visual changes — hiding the map via an overlay, and a few lines of SwiftUI views for the radar — we are now rapidly closing in on our original vision.
Comparing the resulting Radar UI with the aircraft in the sky overhead, we’re pretty nicely matched.
User Testing #2
After 3 solid evenings of work, my toddler was finally starting to show some interest in the toy I’d created.
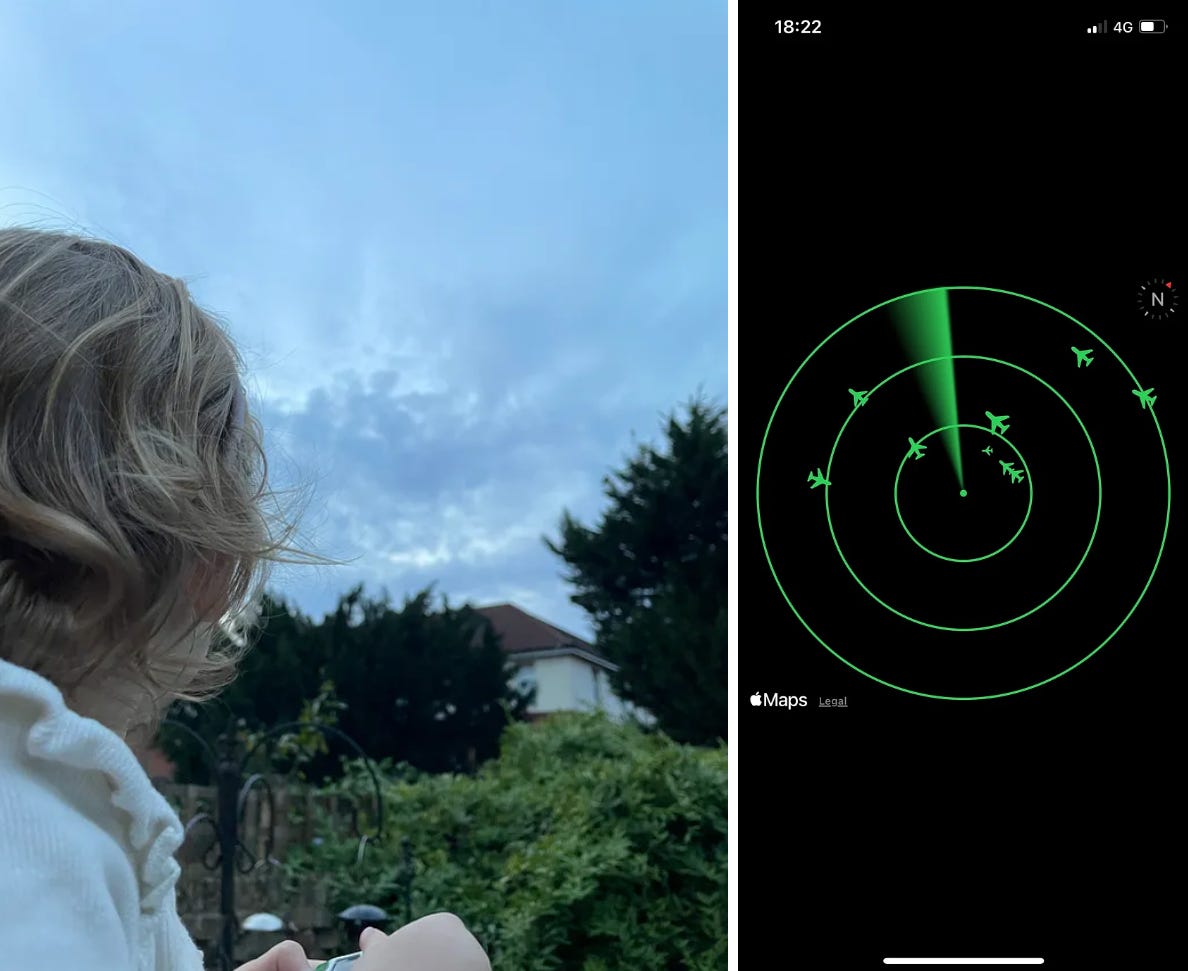
We’ve proven the concept, and put together an MVP that achieves the core initial goals we set out to do.
Now, we can start to think about putting it on the App Store.
From MVP to Product
I’m a big fan of Skeuomorphism. As such, I wanted to flex all my animation muscles to give this app the retro, toy-like quality I envisoned.
Making The Radar Pop
I was proud of the effect I produced on the radar.
The implementation is what I’d call “dumb genius”.
Originally, I thought about using trigonometry and timers — recolouring and fading-out individual map annotations whenever the line hit them.
But then I realised that my line was simply a 20-degree-wide angular gradient that went from green to clear.
What if it was a 360-degree wide angular gradient?
And what if this gradient went from green, to clear, to clear, to clear, to black?
private var radarLine: some View {
    Circle()
        .fill(
            AngularGradient(
                gradient: Gradient(colors: [
                    Color.black, Color.black, Color.black, Color.black,
                    Color.black.opacity(0.8), Color.black.opacity(0.6),
                    Color.black.opacity(0.4), Color.black.opacity(0.2),
                    Color.clear, Color.clear, Color.clear, Color.clear,
                    Color.clear, Color.clear, Color.clear, Color.clear,
                    Color.clear, Color.clear, Color.clear, Color.green]),
                center: .center,
                startAngle: .degrees(rotationDegree),
                endAngle: .degrees(rotationDegree + 360)
            )
        )
        .rotationEffect(Angle(degrees: rotationDegree))
        .animation(.linear(duration: 6).repeatForever(autoreverses: false), value: rotationDegree)
}
More often than not, the grug-brained solution works best.
I also found some weird visual artefacts from the map appearing in the corners of the screen when rotating the device too quickly — the overlay seems to be lazily rendering outside the map’s camera position.
Creating a black outline of the radar view with a reverse mask solved the issue (i.e. a black rectangle with a circular hole for the radar).
Making The Radar REALLY Pop
Our UI is looking pretty tidy now. But I wouldn’t yet call it retro.
I wanted to add a CRT-screen effect, with television scanlines, to make the app look like it was really drawn on an old radar scanner.
iOS 17 comes with support for Metal shaders built into colorEffect, so it implementing this effect is easier than ever before.
#include <metal_stdlib>
using namespace metal;

[[ stitchable ]] half4 crtScreen(
    float2 position,
    half4 color,
    float time
) {

    if (all(abs(color.rgb - half3(0.0, 0.0, 0.0)) < half3(0.01, 0.01, 0.01))) {
        return color;
    }

    const half scanlineIntensity = 0.2;
    const half scanlineFrequency = 400.0;
    half scanlineValue = sin((position.y + time * 10.0) * scanlineFrequency * 3.14159h) * scanlineIntensity;
    return half4(color.rgb - scanlineValue, color.a);
}
I might save digging into the C++ for another article. Feel free to steal it — most importantly, I created a view modifier that can apply the CRT effect to any view we like!
extension View {

    func crtScreenEffect(startTime: Date) -> some View {
        modifier(CRTScreen(startTime: startTime))
    }
}

struct CRTScreen: ViewModifier {

    let startTime: Date

    func body(content: Content) -> some View {
        content
            .colorEffect(
                ShaderLibrary.crtScreen(
                    .float(startTime.timeIntervalSinceNow)
                )
            )
    }
}
Note that this modifier, and the shader itself, take in a time parameter to make the scanlines move up rapidly and make the effect far more dynamic.
Non-Commercial Usage
While the OpenSky Network website is pretty clear, I wanted to be polite and sent a note to ensure my App Store listing would be fine under their policy.
They very kindly replied within 20 minutes!
Beyond Visuals
To help sell the experience of a radar, and also help a touch with accessibility, I added a little beep-boop system sound effect whenever the flights update .
private func fetchFlights(coordinate: Coordinate, retries: Int = 2) async {
    do {
        let flights = try await api.fetchLocalFlightData(coordinate: coordinate)
        await MainActor.run {
            self.flights = flights
            AudioServicesPlaySystemSound(1052)
            hapticTrigger.toggle()
        }

    // ...

}
Alongside the new sensoryFeedback modifier on the main view for some haptics:
.sensoryFeedback(.levelChange, trigger: hapticTrigger)What I realised now, however, is that this beep might get annoying to some people. So I should add a few customisation options.
Controls & Customisation
Firstly, a silent mode is in order.
But also, perhaps, a few simple other customisations with @AppStorage.
@AppStorage("silent") var silentMode: Bool = false
@AppStorage("showMap") var showMap: Bool = false
@AppStorage("userColor") var userColor: Color = .green
Now, uses can turn off the sound, and even turn off the radar overlay to see the map underneath.
Most importantly, however, since I’m building this for my kid, picking a custom color for the radar via the SwiftUI color picker is absolutely mandatory.
Finally, what’s life without an animated SFSymbol or two?
private func toggleableIcon(state: Bool, iconTrue: String, iconFalse: String) -> some View {
        Image(systemName: state ? iconTrue : iconFalse)
            .contentTransition(.symbolEffect(.replace))
    // ...
}
I think our app is ready for prime-time now.
I need to do a little bit of refactoring to move views into their own files.
Now the top-level AviatorView looks a bit like this:
// @State properties ...

var body: some View {
    ZStack {
        if let coordinate = locationManager.coordinateSubject.value {
            FlightMapView(
                cameraPosition: $cameraPosition,
                flights: flights,
                rotationAngle: rotationAngle,
                coordinate: coordinate
            )
        }

        TimelineView(.animation) { context in
            RadarView()
                .crtScreenEffect()
                .negativeHighlight()
        }

        ControlsView(errorMessage: errorMessage)
    }

    // onRecieve modifiers ...
}
The Aviator Mascot
Annoyingly, I stopped paying Midjourney last month, so I wrangled a free-for-non-commercial-use generator at Gencraft.
Fortunately, I managed to approximate my daughter in an aviator hat, which is precisely the look I was going for!

This also led to my most successful Tweet ever.

To The App Store!
I haven’t personally paid for the Apple Developer Program for years.
Look at this graveyard of discarded side projects.
Welp. I’m £79 down and ready to hit publish.
Fun fact: I’m targeting iOS 17 only. But I still need to supply screenshots for 6.5" and 5.5" iPhones. The latest 5.5" iPhone? The 8 Plus. Which has a maximum version of iOS 16. Yup. Fortunately, the good people at AppScreens allowed me to export for both sizes. But don’t get me started on re-scaling videos.
Our Final User Tests
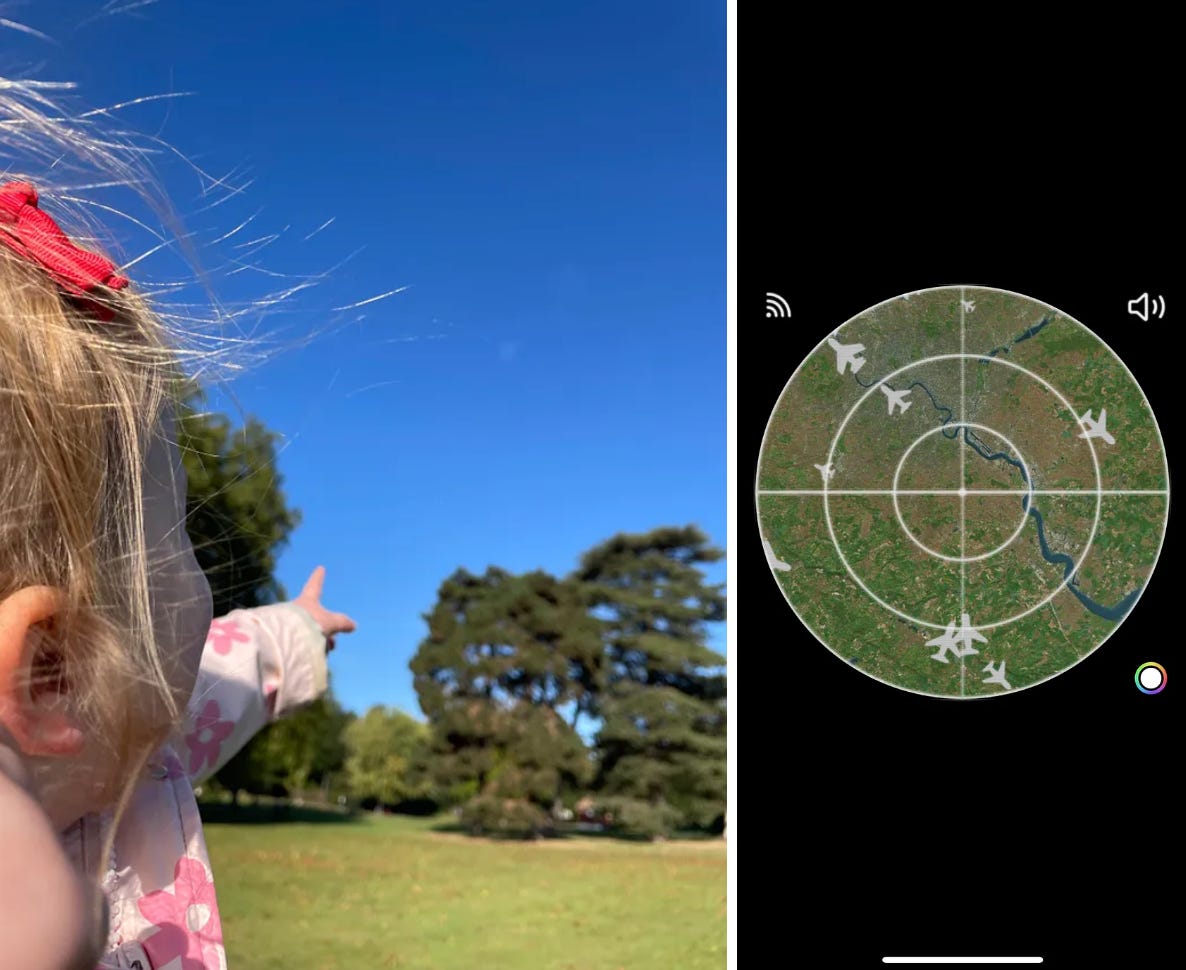
While we wait for Apple app review to work its magic, let’s run a few more rounds of weekend user-testing with my toddler, who’s absolutely delighted that she can now pick her own colour for the UI.
Saturday Morning
Saturday Evening
Sunday Afternoon
And It’s Online!
Want to download the app yourself?
Go to Aviator — Radar on your Phone now (and don’t forget to rate)!
Next Steps
I’m pretty happy with what I put together in a few evenings over a week. It’s been ages since I picked up a side project, and making a fun toy for my daughter is the most fun I’ve had coding in years.
After this write-up, I’ve got a few features in mind in my mini-roadmap for the next release:
Add zoom levels to the map to restrict the radar to closer aircraft only.
Use the advanced version of the OpenSky Network API to show helicopters, satellites, and airplane size classes.
Toggle origin & destination country display on airplanes.
Improve the CRT screen effect with more advanced Metal shaders.
Refactor all the controls into a resizeable progressive-disclosure pull-out modal with detents.
Implement slider controls to filter out certain distances & heights — e.g. to hide all low-down, far-off aircraft.
Implement “zany mode” which renders UFOs, giant bugs, and aliens on the radar.
If you have any ideas of your own, or simply some feedback, please let me know in the comments!


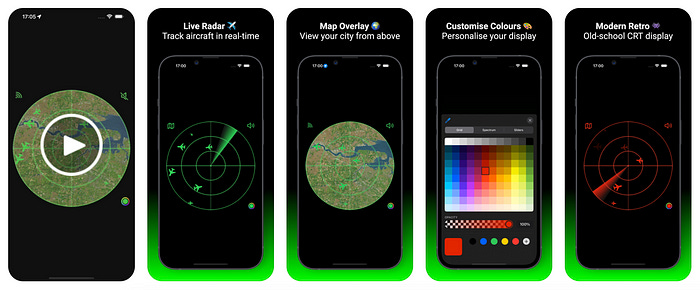


What a lucky daughter!
This is amazing. FYI, I believe it might be a paid feature of the flight radar app, but if you hit "AR", you get a mode where if you point it at the sky it overlays information about the planes you see onto your current camera view, there's an example here: https://www.flightradar24.com/blog/introducing-the-all-new-flightradar24-mobile-app/ -- It's great if you live under a major airway.