
Fitting the Lapse experience into 15 MegaBytes
How we optimised the world's most complex app clip

Today we’re going to explore how we optimised the Lapse app clip to fit into 15MB. Once we got past the low-hanging fruit, there were trickier size optimisations to work through. To get over the finish line, we had to apply some more hacky tricks.
Subscribe to Jacob’s Tech Tavern for free to get ludicrously in-depth articles on iOS, Swift, tech, & indie projects in your inbox every week.
Full subscribers unlock Quick Hacks, my advanced tips series, and enjoy my long-form articles 3 weeks before anyone else.

At Lapse (the series A social media startup I work for), we’re constantly evaluating new iOS technologies to make our social media app more fun, more engaging, and more viral.
The app clip we built for our Rolls feature contains the core experience of our social photo-sharing app, and is almost certainly the most feature-rich app clip ever created.
The challenge?
The app clip was limited to just 15MB.
We achieved this via a 5-stage optimisation process:
An architectural overhaul to fix our dependency graph.
Nice, easy optimisations to pick low-hanging bundle-size fruit.
Painful, difficult optimisations to grind our app clip towards the size limit.
Awful, hacky optimisations to narrowly inch our app clip size over the line.
Setting up automation to catch size regressions before they block a release.
Today we’re going to look in detail at how we applied these optimisations to bring our app clip down to 15MB.
These techniques aren’t limited to app clips—you can apply the same approach to achieve size efficiency to your own apps, and potentially win a dramatic increase in the conversion rate from app store listing to download.
Wait a second, what’s an App Clip?
An app clip is a fast-loading lightweight iOS experience that offers features without requiring a full app install—they can be downloaded via hyperlinks, QR codes, or NFC tags.
App clips are increasingly popular for single-use quick tasks like paying at gas stations, using car parks, renting an e-bike, or ordering from restaurant menus.
They can be created in your existing iOS projects by creating an App Clip Target. Usually this target will import the modules corresponding to features you want to make available.
Rolls
Rolls is a shared photo album you create with your friends. The twist with Lapse is that you are kept in the moment: the photos you take aren’t visible until a time period has Lapsed (hence the name).

The cornerstone of this feature is a viral growth mechanism: the QR code on the lock-screen widget. You can create a Roll, then ask your friends to scan the QR code from your lock screen. Scanning this presents the app clip installation, where your friend can download the Rolls app clip and immediately contribute to the shared album, without having to install or onboarding to the whole app. This mechanism was designed as a low-friction way to introduce Lapse to friends at parties, holidays, and events.
This QR code led to the biggest technical challenge in building Rolls: Apple decrees that, to work via QR code, the app clip install size must to be under 15MB.
If we decided to use hyperlinks, this limit jumps to 50MB—a much looser constraint. But in the social media game, a tiny bit of friction is the difference between a few dozen shares and explosive viral growth. We were going with QRs.
Optimising the Dependency Graph
There was an elephant in the room of our app clip dream: Realm.
Lapse wants to replace your default camera, so everything needs to work offline. Therefore, we have a strong dependency on this persistence framework for data-related tasks.
Unfortunately, the Realm library alone was 16MB, meaning we had to re-architect our modules to decouple from a specific persistence framework.
Our Architecture
At Lapse, our app’s modular architecture is loosely based on The Modular Architecture from our friends at Tuist. In short, each feature module is actually 2 modules: an API contract, then the feature implementation itself.

This allows features to import each other and navigate between screens without creating circular dependencies. For example, when a screen inside uRollsFeature wants to navigate to the camera screen in uCameraFeature, it only needs to import uCameraAPI. This API contract contains a screen factory interface, which is implemented in uCameraFeature.
These Feature modules are dependency-injected at the top level of our dependency graph. This architecture keeps our build times fast because changes to an implementation module like uCameraFeature doesn’t invalidate uRollsFeature, or other parts of your dependency graph—since they only depend on the API.
If you aren’t familiar with interface targets and build times, this is a great primer from SwiftRocks.
Decoupling From Realm
The problem is that our feature implementation modules all imported the Realm libraries, creating a tight coupling to this hefty dependency.

To square this circle, we needed to introduce complexity to our dependency graph: splitting our Feature modules into a UI layer (FeatureUI) and a data access layer (FeatureImpl).
This allows us to use the same screens in the UI module for the main app & the app clip, but swap out the Impl modules to replace Realm with Core Data—a system framework with zero impact on bundle size.
Both the UI and Impl modules import the same API, so we can add data access layer protocols to the API (like CameraDataService and RollsDataService)—therefore our UI module can still contain all the view logic—only the data is swapped out.
Now, the modular structure for our Rolls features looked like this:

Our app clip mirrored this structure, with swapped-out AppClipImpl modules:
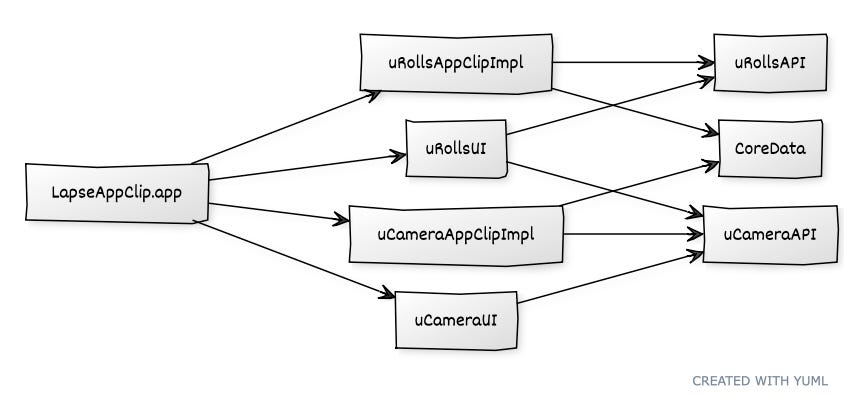
This means all our API protocols, UI code, and view logic is shared. The only difference between the app and app clip lies in the implementation files that manage the data access layer—either Realm or Core Data.
The APIs and Impl modules eventually included our navigation logic as well, allowing us to implement different screen navigation on the app clip. This allowed us to present a StoreKit overlay prompting a user to download the full app whenever an app clip user tried to access a feature outside Rolls.
While this dependency graph has become pretty complicated, the process of wiring the modules together became fairly straightforward with the help of Tuist—we could template this dependency graph structure to automatically set it up for any new module.
The Initial App Clip
Flash forward a few weeks. We’ve built the core Rolls experience with this novel modular architecture, and we’re ready to start optimising.
The initial analysis shows things aren’t too bad to start with: our app clip bundle clocks in at 21MB. For an unoptimised app, a 40% bundle size haircut isn’t totally crazy. We should be able to do this.

The 15MB limit is for install size, not download size.
This was a little annoying, because app clip size limits are designed to facilitate a speedy download. Setting the limit for install size (usually at least 2x larger than the compressed .ipa download size) felt a bit arbitrary.
Oh well.
I performed a simple analysis of some potential opportunities for bundle size optimisations, including:
What we might be able to optimise
How much space each change will save
The effort level (both for the initial optimisation and any maintenance)
I brought it back to the team, we agreed on priorities, then I got to work.
Nice, Easy Optimisations
Assets & Fonts
The biggest opportunity for bundle size optimisation is almost always assets:
Minimise use of images and videos.
Offload what you can to the network.
Compress the rest.
These usually involve negotiations with your product and design teams. We can’t offload everything to a CDN, because what if users are onboarding somewhere with spotty internet? Some compression is great, but we don’t want our onboarding videos full of distracting compression artefacts.
We’d been pretty careful when building Rolls, so we didn’t have many big image or video assets remaining in the bundle.
Fonts were a different story: our app clip (and our main app, since they shared our UI library) had several sparsely-used font files from old design systems. This was a pretty simple negotiation with design, deleting several and occasionally substituting with a more commonly-used font.
Deleting several fonts from the UI library, we shaved off 600kB.
Binary Symbols & Metadata
If you look closely at each framework in our bundle, they all contain a String Table. These are binary symbols, metadata used for debugging. Since Xcode 14, this metadata is left bloating release builds by default.
This app clip includes hefty string tables for each dynamic framework. We can add a build script that iterates through each framework and removes these symbols using the UNIX strip command.
strip -rSTx Apollo.frameworkBinary symbol metadata is a similar piece of cruft that shows up in your binary. It’s more metadata to help facilitate linking modules together dynamically. This isn’t necessary in app binaries, because nothing will link against them. This binary symbol metadata can be striped using Xcode linker flags:
-Wl,-exported_symbols_list,/dev/null
All in all, clearing out this cruft saves us a stonking 2.8MB.
Swift Optimisation Mode
Swift itself provides a way to reduce the size of our bundle: optimisation modes. While the default release build performs speed optimisations, we can set a flag to request the compiler optimises for a smaller binary size instead.

This disables several of the aggressive code-level speed optimisations performed at the SIL stage such as loop unrolling and inlining. This optimisation mode had a modest but helpful impact, saving us about 300kB.
Dynamic vs Static
When you build a Swift app, dynamic libraries are compiled independently from other modules, because they are linked to the executable at runtime.
Dynamic libraries therefore miss out on some size optimisations such as dead-code stripping, because the Swift compiler can’t know which functions will be mapped into the app process at compile-time.
The Factory library used for dependency injection is a great example: as a dynamic framework, alongside all the framework metadata, it is 200kB overall. When linked as a static library, it took up a minuscule 15kB.
Why were we using dynamic frameworks at all?
Dynamic frameworks are extremely useful when you want to avoid duplication in your app bundle. If you have multiple targets, such as the main app plus a widget, you might import a shared library into each target. If the library is statically linked, it will be duplicated into every target individually. Frameworks, conversely, will not be duplicated, saving overall bundle space.
This led us to defy the standard dogma: we changed some frameworks to static libraries in order to save space, because the individual modules are smaller in the app clip, which we are focusing on. We accepted the trade-off: that these libraries may be duplicated in the main app bundle and other targets.
Overall, statically linking most of our dependencies saved 400kB.
If you want a primer on how linking behaves in your apps, check out my recent work:
Static, Dynamic, Mergeable, oh, my!

If you want to embarrass a senior iOS engineer, ask them to explain the difference between Dynamic Frameworks and Static Libraries.
With these nice and easy optimisations, we’ve taken the app clip down from 21.0MB to 16.9MB. The end is in sight—only a couple more megabytes to go.
Now we’d picked the low-hanging fruit, it’s time do some hard work.
Painful, Difficult Optimisations
Removing Dependencies
My original analysis checked the dependencies we imported into our app clip. Several libraries such as Nuke for image loading and caching, Apollo to handle our GraphQL APIs, and Mixpanel for analytics.
We considered forking these to remove any parts of the library we don’t use, but decided against it—the maintenance burden of keeping these forks working (let alone keeping up with security patches) was not going to be worth it. Regardless, switching them to use static linking got us most of the way there, since dead code was being stripped out anyway.
There were a few libraries which we didn’t need, which we might be able to remove if we either gave up on certain behaviours, or re-implemented them ourselves.
We had a few false starts—I spent some time trying to fork Pointfree’s Swift Identified Collections, but it used too much of its sub-dependency to be worth the effort. In the end, we managed to cut the Motion and Hero libraries from the app clip, rolling our own gesture animations and custom screen transitioning delegates respectively.
These library optimisations cut 600kB from the app clip bundle size.
Splitting Up The Rolls Module
I always knew this was on the cards, but I put off this optimisation as long as possible: splitting our Rolls feature module into two. One for app-clip-only screens, then another for screens that only feature in the full app.
Other than the time and complexity overhead of creating a module, this was going to be painful for 2 reasons:
There were a number of shared services, models, and utilities in the Rolls module which were used by all the screens, that would have to be refactored somewhere.
All my teammates were working on Rolls screens, so I had to work quickly, and ask them not to merge anything while I did this.
I cashed in some tech debt for speed: I dumped all the shared services into another new module to avoid individually having to appraise each model or service function to find where it belonged. In an arthritic whirlwind of file refactors, partial compilations, and Tuist configuration errors, I managed to split uRolls into uRollsLite and uRollsExtended in an afternoon.
It was worth it: taking half the screens out of the bundle knocked off 900kB from the app clip.

We were close to the line now, with a couple of really nasty tricks up my sleeve.
Awful, Hacky Optimisations
Forking a Library
As part of our onboarding, we use PhoneNumberKit to help validate phone numbers and country codes. This library was useful, but pretty badly optimised—it included two large metadata files in the bundle containing every global phone number format.

Not only was this redundant (it had the same data in JSON and XML format), but Lapse only operates in a dozen or so markets, so we don’t need most of this metadata in our bundle.
We created a local fork of the library, deleted the XML, then manually slimmed down the JSON so it only included the locales we needed. For good measure, we offloaded this JSON file to our CDN to fetch it remotely.
This library fork saved us 700kB in the app clip bundle.
Font Hacking
This was my favourite optimisation of the bunch, but is also probably the nastiest code I’ve written.
We used SFCompact to display user-defined Roll names. Our designers were clear on keeping this.
Unfortunately, the .otf font file was almost 500kB. Looking at the file on FontForge, it was clear why. The file contained glyphs for virtually every alphabet.

Again, we aren’t operating in that many markets, so this is overkill. With FontForge, we re-encoded the file down to Latin characters.

This saved 400kB, but had a tricky second-order impact: users were able to type the name of the Roll displayed in this font.
On iOS, the system falls back to default 17pt SFPro font for any missing characters, so it doesn’t look too bad when you spam áccented or ümlatted characters.
But for the last step, we can do a little better than that—we want to make it as close as possible, and define a specific font size and weight for the fallback font. I first tried setting this fallback with the high-level UIFontDescriptor.AttributeName.cascadeList, but it didn’t work when I adjusted font size.
I had to reach for the low-level CoreText APIs to build an attributed string character-by-character.

This iterates through the characters in the string and checks whether the glyph is available in the font file. If not, it adjusts the attributed string to use another font for the range of the missing glyph.
We’ve achieved our goal!
Through these combined optimisations, the Rolls app clip is now a tidy 14.3MB.

Now we need to roll some automation to ensure we don’t slip over the limit again.
Staying below the limit with Automation
Without keeping on top of size, we risk causing a serious production incident in the future. Apple tells you pretty clearly in App Store Connect whether your main app bundle exceeds the 200MB cellular download limit, but you get no such warning about an app clip going past the 15MB QR-code-scanning limit.
Without keeping tabs on this, we risked unexpectedly breaking the feature.
We approached a solution by bolting a script onto our existing QA-build CI infra.
When you export an app archive to TestFlight or the App Store, it creates a text file alongside the .ipa and other export artefacts: App Thinning Size Report. This contains the install and download size of each thinned variant (1x, 2x, 3x, and universal), for both the main app bundle and any app clips.
To automate, we simply ran a script that checks this report for the biggest app clip size variant, and posted a message to Slack.

Now, every time we build, we can be confident we aren’t breaking the app clip. Any time we go close to the limit, we can prioritise further optimisations to keep everything working smoothly.

Conclusion
It wasn’t easy to fit the Lapse experience into a 15MB app clip.
There are lots of simple optimisations available to begin with, such as stripping metadata from the binary, removing and offloading unnecessary assets, setting the Swift compiler optimisation mode, and being thoughtful about linking modules dynamically or statically.
Once you get through the low-hanging fruit, there are trickier options to play with. Removing and re-implementing libraries. Splitting up modules into separate entities. Overhauling your entire architecture so we can use a system persistence framework instead of a large dependency.
To get across the finish line, you might need to do something hacky like forking and offloading metadata from a library, or manually editing a single font file to fit it into the bundle.
But the end result makes it worth the effort: a fantastic app experience you can frictionlessly share with your friends.
Thanks for Reading Jacob’s Tech Tavern! 🍺
If you enjoyed this, please consider paying me. Full subscribers to Jacob’s Tech Tavern unlock Quick Hacks, my advanced tips series, and enjoy my long-form articles 3 weeks before anyone else.

Great post. What tool did you use to produce that tree graph?