
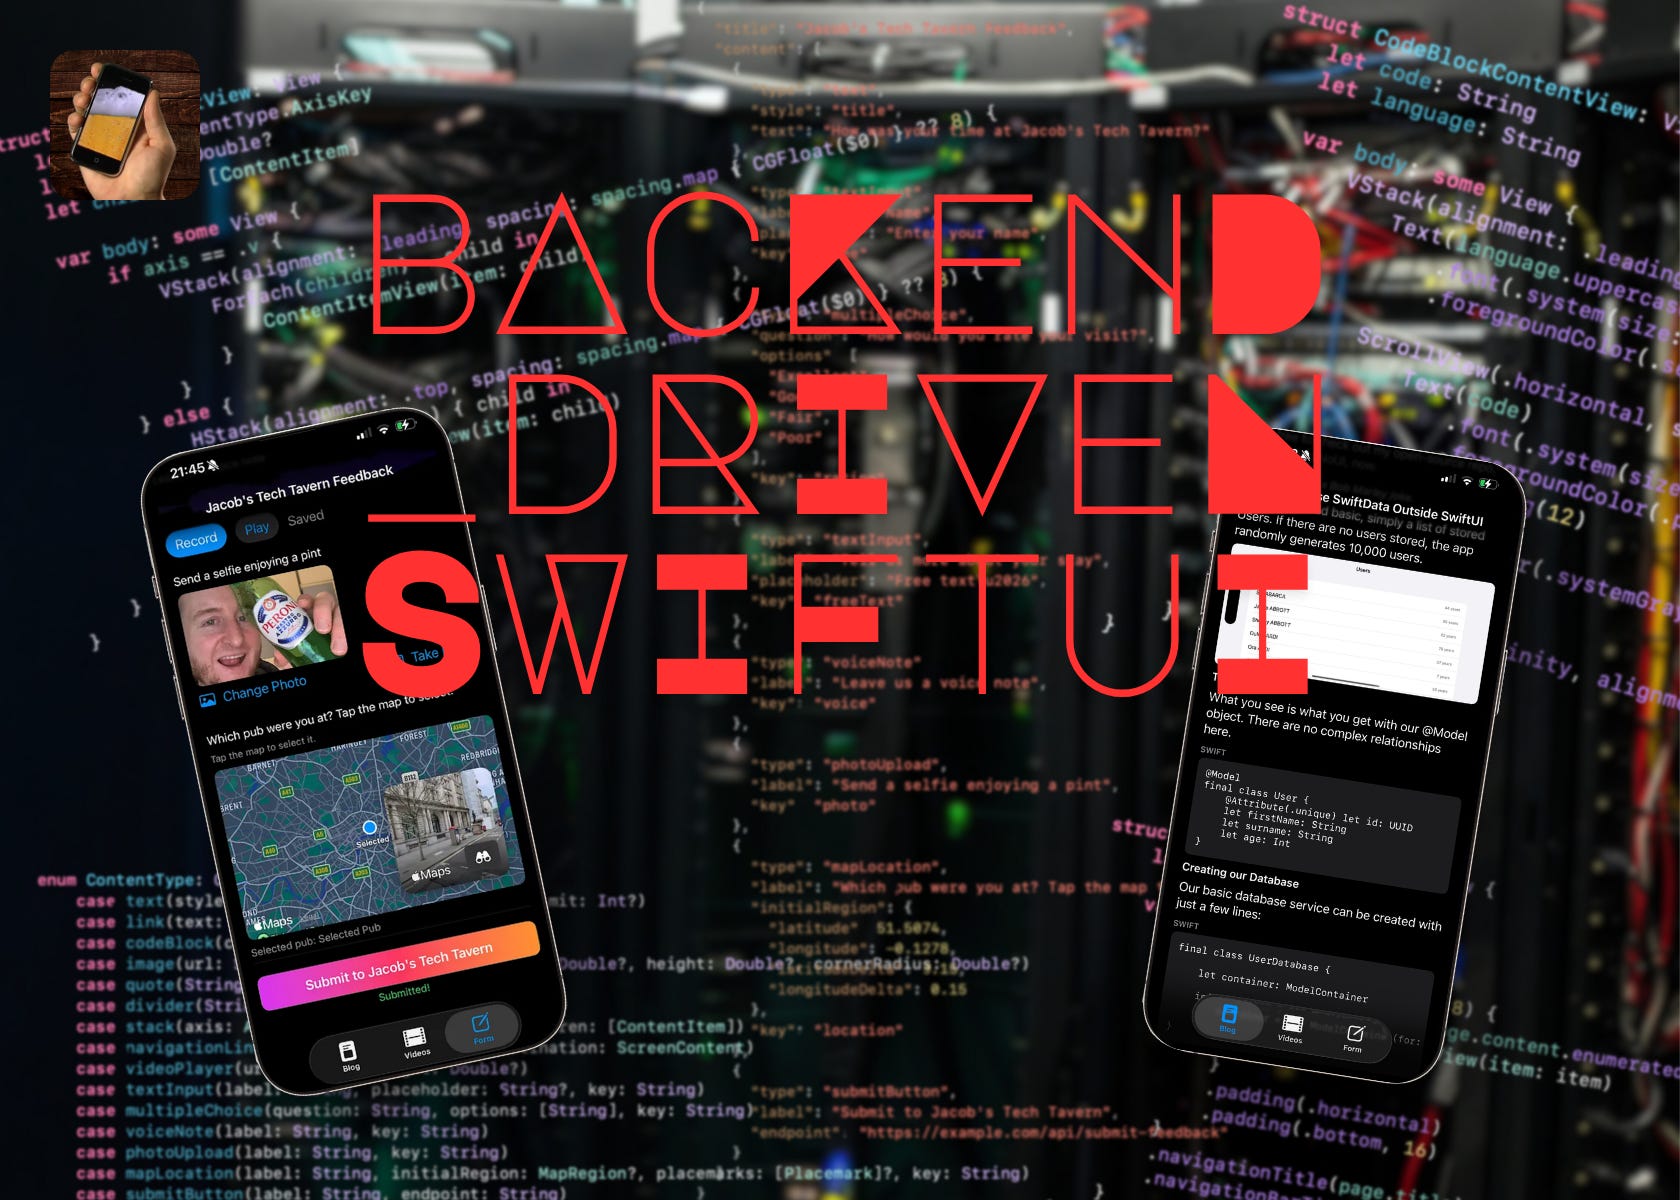
Backend-driven SwiftUI
Spec ultra-flexible UI that updates in seconds, not hours

Backend-driven UI is older than most of our careers.
Perhaps older than most of us, full stop.
In the early web, the server told the browser exactly what to render, returning static HTML for a given URL. Layout and data flow sat server-side dictated by the PHP, Django, or Rails application. The client just rendered what it was told.
Gradually, in the 2000s, Ajax and jQuery introduced some client-side dynamism, but the front-end framework explosion of the 2010s placed nearly all the logic and rendering browser-side, with APIs and JSON replacing HTML.
Along came mobile apps in 2008.
These are one of the thickest clients imaginable, designed to run as a standalone computer program. Backend-driven UI can feel… alien. But this tool can be incredibly powerful when used judiciously.
Backend-driven UI, a.k.a. server-driven UI, is a little fuzzy to define. If your app connects to the internet, and displays some nicely-formatted JSON data, your UI is being driven by the backend.
(I’ll try to avoid being a pedantic jerk now). Your UI is backend-driven when the backend sends information about the structure of your screen as well as the content.
Backend-driven SwiftUI has 2 parts: a small, tightly-scoped DSL (domain-specific language), and a flexible parser that renders the content as views.
Confused? Good. It’ll become easy once you see the first example. The trick is balancing power, flexibility, and simplicity: nobody wants you to re-implement HTML from scratch.
Today we will:
Learn why you might want to introduce backend-driven UI
Define a minimal JSON-encoded DSL to render a static blog post.
Introduce layout composition and navigation to render a Netflix-style video feed (from the exact same base screen).
Build a fully-interactive form that posts multimedia data to an API.
Close with some sanity checks around when backend-driven UI is actually worthwhile.
Subscribe to Jacob’s Tech Tavern for free to get ludicrously in-depth articles on iOS, Swift, tech, & indie projects in your inbox every week.
This Black Friday, I’ve bundled my big tentpole paid-only masterworks on Swift Concurrency for over 55% off until the end of November.
There’s a lot of code here, so I’ll ruthlessly redact to keep things readable. Grab the repo if you want to remix my work for yourself: https://github.com/jacobsapps/BackendUI/
Why would you want Backend-driven UI?
You certainly don’t want your entire app to be backend-driven (except in a couple of edge cases I’ll explain soon. If you find yourself doing this, you’re probably making life harder for yourself, when you could just be building a webapp. It’s the AI age, just ask clanker to write it for you.
But there are a few very compelling reasons you might want some of your app to be backend-driven:
Ship changes without app review. This is the big one. 2.5.2 forbids the download of executable code, but a JSON DSL is simply data interpreted by your local rendering engine, and so is entirely kosher. Updating the JSON files on the backend means your changes appear in seconds, instead of waiting hours (or days!) for app review.
Decouple changes from engineers. There’s a ton of promotions, paywalls, A/B tests, or content which your product and marketing folks want changed. And they’ll want to make it your problem. Teach them the DSL and tell them to leave you alone. Switch off the lights on the way out, buddy.
Rapidly iterate and test variants. This can turbocharge your A/B testing to more quickly try out variants and optimise your app. Yes, this reason is sort of a cop-out amalgamation of the above 2 points.
Multi-tenant white labelling. The logical conclusion of backend-driven UI is shipping a single app binary for many different brands, with feature sets driven entirely by remote config files.
Smaller binaries. If you have a ton of content, and you keep the DSL and rendering engine tightly scoped, you can ship complex working apps with a single screen of code. This only works for relatively simple apps, naturally.
It’s likely you already use some backend-driven functionality in your app today. Any kind of complex dynamic social media feed, personalised storefront, or multimedia chat will include an infinitely-scrolling menagerie of different types of view. You probably won’t be calling this backend-driven UI, but it is.
I’ve built backend-driven UI’s a couple of times. In my first startup, Carbn, the users insisted in testing that they would become a DAU if we included educational content*. We diligently introduced a flexible set of up-to-date personalised educational content.
*(they were lying)
Previously, when I worked in consulting, we also built an internal app for industry news. This one was cool because admin users could update the app content by directly adding DSL components to screens. But I am pretty sure that, like 99.9% of internal apps, it was never used. We should have spoken to users. Or, I guess, maybe not?
Okay, primer done. Let’s start with the least surprising, most useful, thing first.
Building backend-driven UI
Phase #1: Static Content
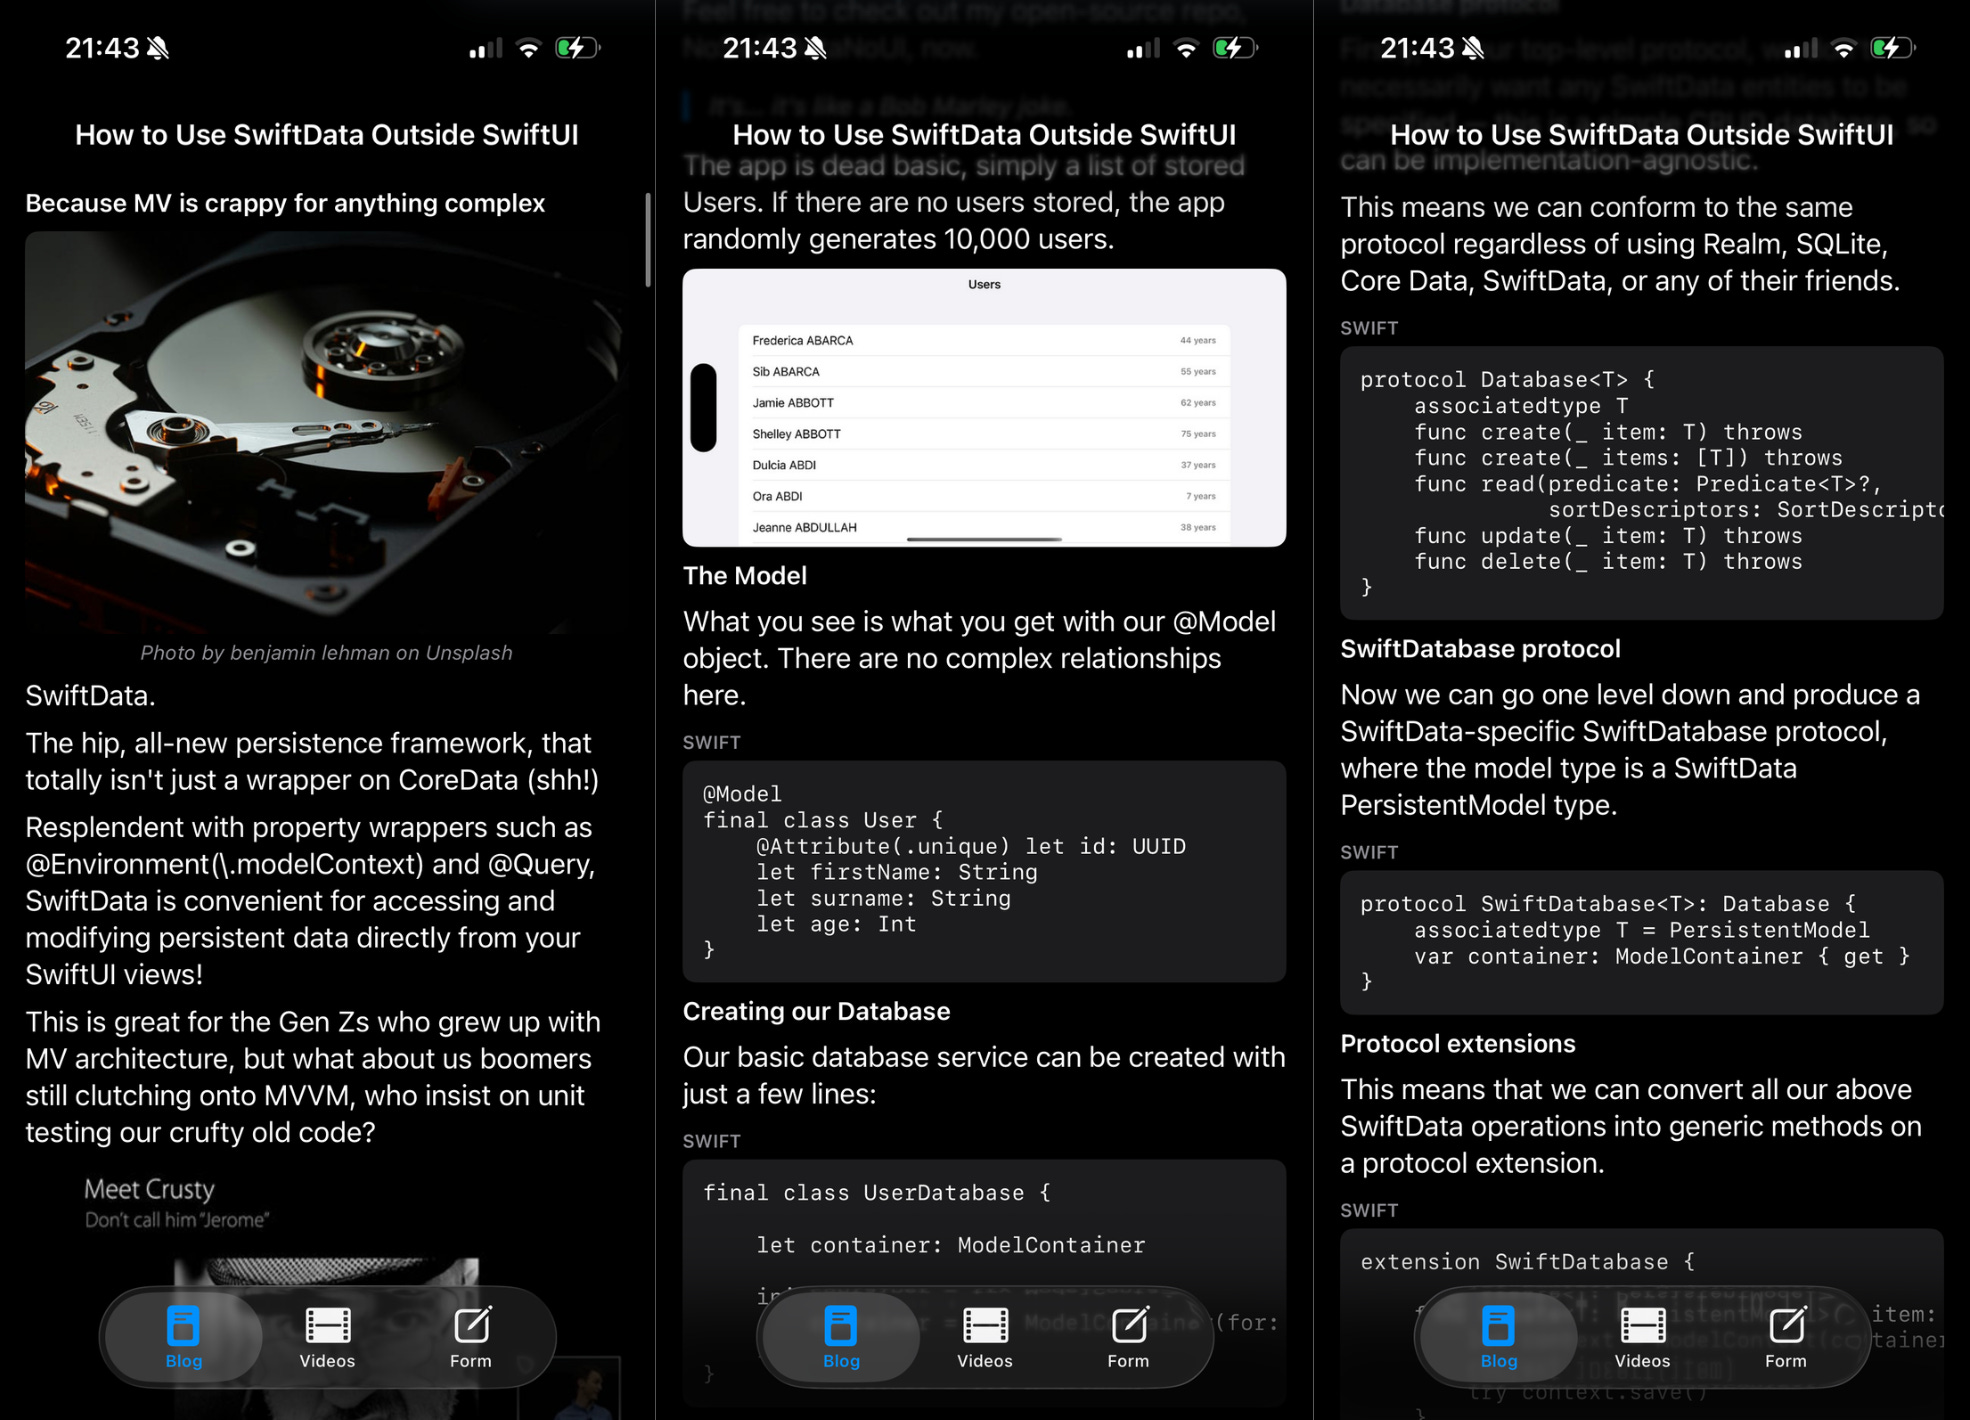
This tab renders a static content, with a number of types of media: rich text, code blocks, images, and titles.
We begin our small DSL with ContentItem, which stores an ID (for view diffing) and a ContentType. This is an enum that defines every kind of view we might want to render, for example text, code blocks, or images.
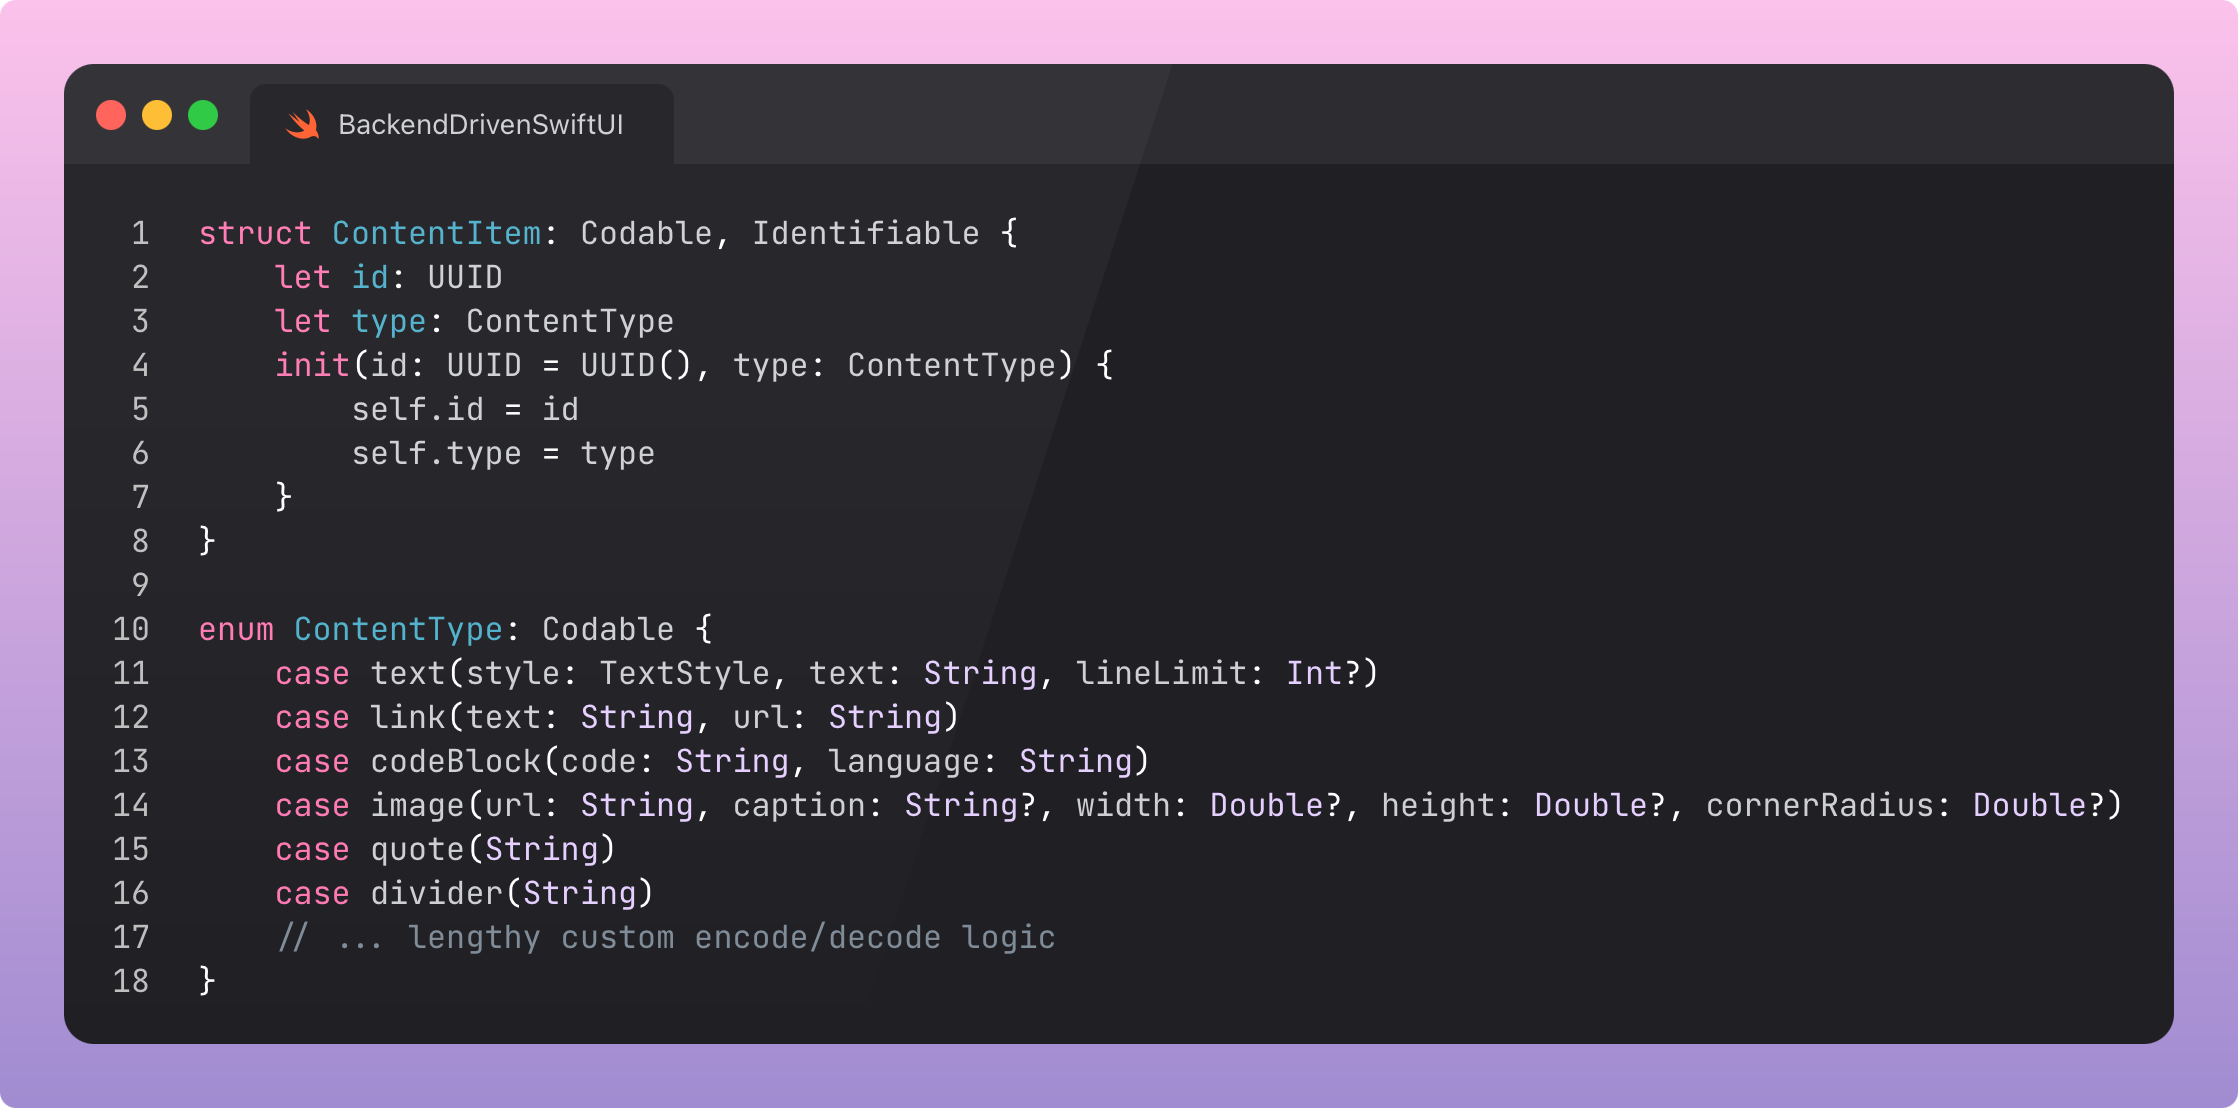
This is where Swift really shines. We add associated values to the enum to define the ‘contents’ of the view, plus customisation options.
For example, ContentType.text has the text itself, plus dynamic type style and a line limit for multiline text. This provides ergonomics that allow many combinations of types without exploding the API surface of the enum.
The actual screen renderer is intentionally quite mundane:
We pass a page with a title and an array of ContentItems. The renderer displays them as a feed, with the classic ScrollView, LazyVStack, and ForEach.
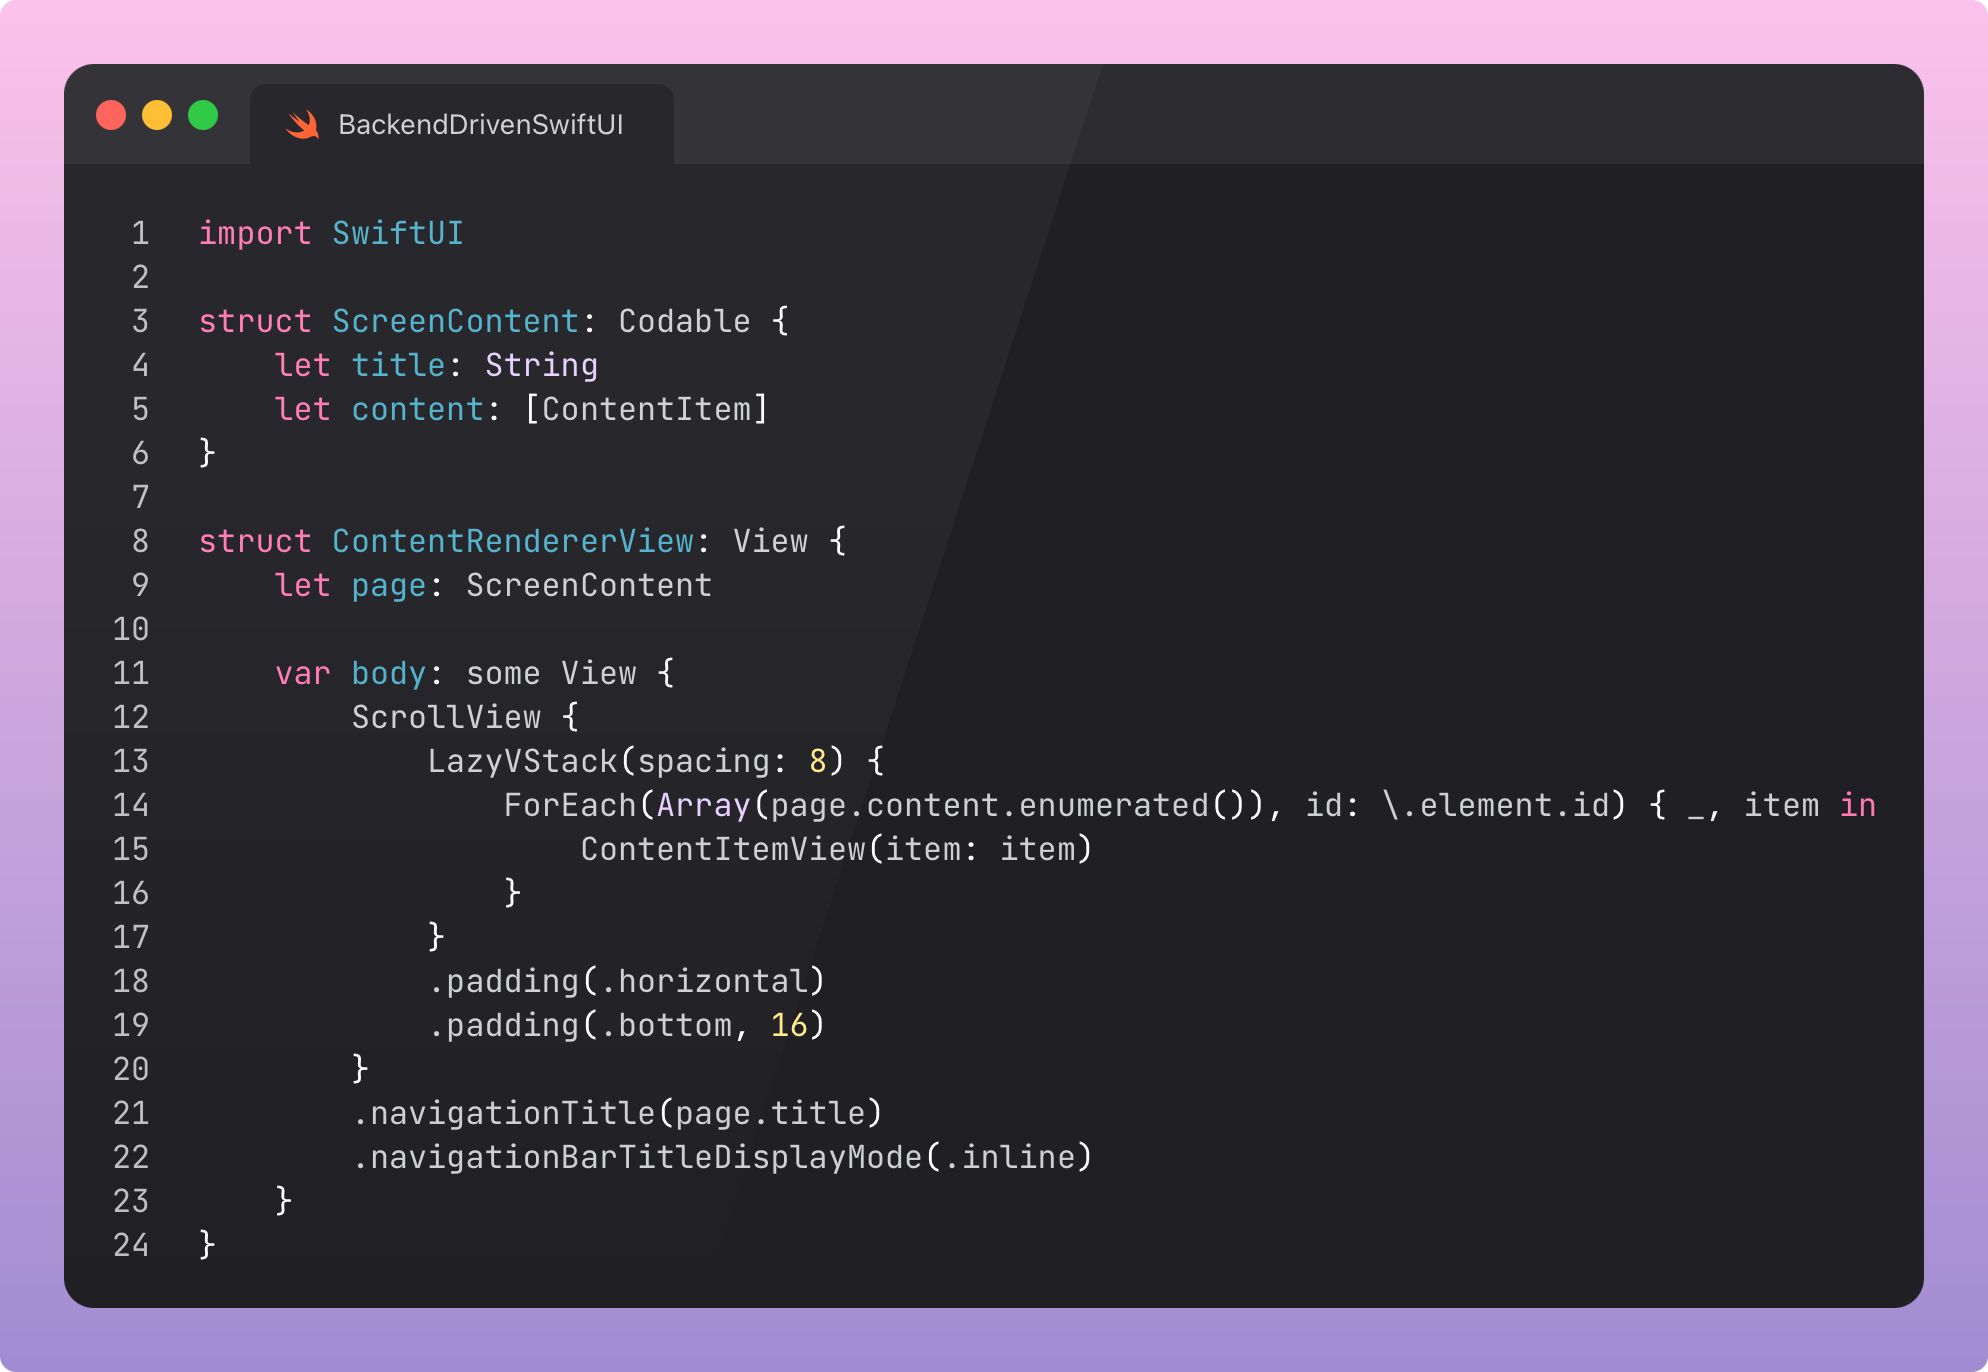
The heart of the renderer is ContentItemView, that renders the view based on the ContentType. One big bloody switch statement. It is simple, fast, and explicit.
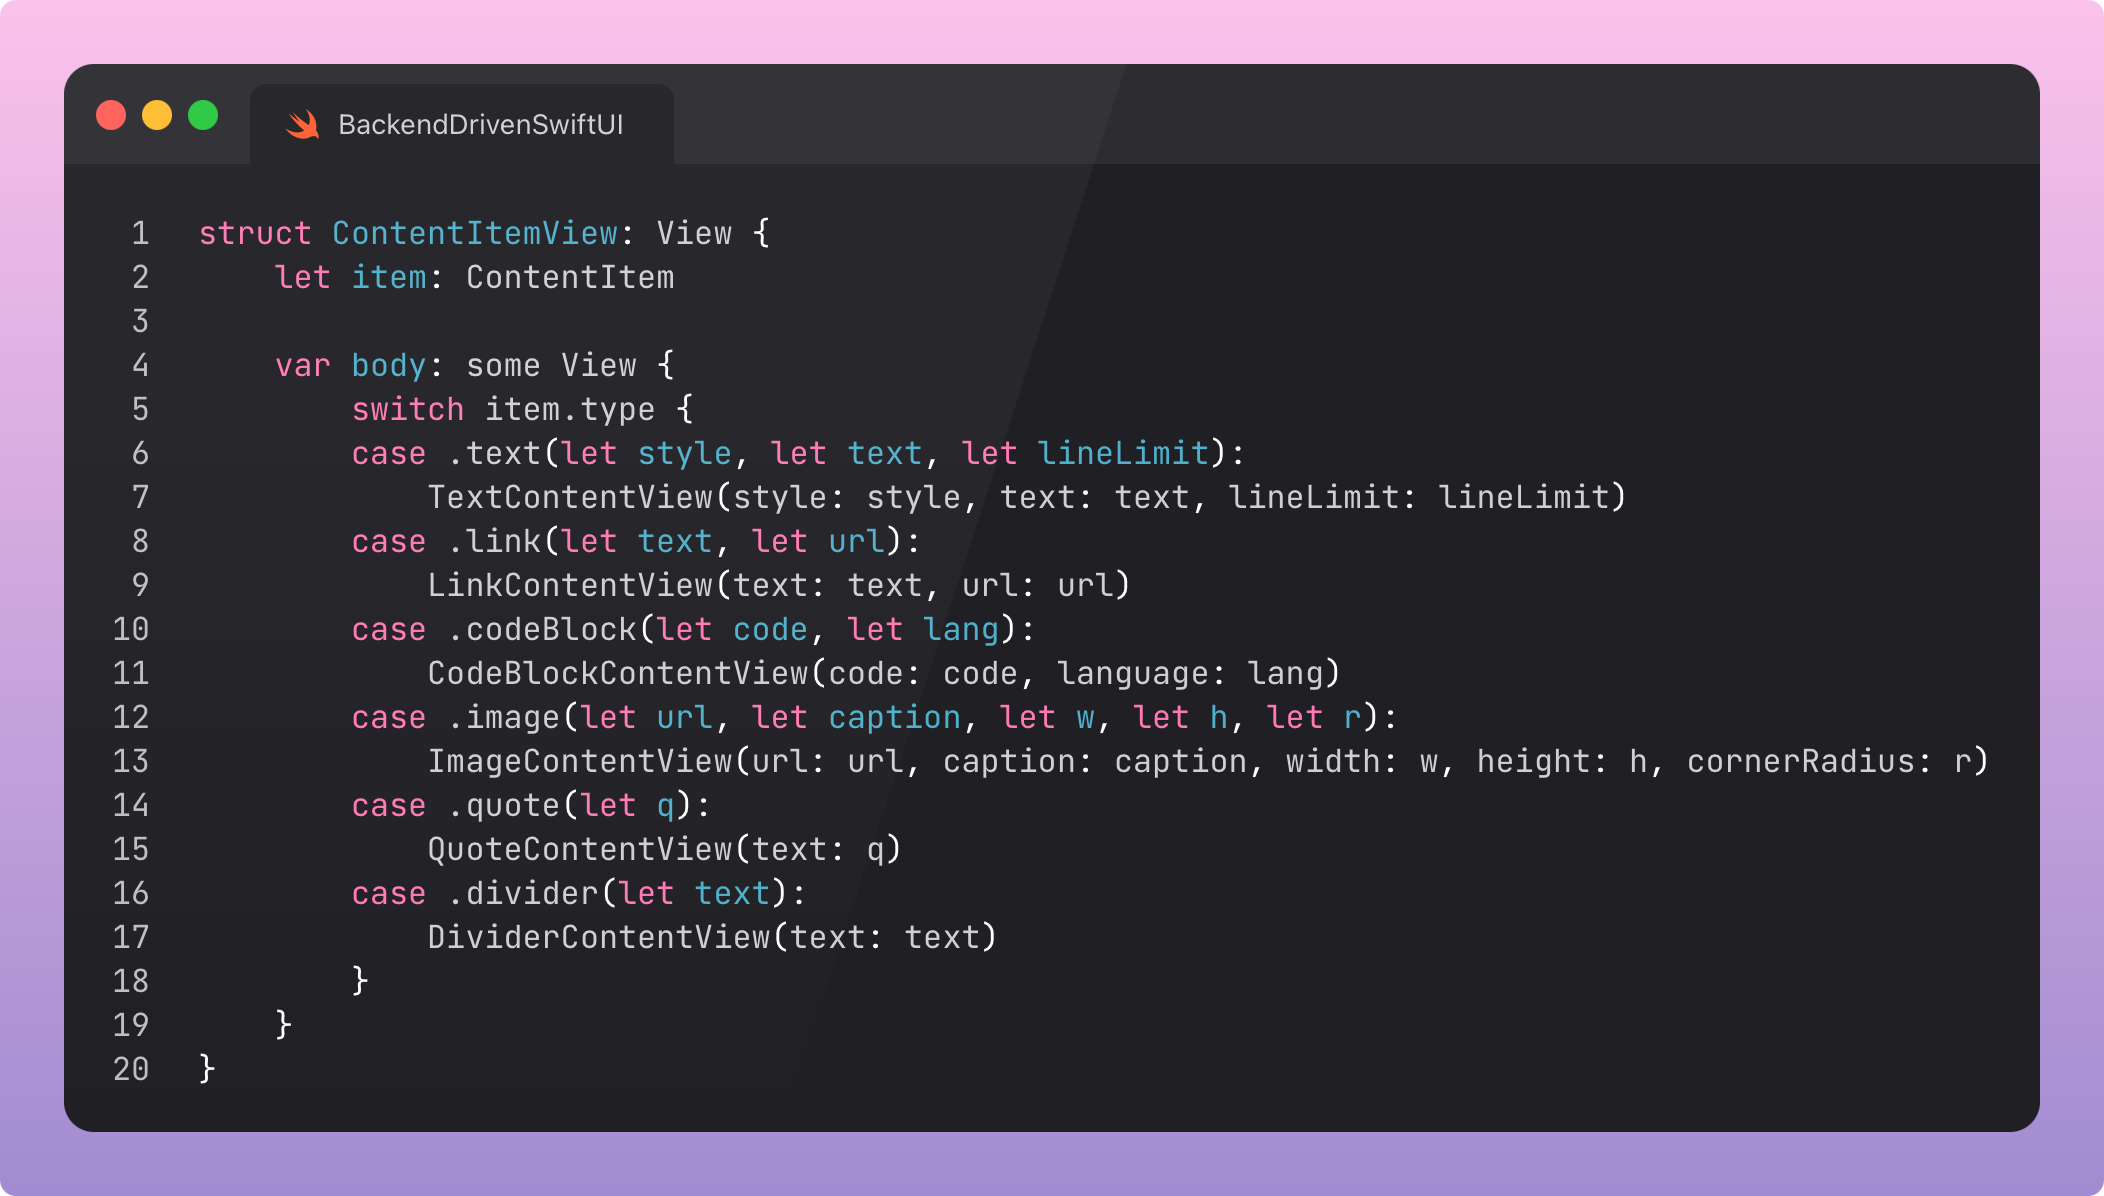
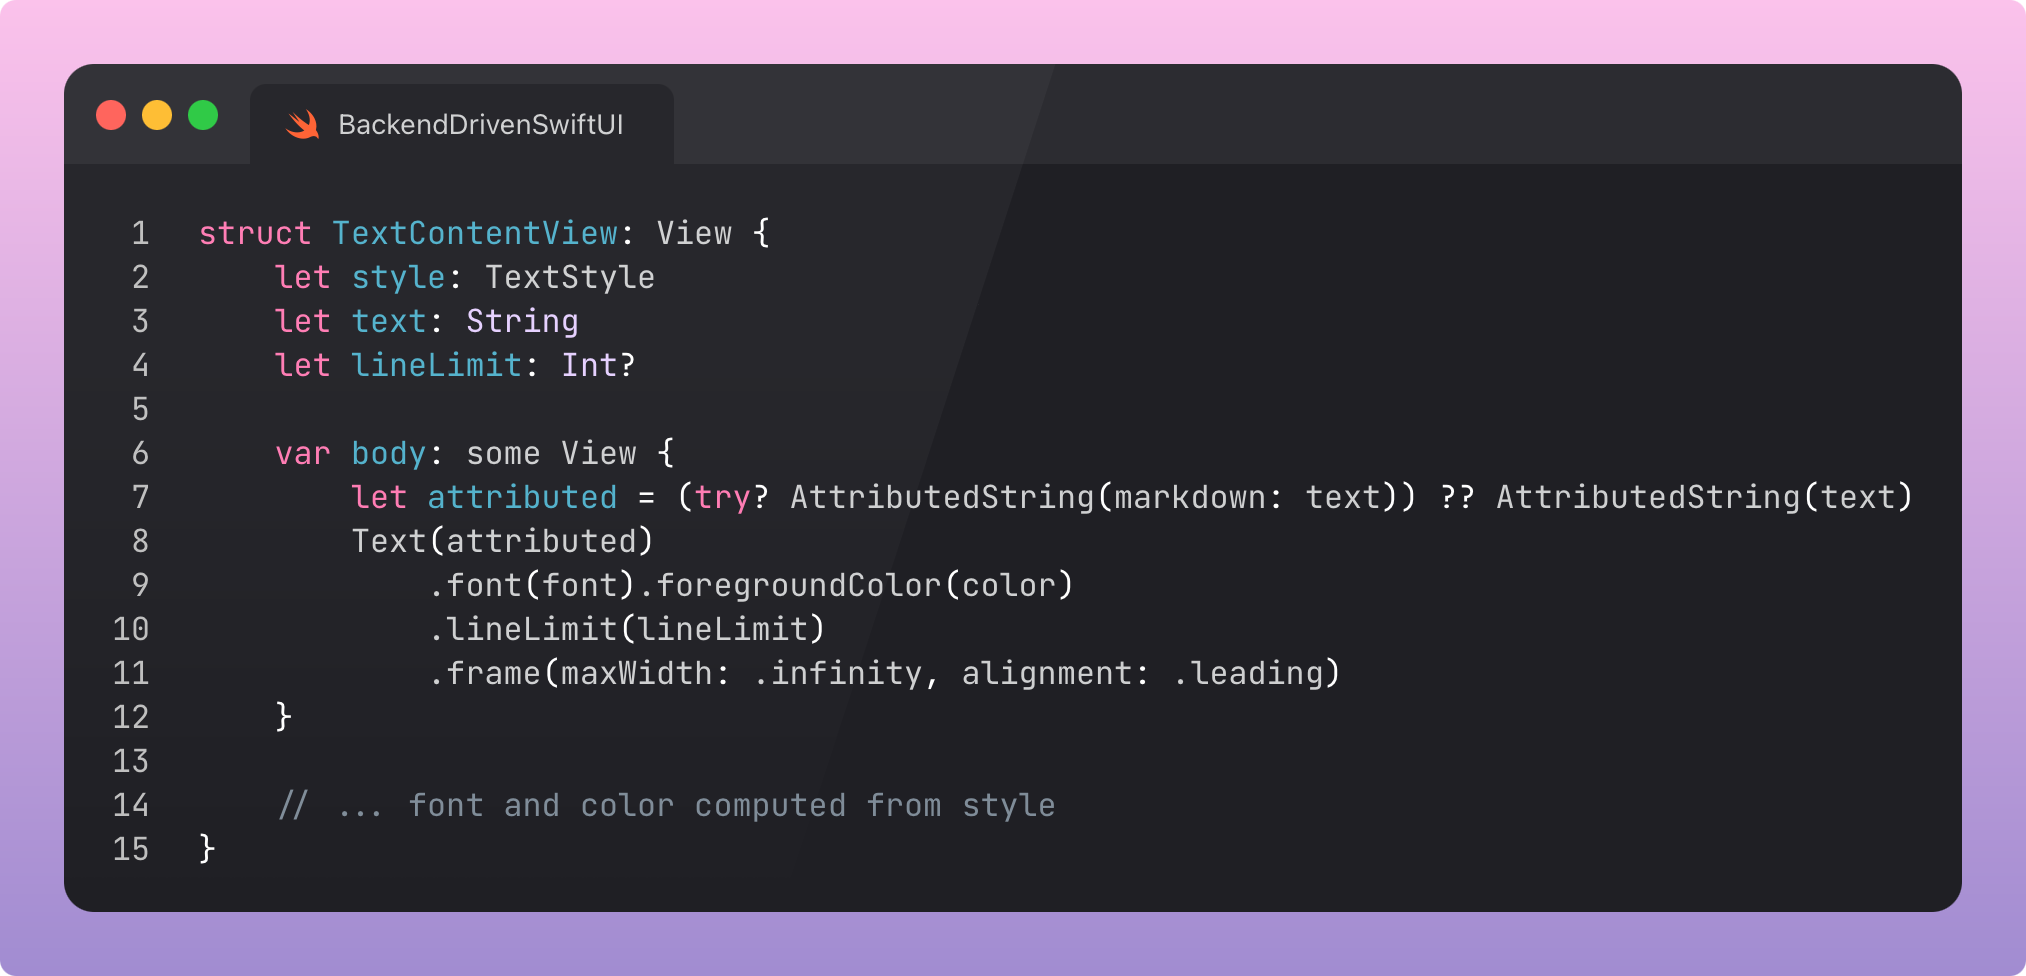
Looking at a couple of the views, text rendering supports dynamic type, line limits, and uses AttributedString to inline markdown, allowing links to be inlined easily. We might later want to include alignment or colour into our DSL.
Code blocks are deliberately simple, plain, and scrollable.
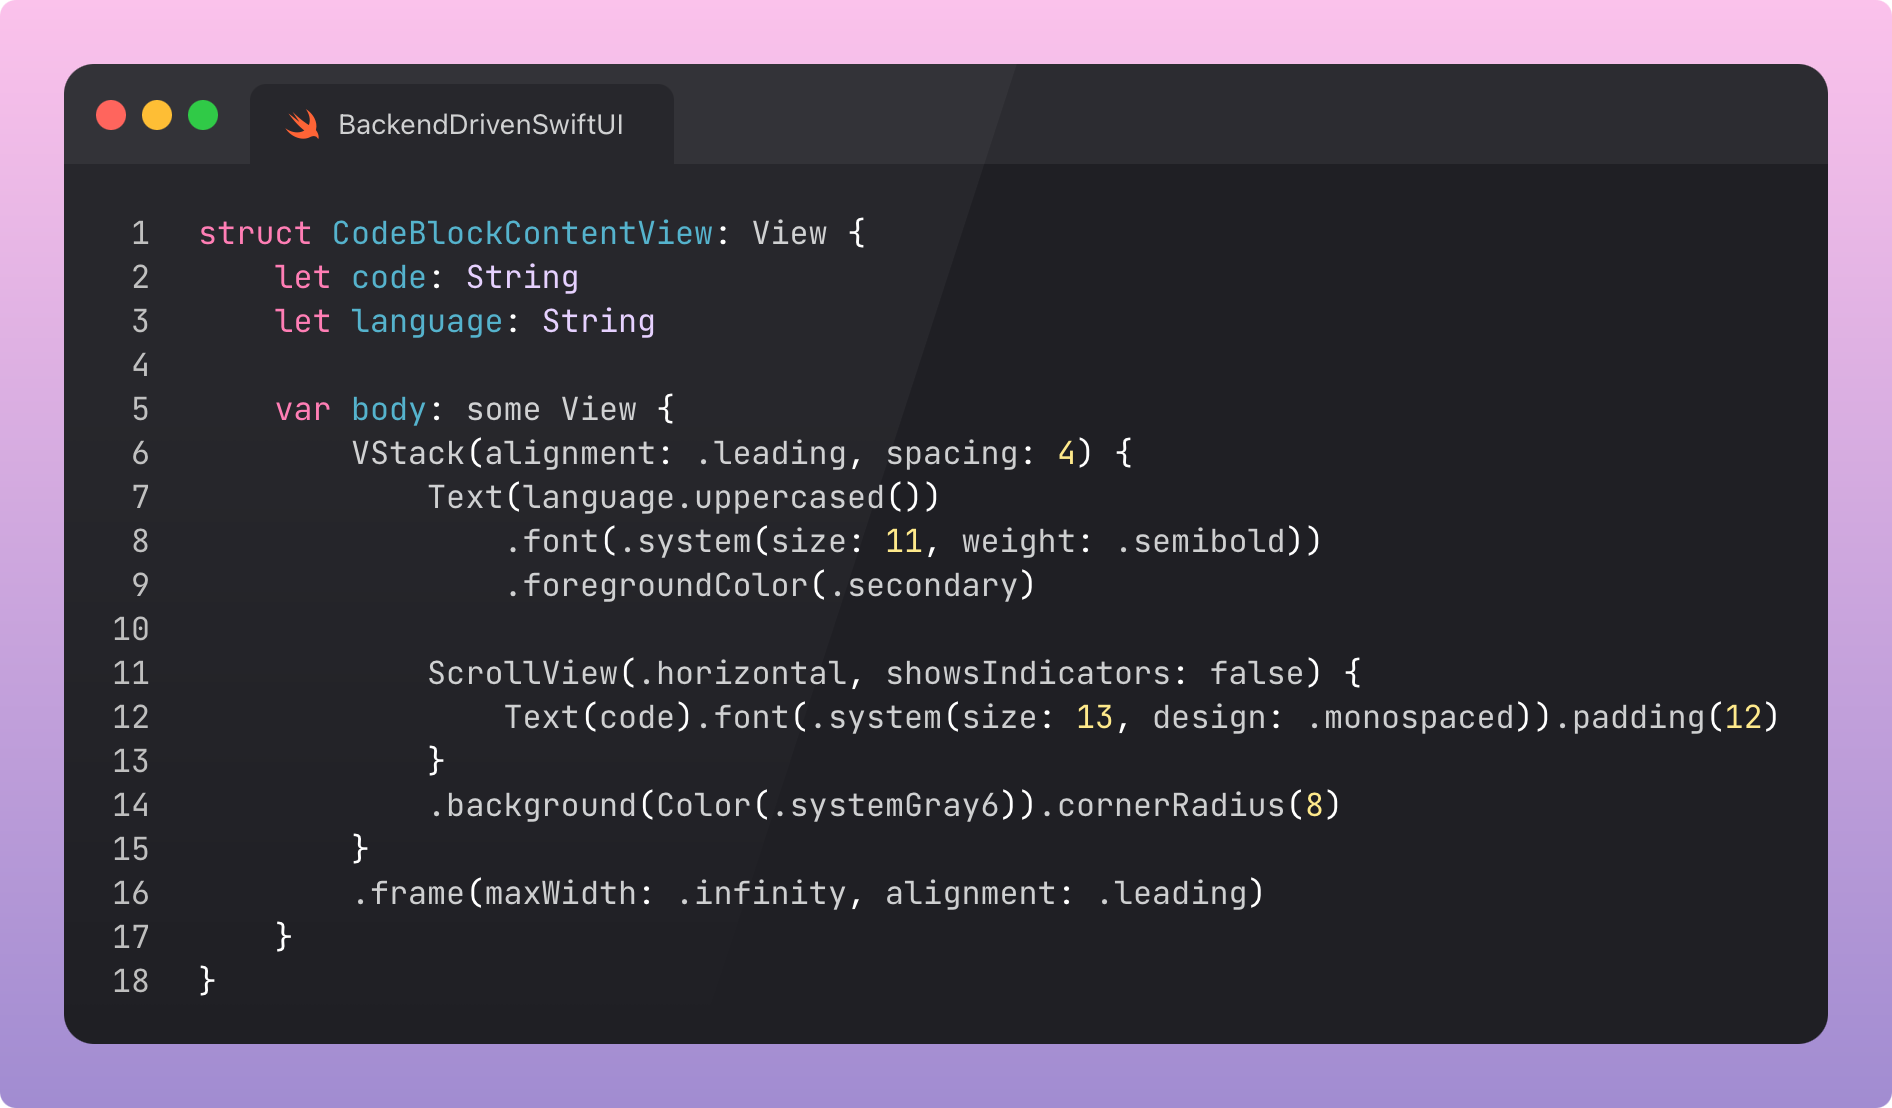
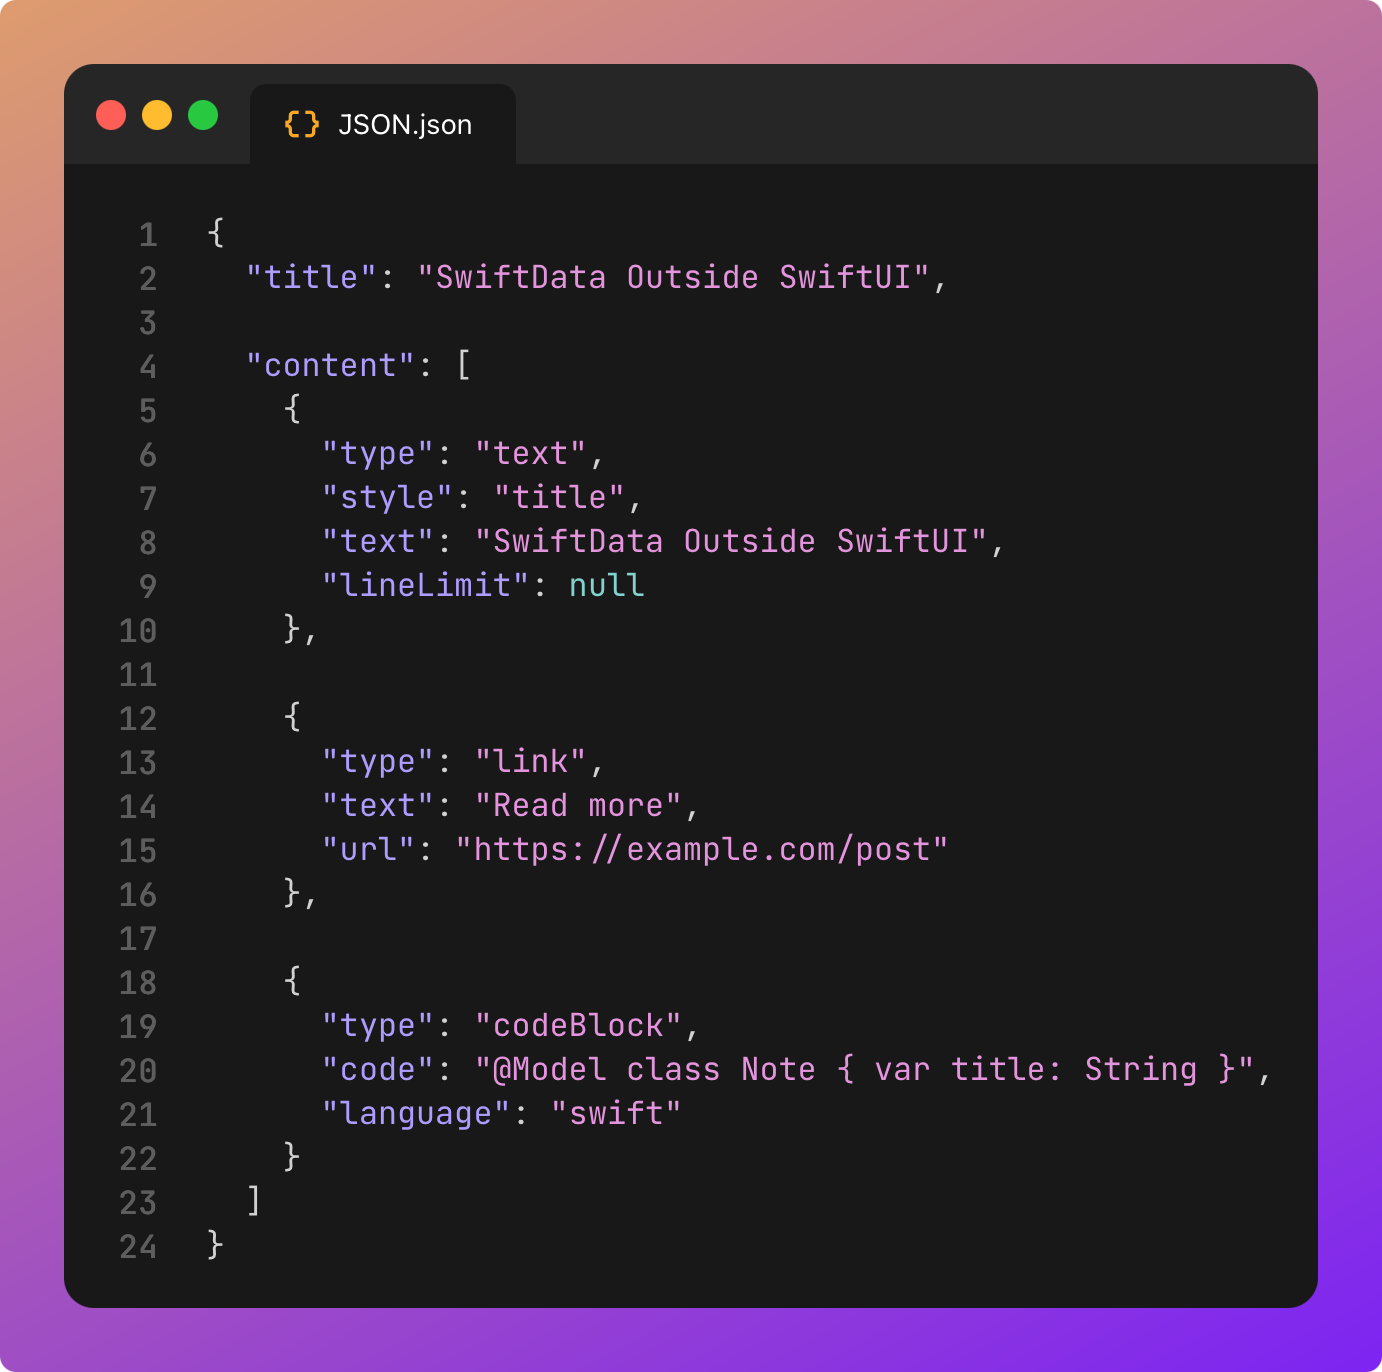
Let’s now check out the JSON that powers the blog.
Our custom Codable logic takes the type and parses out the relevant fields for each associated value using CodingKeys. It’s pretty human-readable, but very easy to muck up. You will want to validate changes in staging.
Okay.
DSL, ContentType, associated values, LazyVStack, switch statement. Various views.
We have achieved everything we need for 95% of most server-driven-UI use cases. But we can push a little bit further without getting too silly.
Phase #2: Layout & Navigation
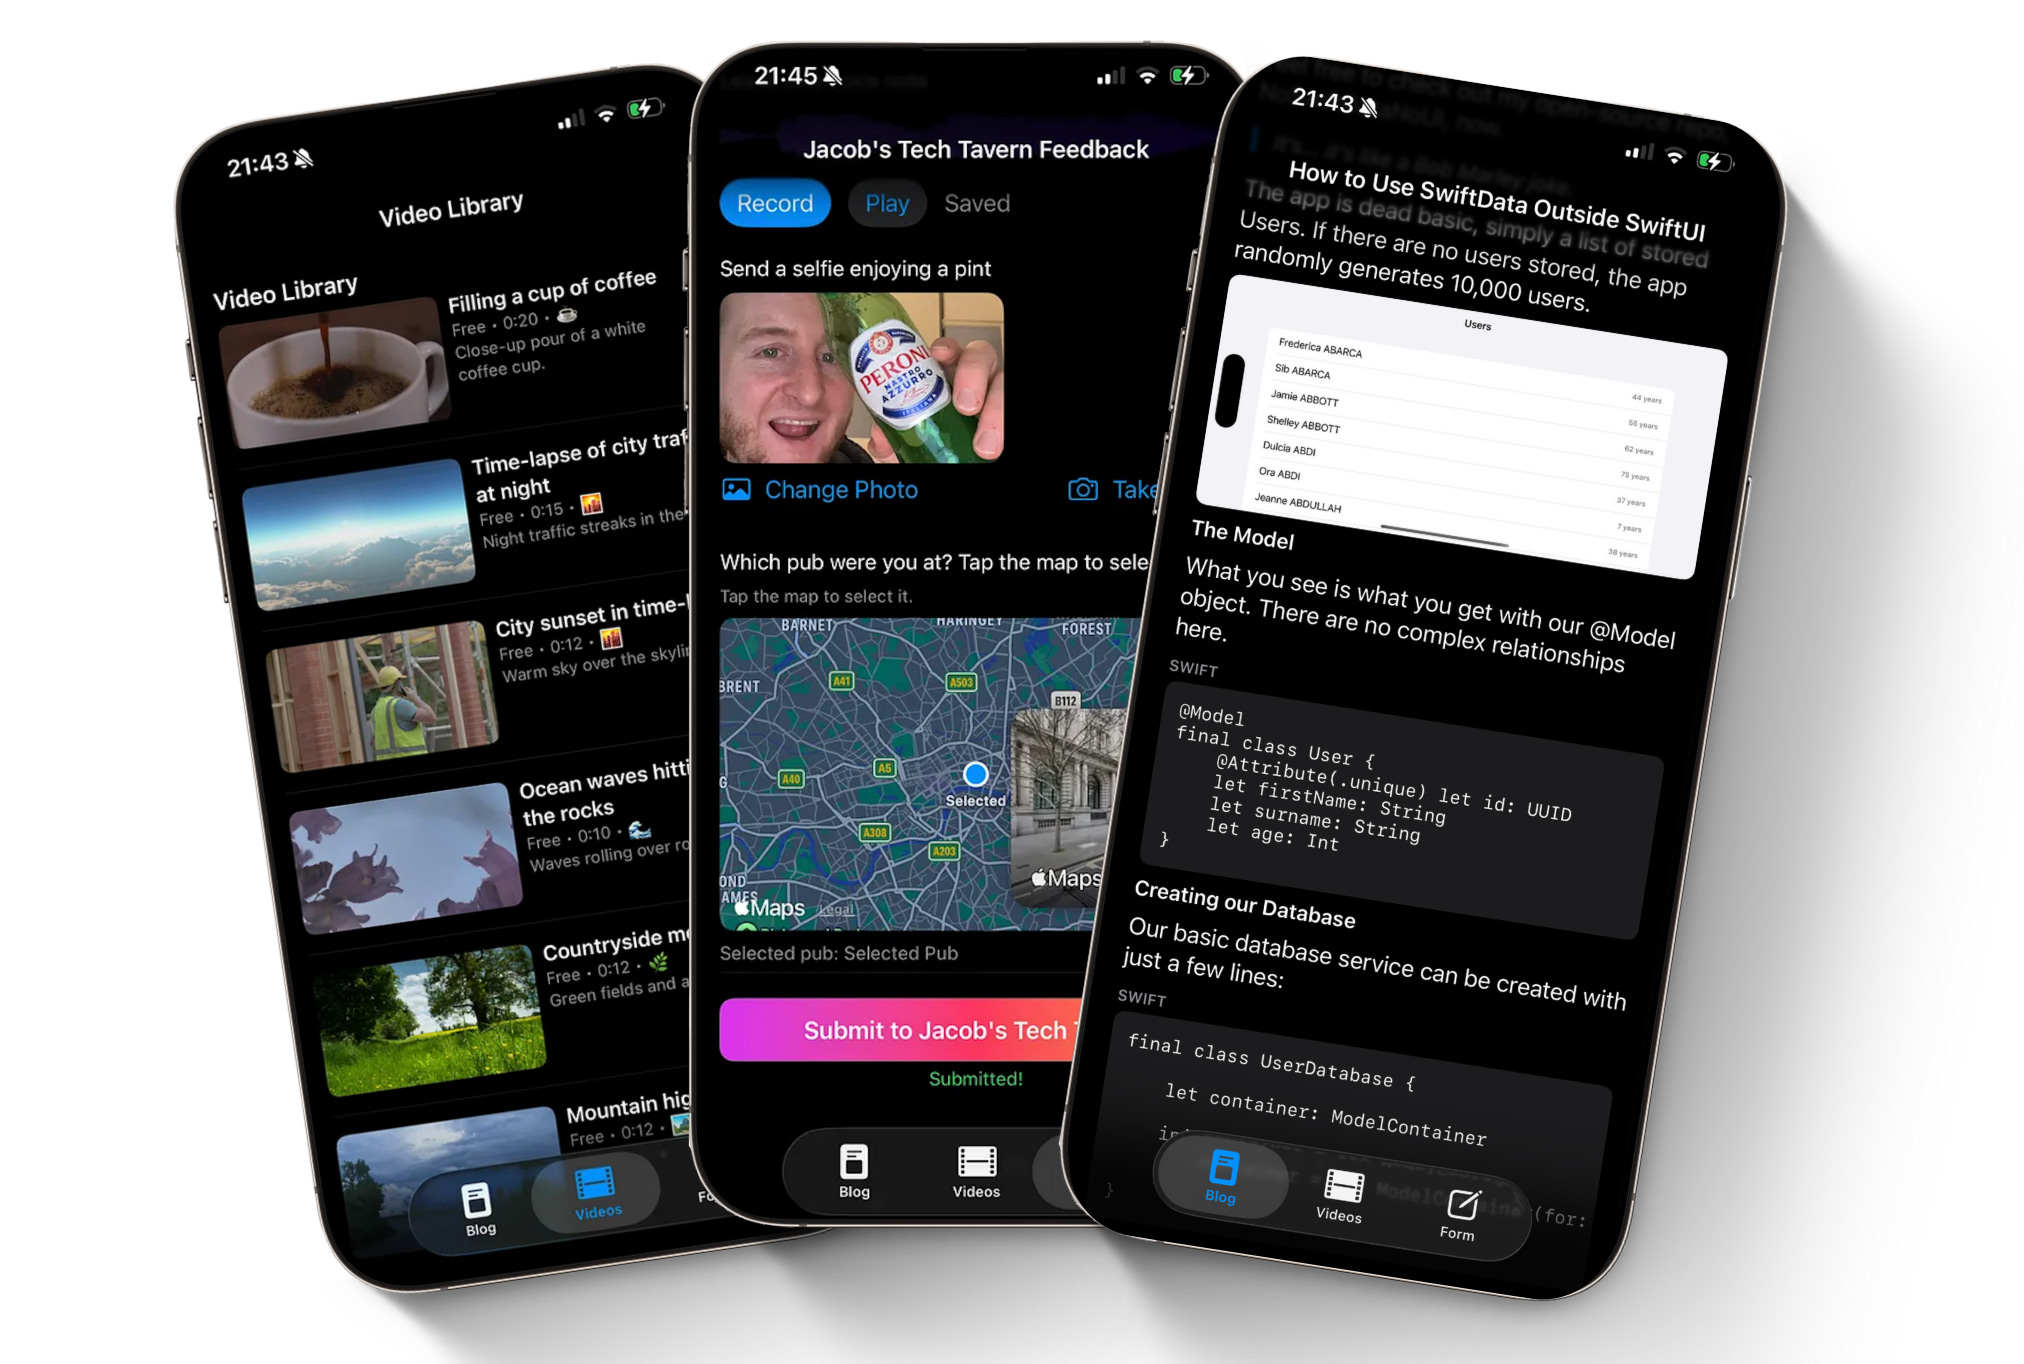
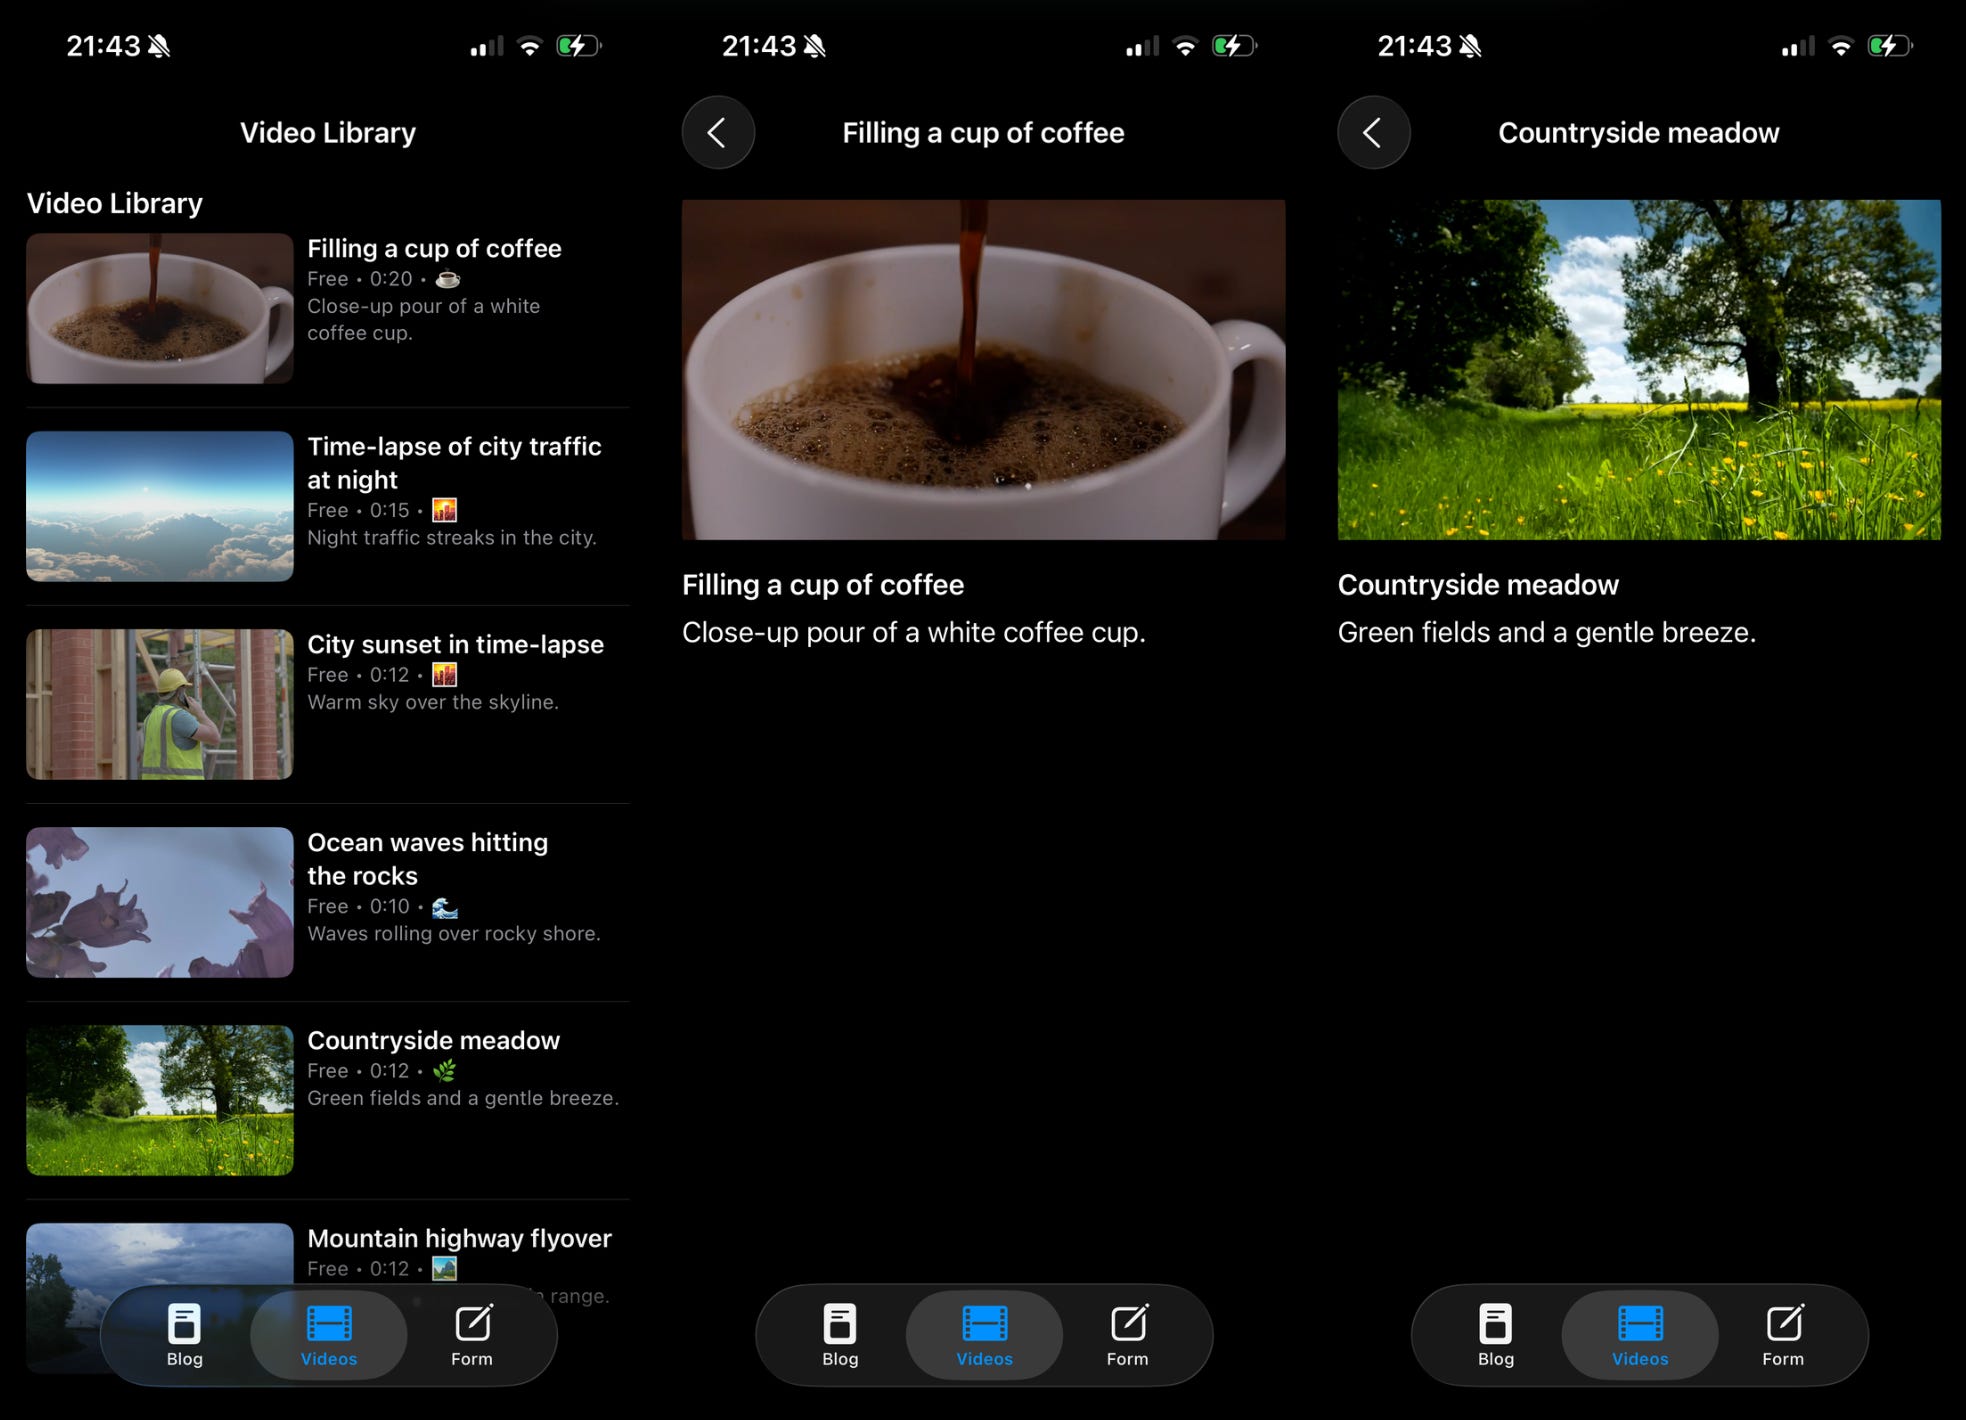
We can create a Netflix-style layout with a list of videos alongside a player.
We achieve this by adding containers and navigation. The principle stays the same: a tiny set of well-chosen building blocks. The main change is recursive nesting. But seriously, keep it shallow to avoid brittle, uncooked, JSON spaghetti.
Let’s see what the code for our screen looks like.
You aren’t going crazy. This is the exact same screen from Phase #1. The same screen renders both sets of content! The only difference is the JSON endpoint we pass to the container view which loads the JSON and passes it to ContentRendererView.
This is the flexibility you’re playing with when you use backend-driven UI.
Now we just add our new cases to the ContentType enum:
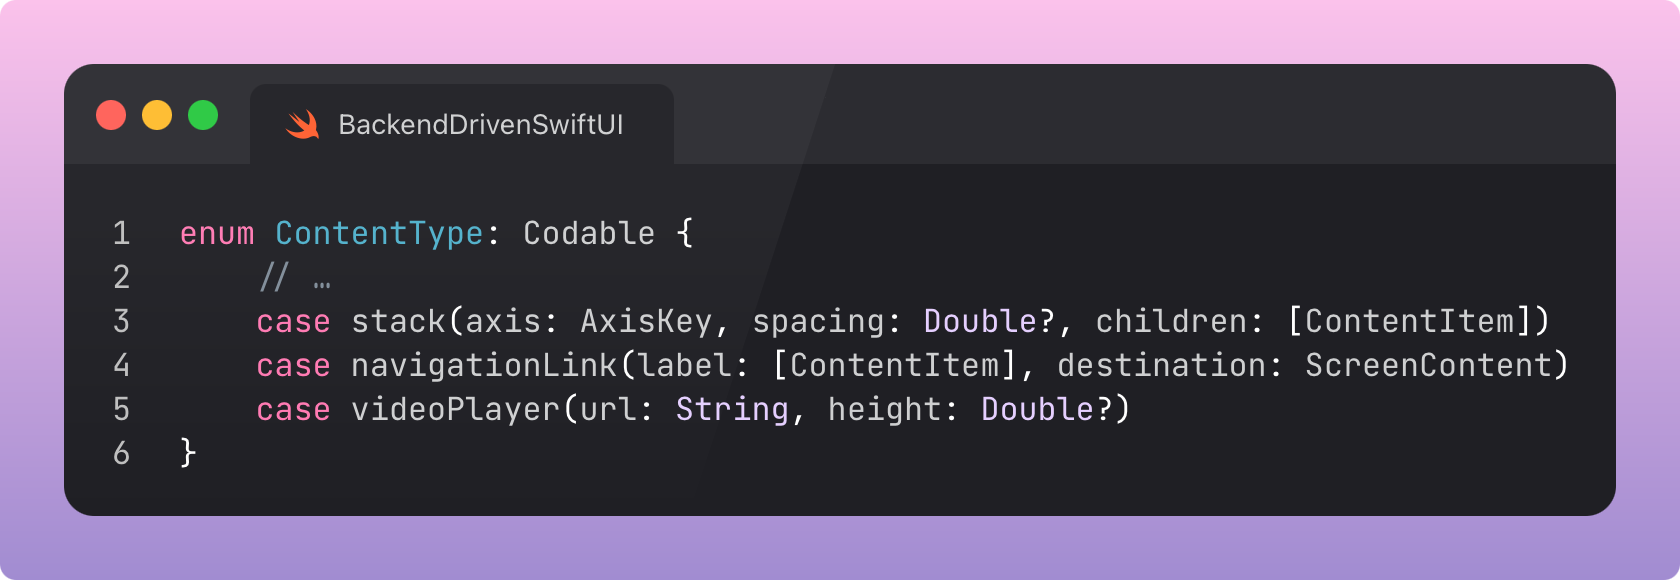
Note the inclusion of children and label which recursively introduce lists of ContentItem nested within these ContentItems.
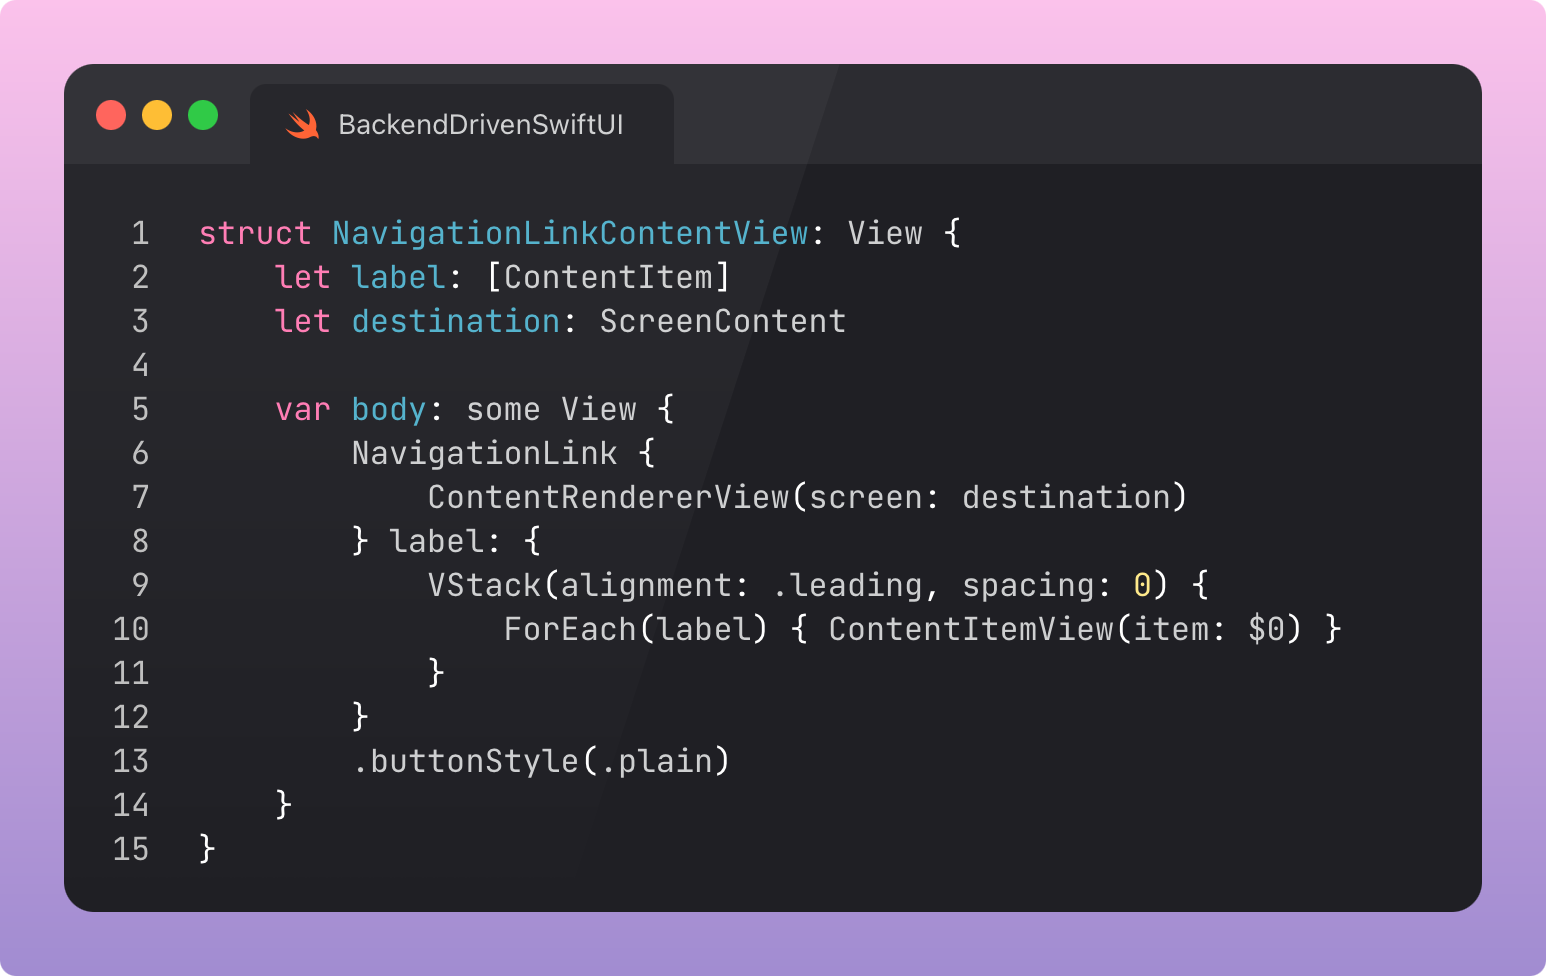
For all this pomp and ceremony, the fancy new views are almost disappointingly simple. Here’s the stack, which takes the axis as a parameter to choose between HStack or VStack:
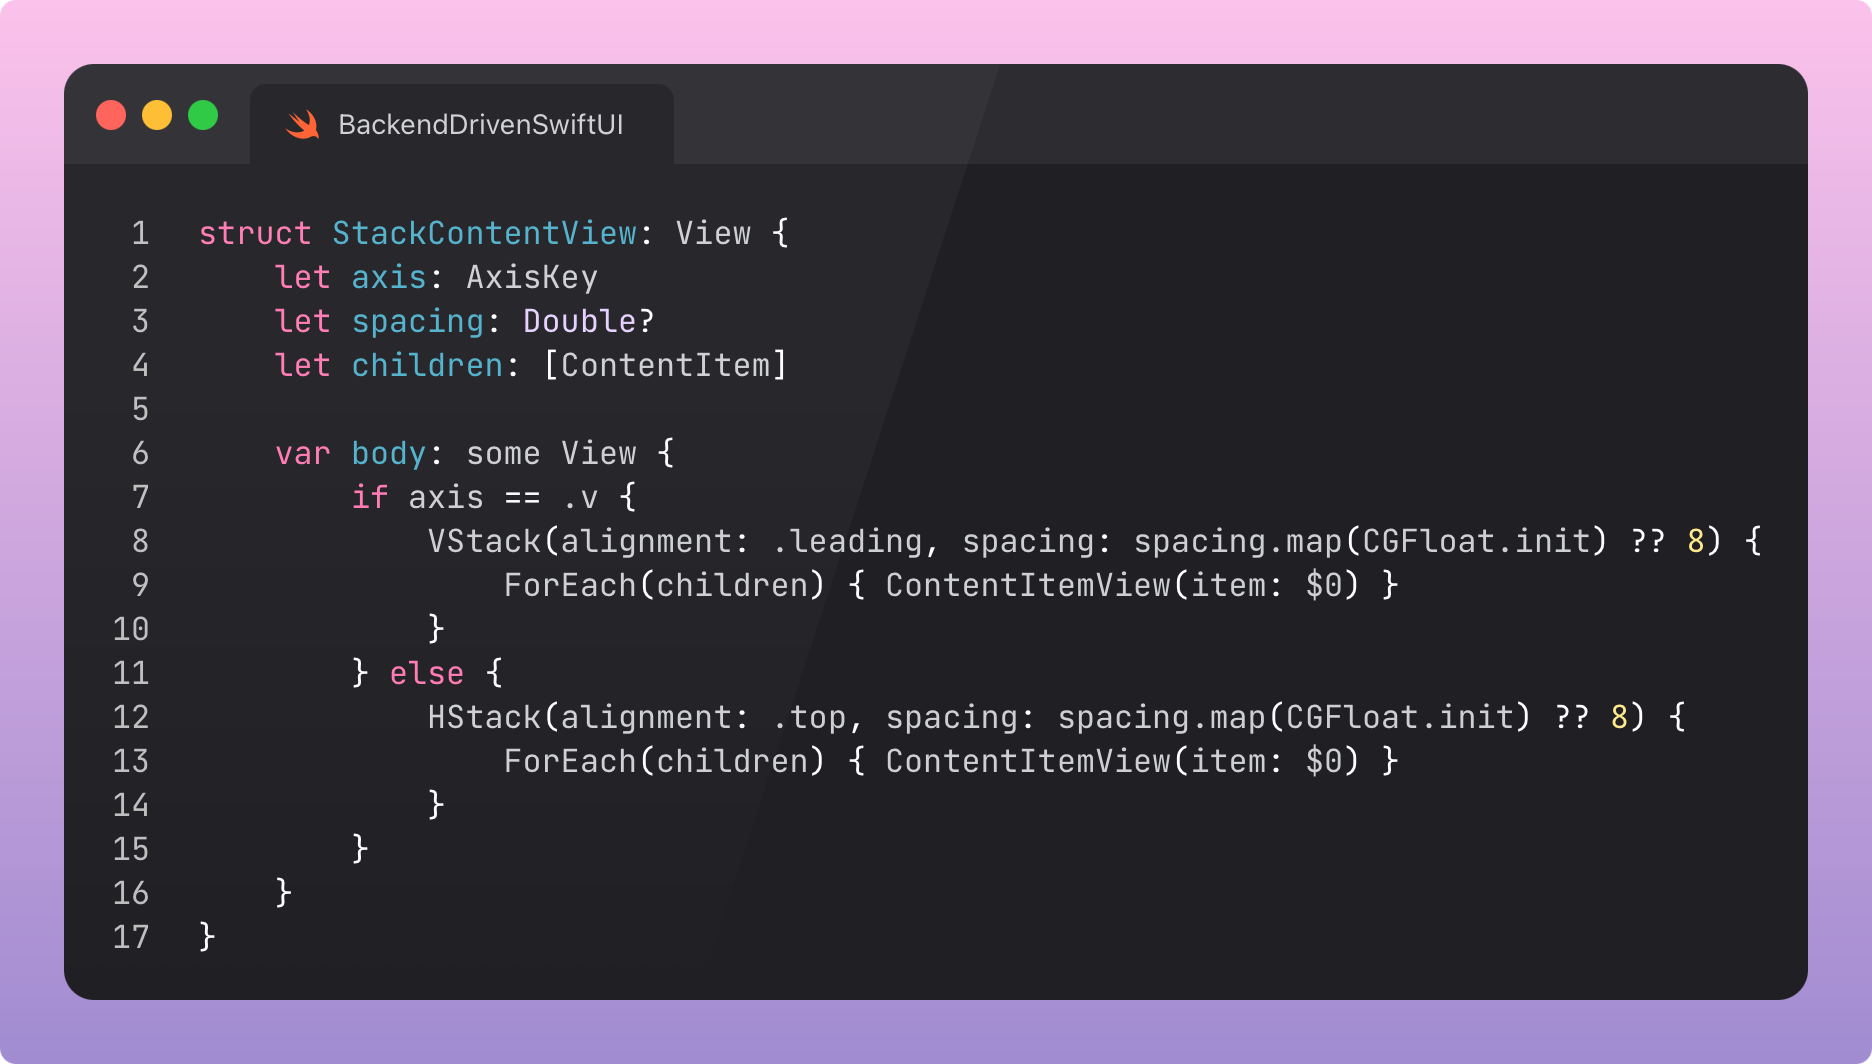
…and here’s the navigation, which nests a label and full destination screen within:
I didn’t show the video player, because it’s just a thin wrapper around AVKit.VideoPlayer. Boring, on purpose. Are you getting it now?
The JSON is a little scarier on account of the nesting. I wasn’t mucking about when I told you to keep it shallow.

Guardrails matter.
If you opt for maximum flexibility, you will find yourself re-implementing SwiftUI in JSON. Here there be dragons. And regret.
Stacks can have axis and spacing, and make do. Navigation links don’t get modals, detents, or flexible destinations. Keep the DSL small and focused on your actual use cases, not a hypothetical. And push back on any product manager who starts to expand the scope.
Phase #3: Fully Interactive Multimedia
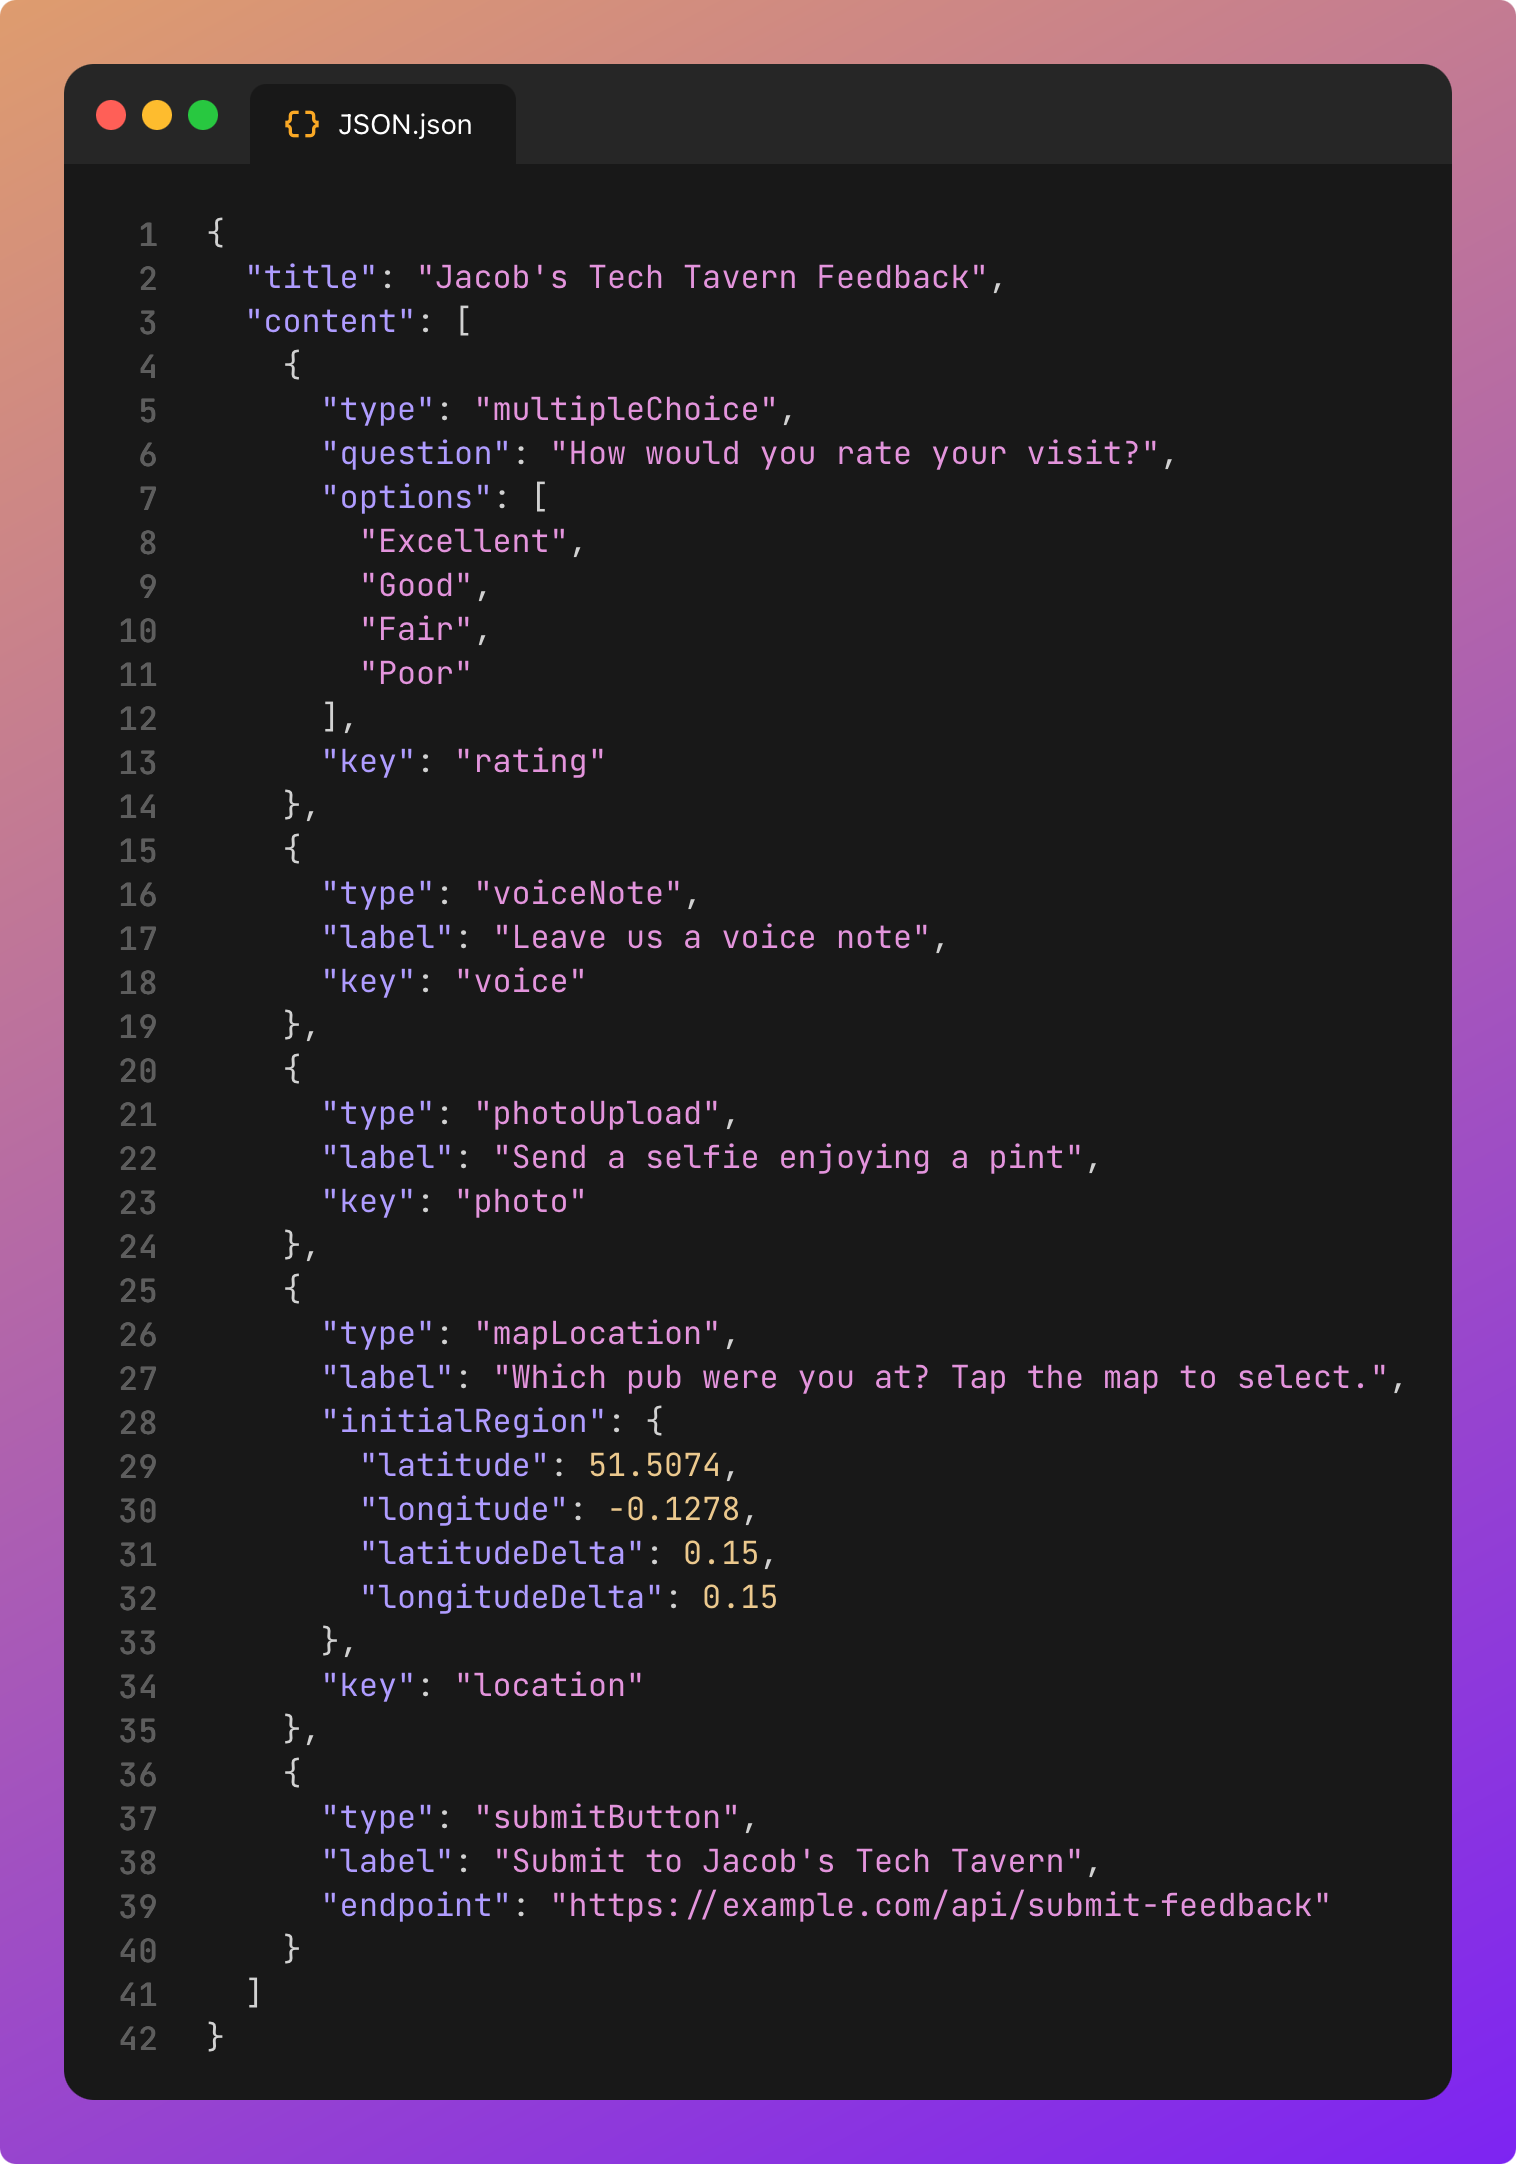
Now for the fun, slightly silly part. We render inputs driven by the JSON DSL, and submit multimedia to an endpoint as multipart form data.
This use case can really shine when white-labelling apps for multiple clients: think menus, concerts, or surveys.
In this section, the client is doing most of the heavy lifting: the JSON tells it what to render, but it contains various complex components which include deep functionality such as voice recording, camera access, and maps. Our submit button sends the input multimedia to our backend all the same.

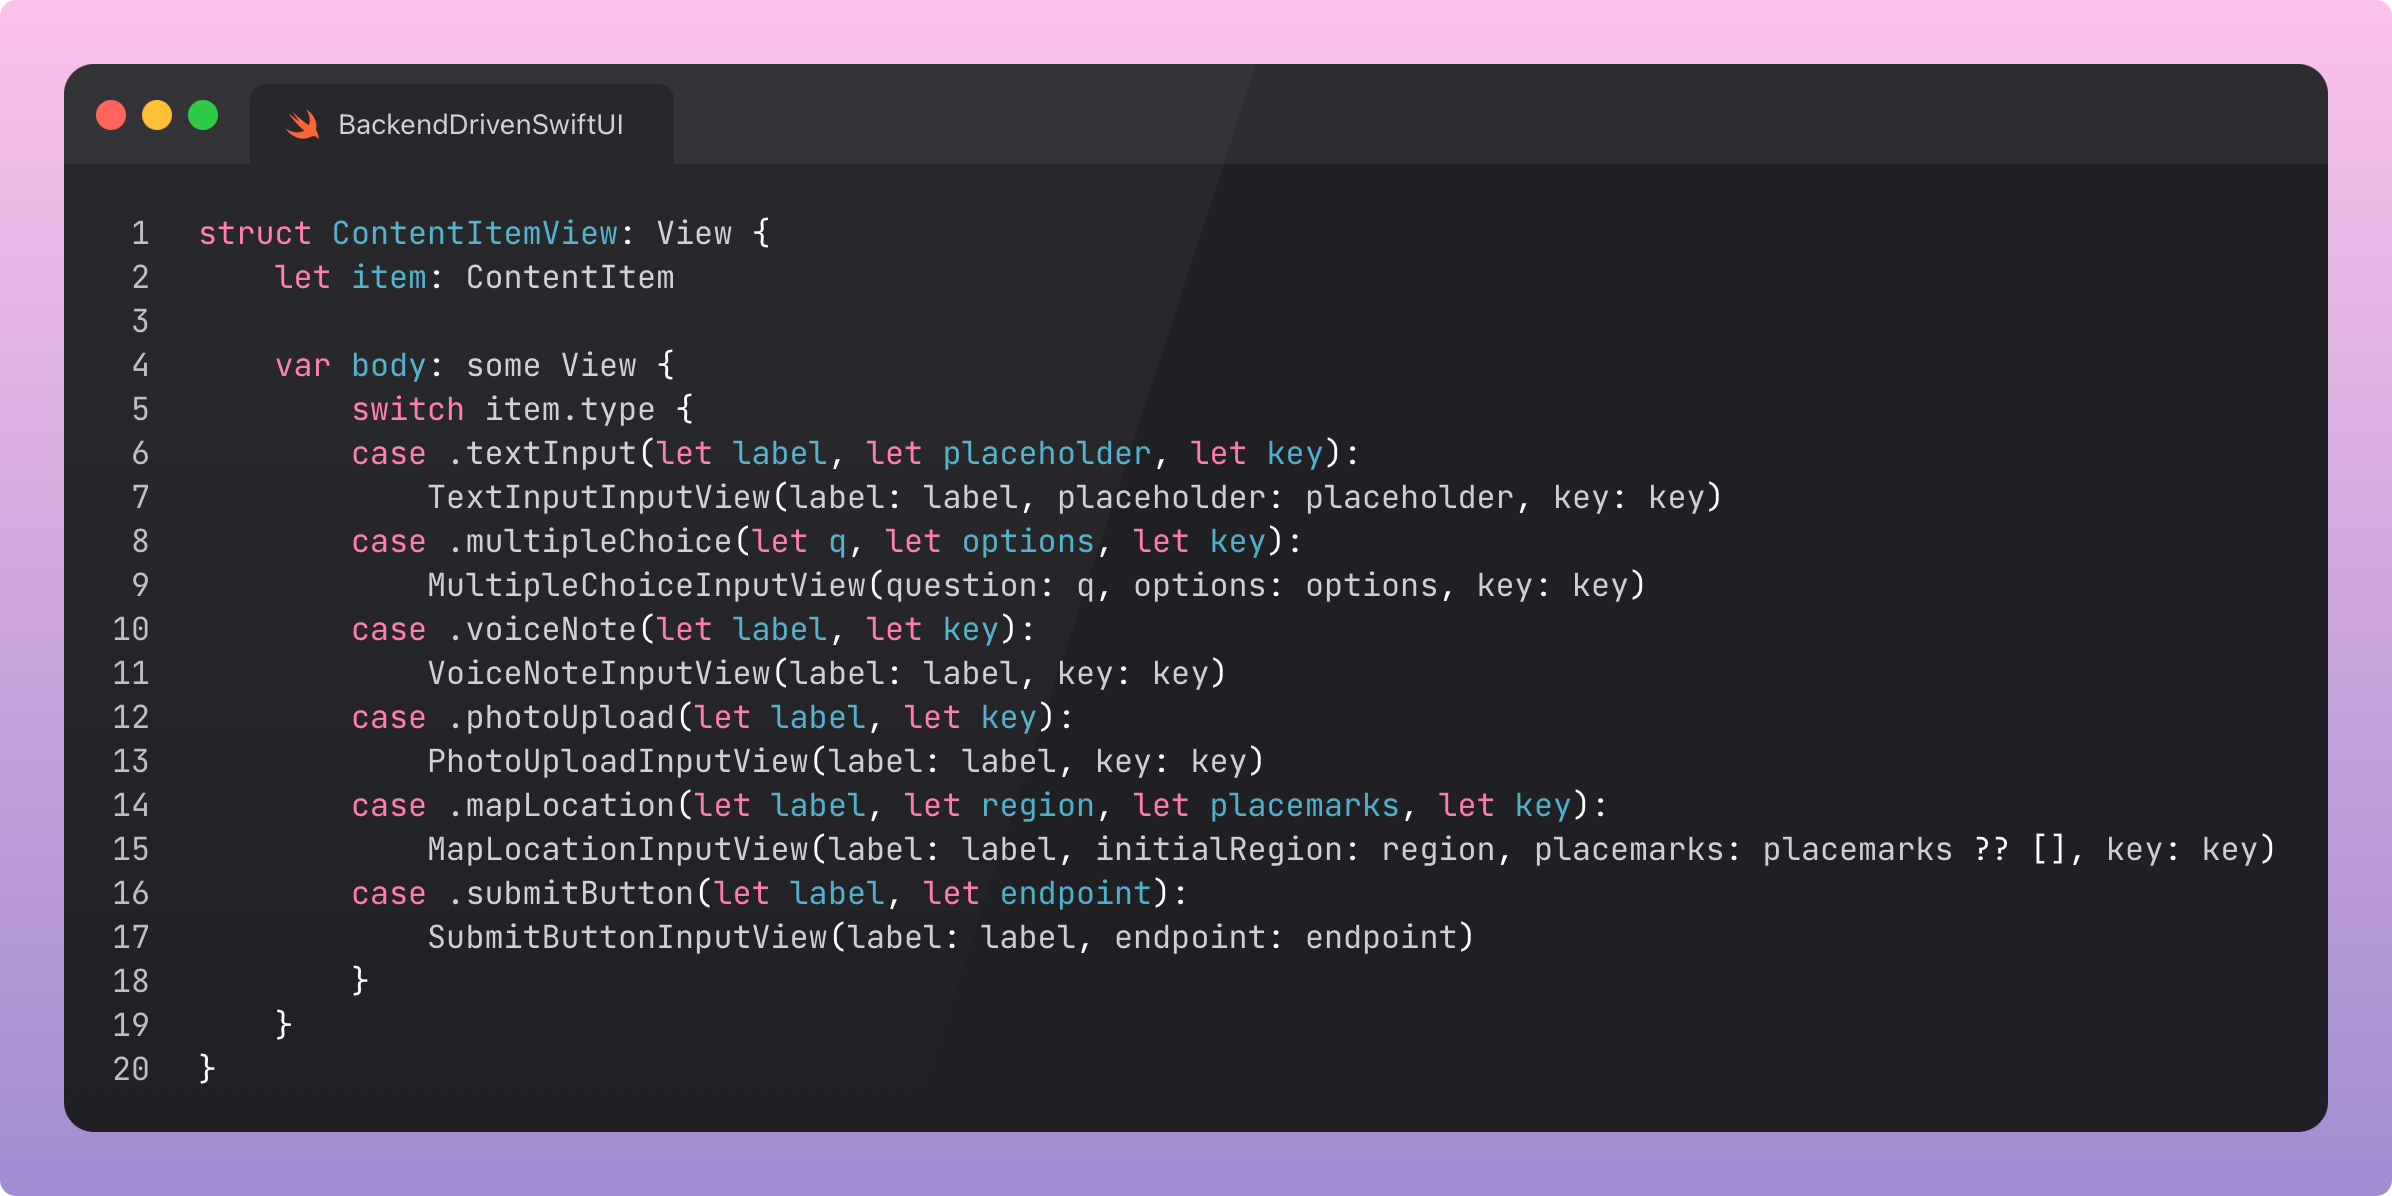
This introduces a plethora of content types, because I was having fun with it.
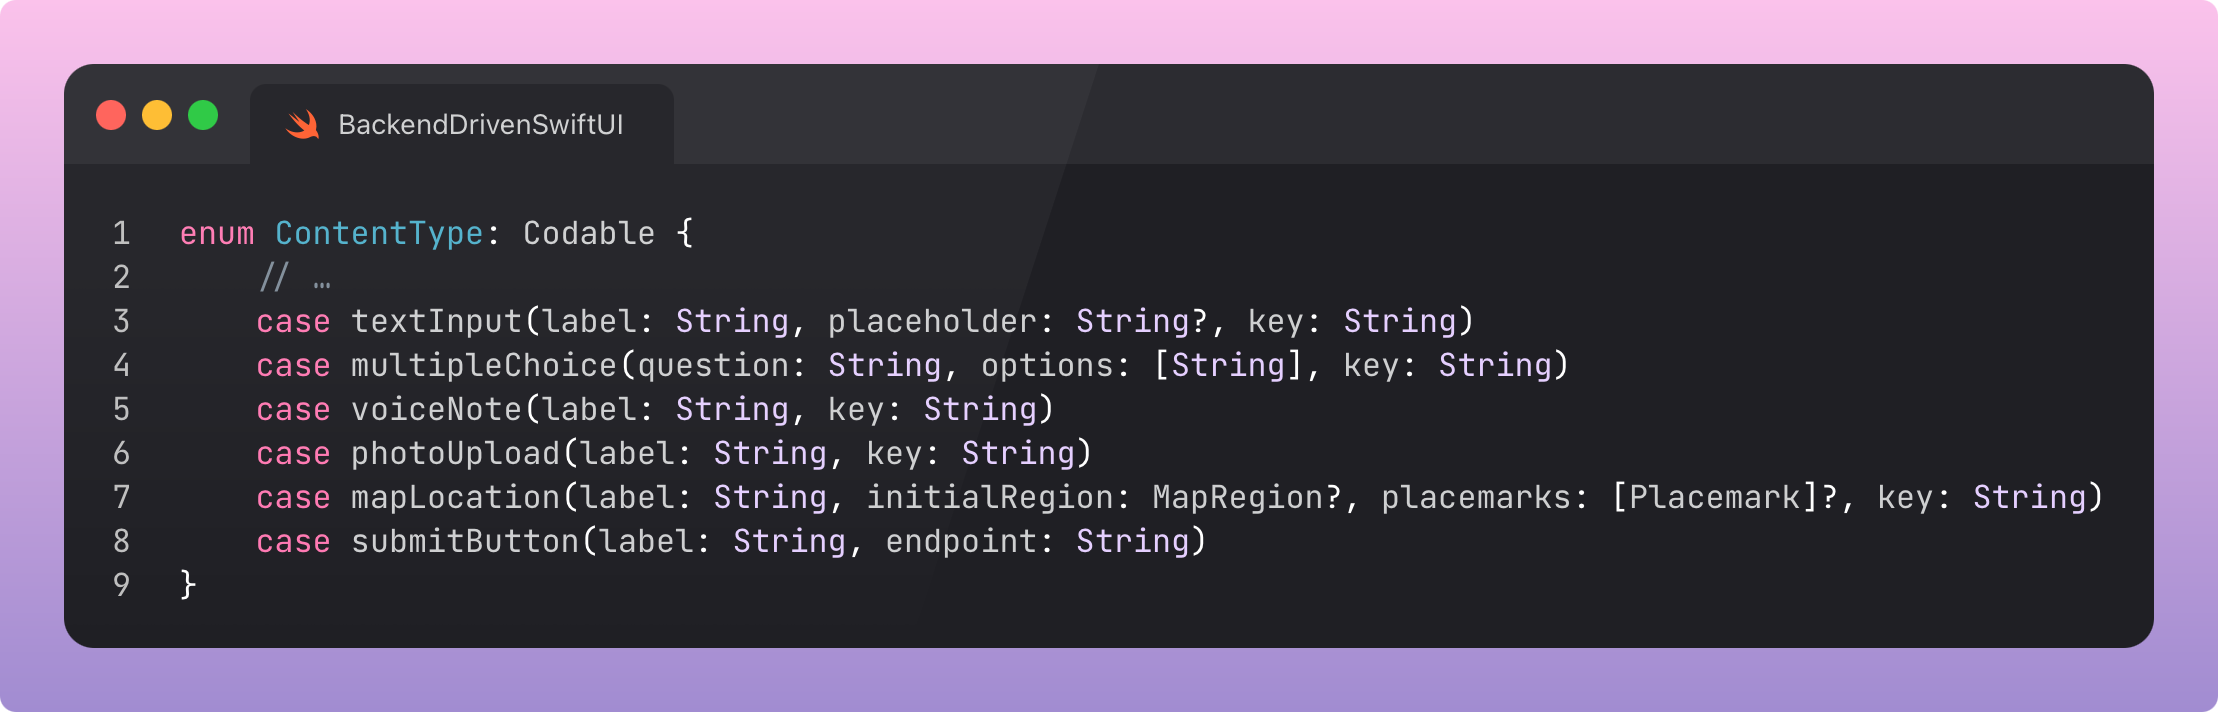
Each of these switches over in the ContentItemView to render a specific view.
Here, we have an embedded SwiftUI Map which includes tap-to-select locations, allowing a user to submit freeform coordinates.
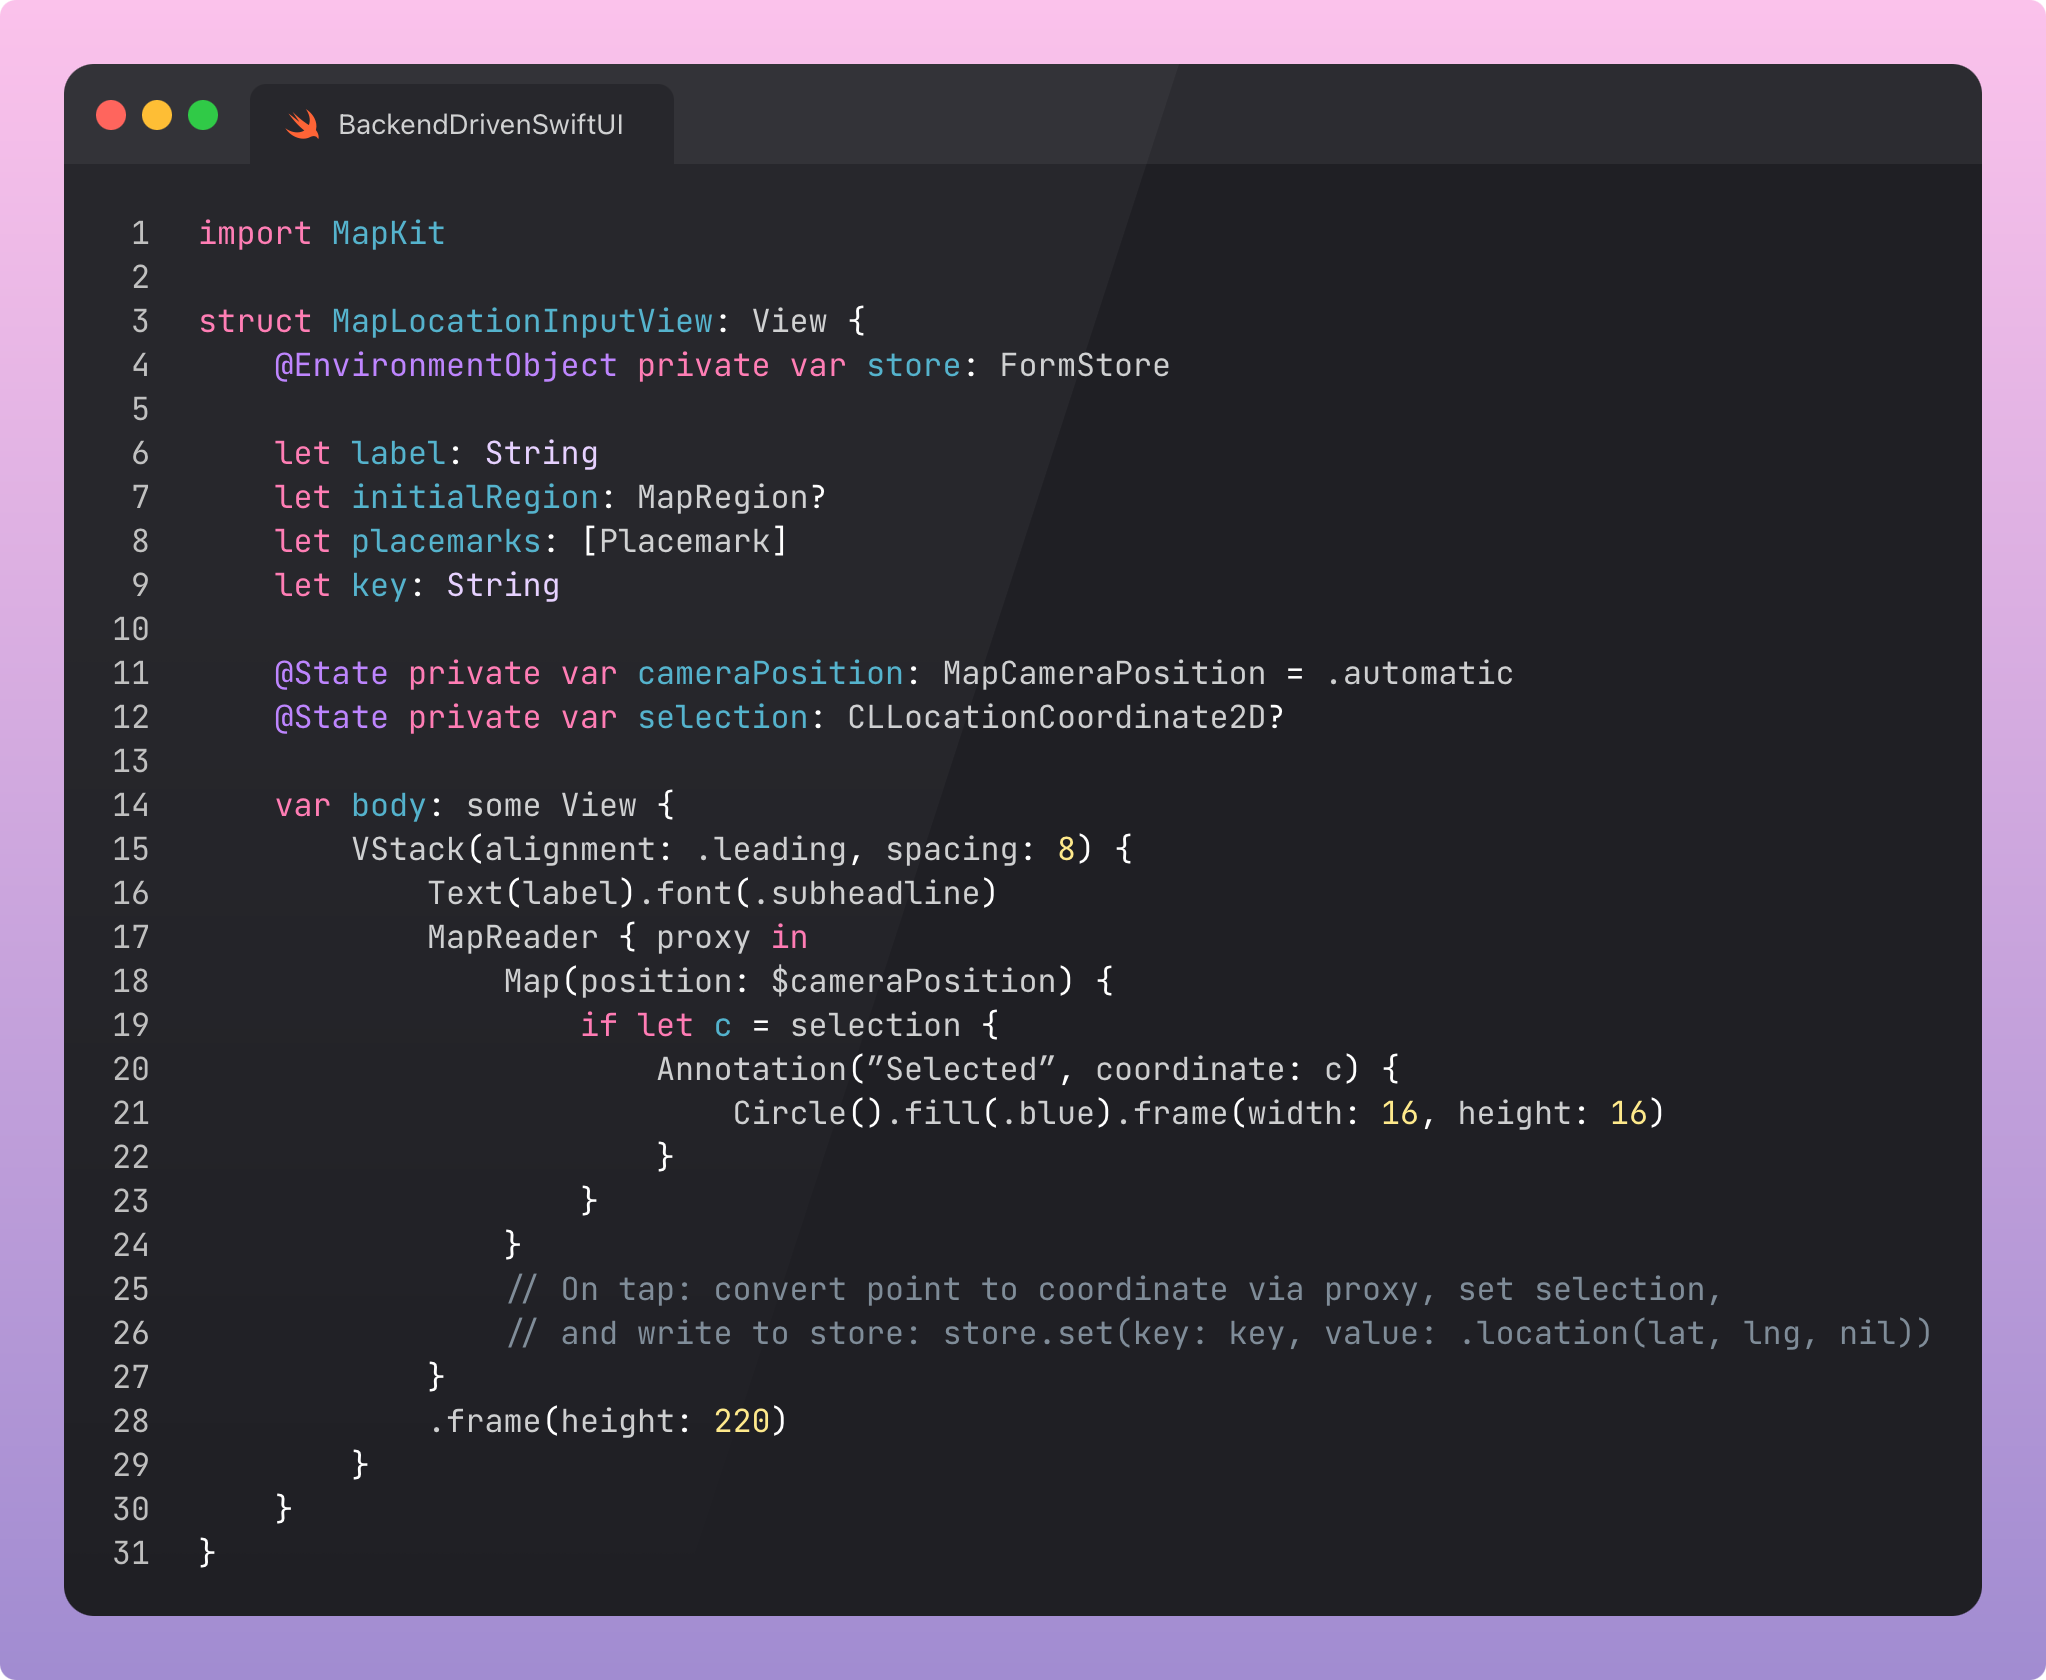
The voice note uses AVFoundation to record an .m4a and displays a cool equaliser as you talk. Photo upload uses the camera and saves a .jpeg. All rendered by your SwiftUI code, driven by the DSL.
Submitting the form aggregates all the values and builds a multipart payload. ContentType.submitButton includes an endpoint as the associated value, sending the data there.
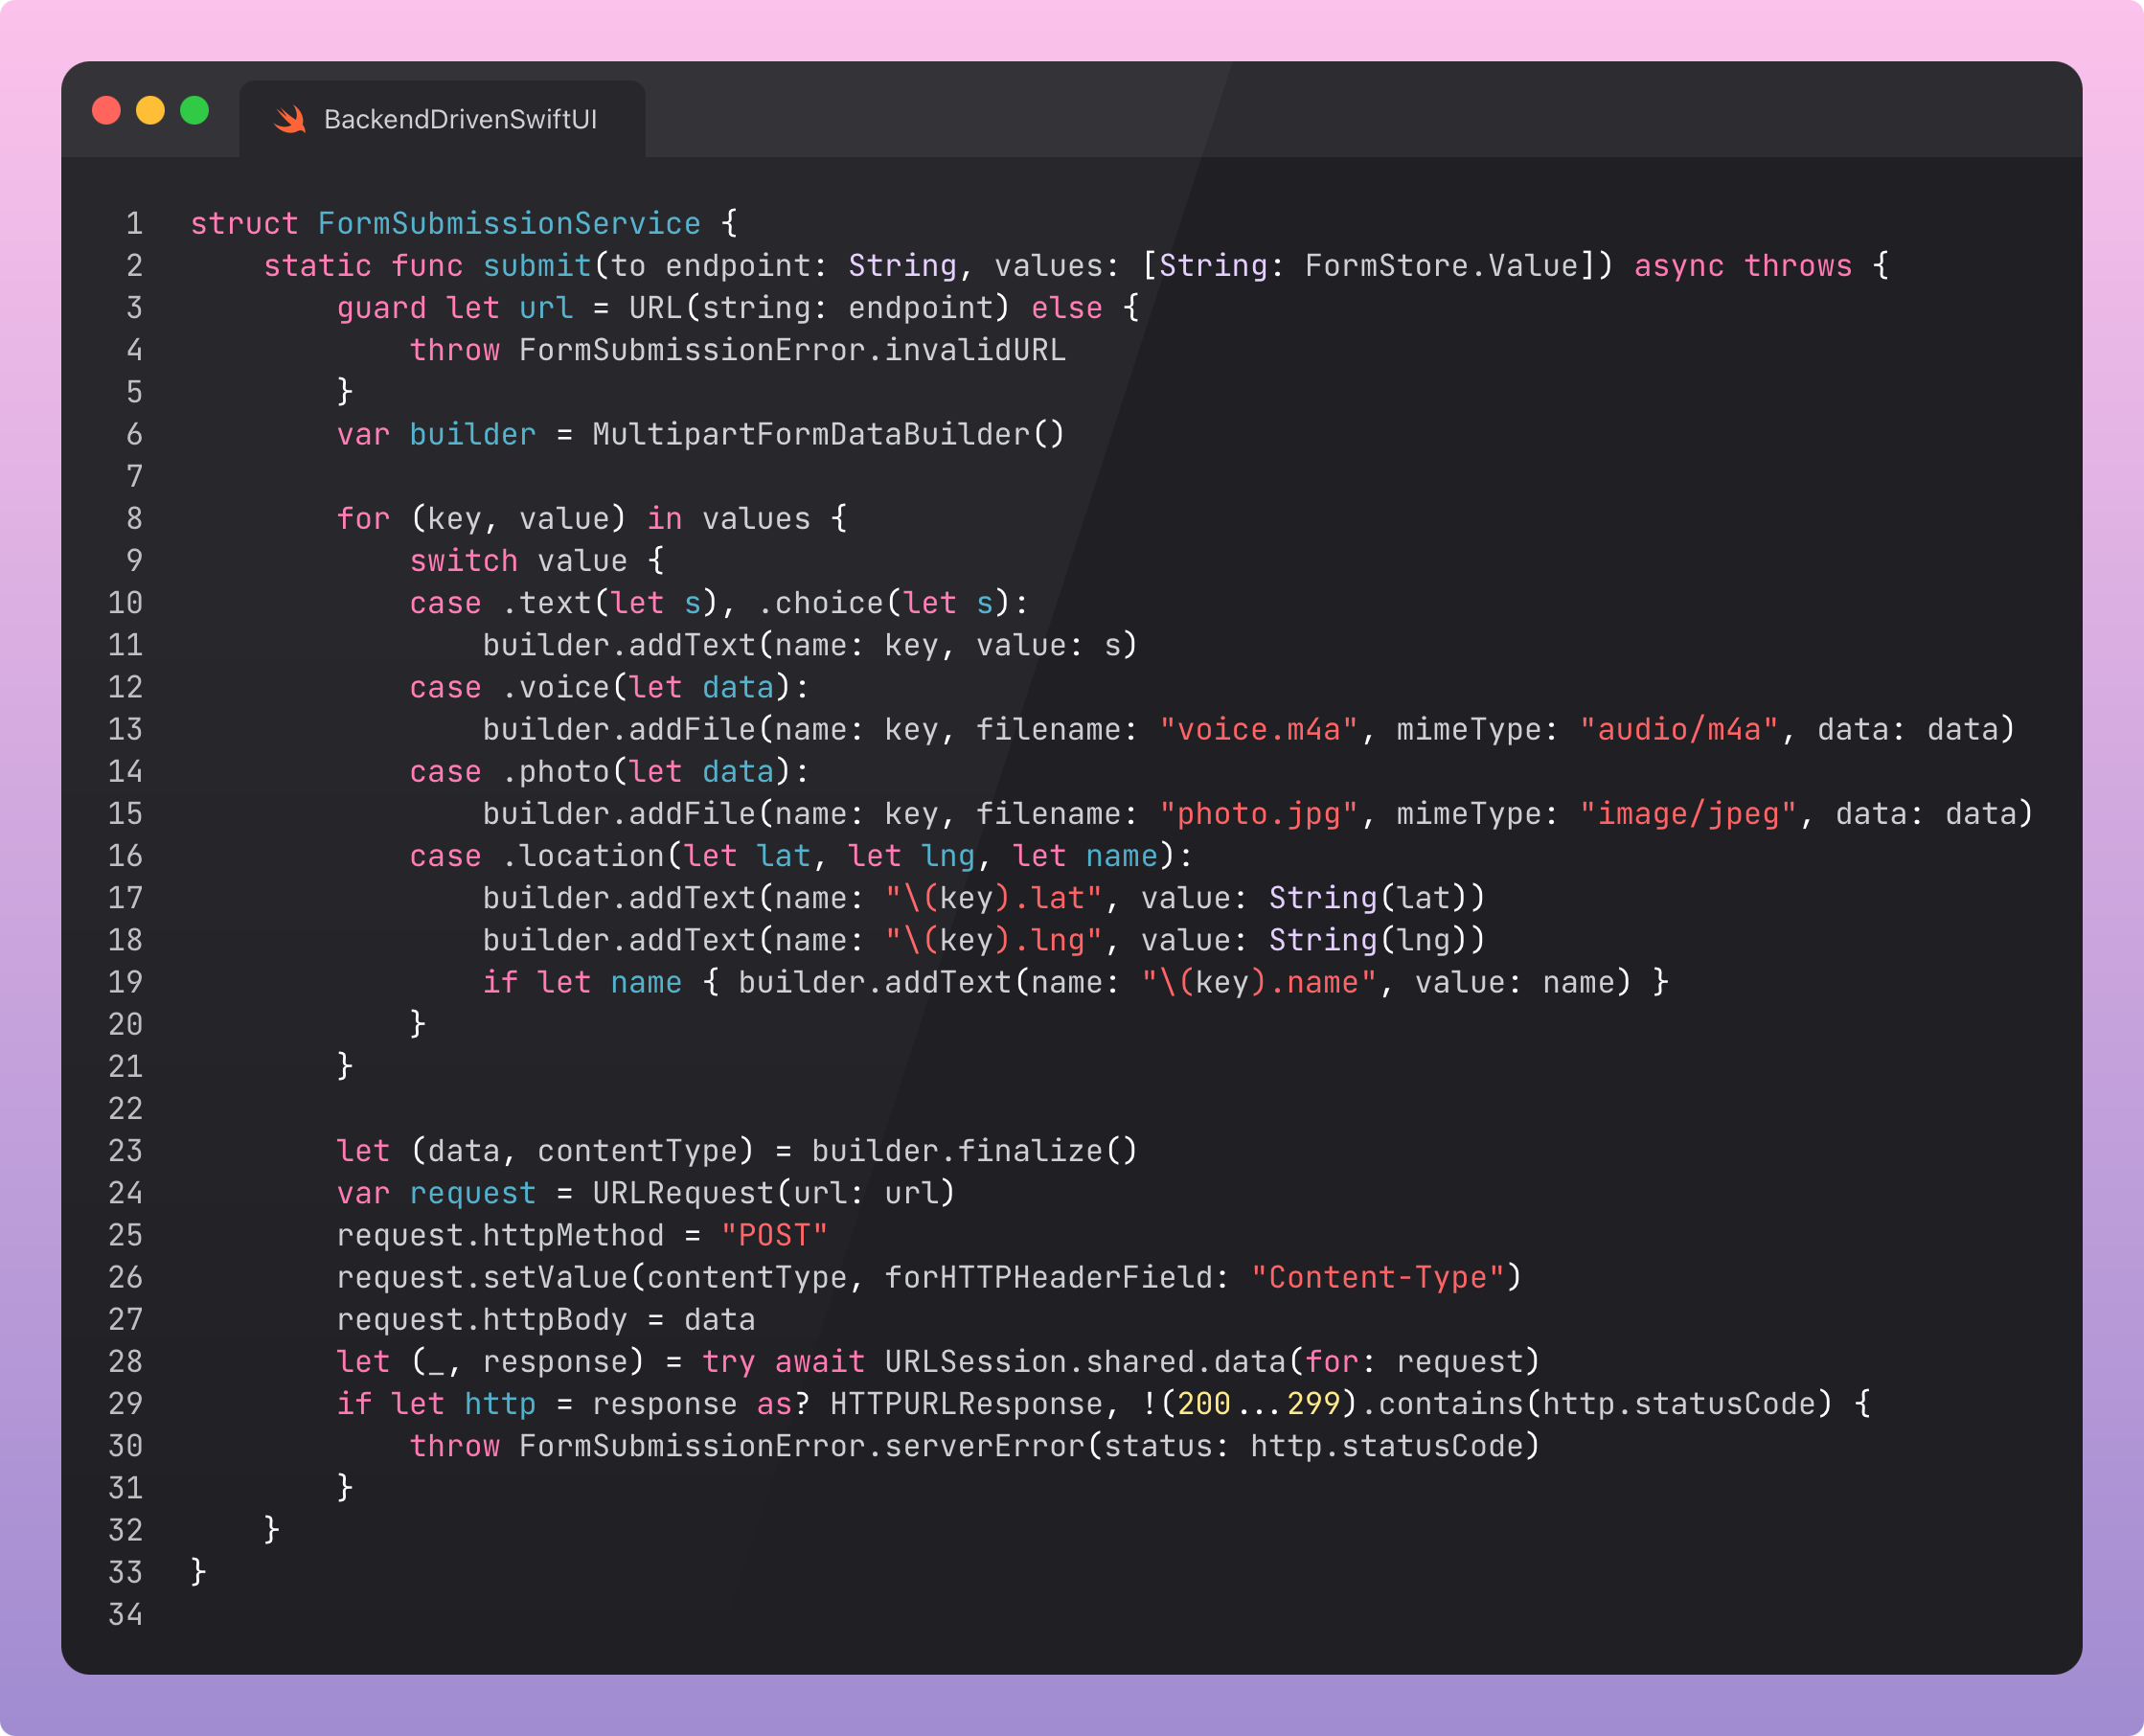
In production, you will need a lot of work to get this behaving. First, you’ll need to change the backend every time the DSL changes, in order to accept the data in the right structure. You’ll also want to version the hell out of this and include lots of observability, this is pulling so much data from so many places, it’s likely quite fragile.
Who uses multipart form data these days anyway? Any sane engineer would just send different requests for the blob data upload and the metadata.
The JSON for the form is actually relatively mundane in comparison to the previous example.
I’ve already said it, but I’m going to say it again because it’s really important. When you do this in production, seriously, put some versioning on your DSL, because otherwise breaking changes will kill all your users until they update the app. Sort of negating the entire point of back-end driven UI.
Plan ahead with explicit versioning for the DSL, and a reasonable fallback screen if you mess up. Test schema changes against old clients before rollout. You are not getting magical review-free changes unless you plan for the long tail of old builds.
When Not To Use Backend-driven UI
Backend-driven UI is terrible for designs that require highly-bespoke gesture-based interactions, heavy animations, or anything that needs high performance. Using SwiftUI (or, maybe in the case of performance, UIKit) directly will be your best bet.
One of my favorite takes on backend-driven UI (a.k.a. server-driven UI) came from Reddit:
“Specialized SDUI is fine and in many cases required: news feeds, shopping carts, etc. but [sic] sometimes hubris makes engineers believe it’s possible to create a successful generic SDUI framework and they start re-implementing HTML with JavaScript. It usually happens when smart people have nothing to work on that really brings value to the customers and they try to entertain themselves by creating sophisticated frameworks.”
Keep your DSL humble and purpose-built. Do not build more than you need to. Push back on design scope creep. If you find yourself re-implementing SwiftUI, check yourself before you wreck yourself.
Backend-driven UI shines when testing bespoke onboarding flows, experimenting with paywalls, or when delivering a content-heavy experience that benefits from frequent iteration. It’s also a great fit for less complex white-labelled apps, allowing a single binary (and store listing!) to support many brands and many customisations.
Last Orders
Backend-driven SwiftUI is powerful, but it’s not good for everything.
It allows you, and the non-technical members of your team, to ship flexible experiences fast, unconstrained by the tyranny of app review. You’ll start with a tiny, focused DSL, but you can extend it to introduce flexible layouts, navigation, and multimedia experiences for your user, defined entirely by a remote configuration file.
Seriously, though, make sure to stop before you reinvent SwiftUI in JSON.
I didn’t want this article to be 45 minutes long, so I didn’t go into detail, but there was a hidden phase #4: Editor Mode™. The same ContentType schema supports Encodable, allowing admins to drop in components and configure them, like any CMS. They can encode and POST the resulting JSON to the backend, ready to be immediately consumed by app users.
Remember to check out my sample project!
https://github.com/jacobsapps/BackendUI/
I look forward to seeing what you build with this technique.
But, for the last time, please do not go too far.
This Black Friday, I’ve bundled my big tentpole paid-only masterworks on Swift Concurrency for over 55% off until the end of November.
📘 The Complete Swift Concurrency Toolkit explains every facet of Swift Concurrency from async/await to the latest Swift 6.2 actor isolation changes. Read it through, then keep it as a reference guide on your learning journey.
📕 Advanced Swift Concurrency Training takes you through 12 increasingly complex real-world problems, allowing you to apply this learning and lock-in practical knowledge.