Apple Animation Through the Ages: 2001
Try out real code from NeXTSTEP to Mac OS X to SwiftUI
Timeline
1989 — NeXTSTEP Generation: Display PostScript
2001 — Apple’s Renaissance: Quartz & OpenGL
2007 — The Modern Era: Core Animation
2014 — The Performance Age: Metal
2019 — The Declarative Revolution: SwiftUI
2001 — Apple’s Renaissance: Quartz & OpenGL
In 1996, Apple Computer acquired NeXT, Steve Jobs, and the NeXTSTEP operating system. This was the foundation for the original Mac OS X released in 2001.
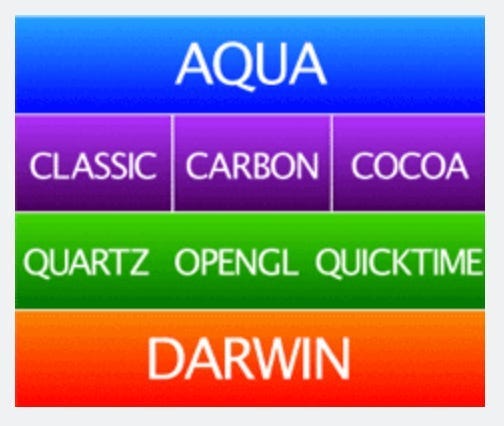
Mac OS X (pronounced OS-ten) instituted the fundamental building blocks for Apple’s future, and itself was a revolution of OS design that we take for granted today — all the way from its signature look-and-feel (Aqua) down to the kernel itself (Darwin).
The graphics layer of our O.G. OS has three components:
Quartz for low-level display and rendering, including Windows.
OpenGL for animation and 3D rendering.
Quicktime for audio and video (i.e., very out of scope).
Let’s go over Quartz and OpenGL in some detail to get a feel for what OS X programming was like back in 2001.
Quartz
Quartz, nowadays known more commonly as Core Graphics, forms the underlying display layer for Aqua, the design language at the top of our architecture diagram — a language that introduced the familiar Apple UX we know and love today. The Dock’s mouseover-to-expand and its famous genie animation when opening and closing a window were created using Quartz.
Quartz and Display PostScript were both “third generation” display layers — meaning they maintained information about the shapes drawn to the screen. Third-generation layers were also vector-aware, which helped power the easy transformation of on-screen objects. Quartz used Adobe’s PDF instead of PostScript as the underlying graphics representation language. This is a more advanced, open, standard which brought improvements across the board to colors, fonts, and interactivity.
Let’s draw something!
I’ll keep things simple with a basic Objective-C app — sorry to my Swift comrades, but that language isn’t released for another 13 years!
First, I create a header file for ATTAQuartzView.h A.K.A. my “Animation Through The Ages Quartz View” — name-spacing is important in Objective-C!
#import <Cocoa/Cocoa.h>

@interface ATTAQuartzView : NSView

@end
Then I implement the drawing logic in ATTAQuartzView.m.
#import "ATTAQuartzView.h"

@implementation ATTAQuartzView

- (void)drawRect:(NSRect)dirtyRect {
    [super drawRect:dirtyRect];
    CGContextRef context = (CGContextRef)[[NSGraphicsContext currentContext] graphicsPort];
    CGContextSetRGBFillColor(context, 1.0, 0.85, 0.35, 1.0);
    CGContextFillRect(context, CGRectMake(150, 150, 200, 200));
}

@end
I create a Core Graphics context, set a fill color, and fill a rectangle with this color.
Finally, to make life simple, I instantiate this view in the View Controller’s viewDidLoad method:
- (void)viewDidLoad {
    [super viewDidLoad];
    ATTAQuartzView *quartzView = [[ATTAQuartzView alloc] initWithFrame:NSMakeRect(0, 0, 400, 300)];
    [self.view addSubview:quartzView];
}
The result? A glorious golden square rendered to the window.
While
NSViewControllerdidn't really exist until Mac OS X Leopard (2007), I'm compromising to keep things simple with our Xcode project template.In reality, developers would create and manage
NSViewinstances directly, handling loading and transitions themselves.
Animating with Quartz
When you want to animate with Quartz, your options are rather limited.
Coming from Core Animation and SwiftUI, it may be a little more literal than you might be used to. We’re going to run some code on an NSTimer to directly update the frame of our on-screen shape.
First, we update ATTAQuartzView.h header file with a new side property:
#import <Cocoa/Cocoa.h>

@interface ATTAQuartzView : NSView

@property (nonatomic, assign) CGFloat side;

@end
And then, we can update our ATTAQuartzView.m implementation file to…
…set up a timer to modulate the rectangle’s side length over time:
@implementation ATTAQuartzView
{
    NSTimer *_timer;
    CGFloat _increment;
}

- (instancetype)initWithFrame:(NSRect)frameRect {
    self = [super initWithFrame:frameRect];
    if (self) {
        _side = 50.0;
        _increment = 3.0;
        _timer = [NSTimer scheduledTimerWithTimeInterval:1.0/60.0 target:self selector:@selector(tick:) userInfo:nil repeats:YES];
    }
    return self;
}

- (void)tick:(NSTimer *)timer {
    self.side += _increment;
    if (self.side > 200.0 || self.side < 10.0) {
        _increment *= -1.0;
    }
    [self setNeedsDisplay:YES];
}

//...

@end
...and redraw the shape based on this updated side length:
@implementation ATTAQuartzView

//...

- (void)drawRect:(NSRect)dirtyRect {
    [super drawRect:dirtyRect];
    CGContextRef context = (CGContextRef)[[NSGraphicsContext currentContext] graphicsPort];
    CGContextSetRGBFillColor(context, 1.0, 0.85, 0.35, 1.0);
    CGContextFillRect(context, CGRectMake(250 - self.side / 2.0,
                                          200 - self.side / 2.0,
                                          self.side,
                                          self.side)
                      );
}

@end
Our efforts are paying dividends in the form of a beautifully animated square.
The API is pretty straightforward when we’re just drawing or resizing a basic vector shape, but you can imagine how complex things could become if you wanted to move multiple items on-screen, deal with layering and opacity, or implement smoother animation timing curves.
OpenGL
OpenGL constituted the second pillar of the OS X graphics story. OpenGL is an open-source and cross-platform API for rendering vector graphics in 2D and 3D. It utilised hardware acceleration, which is a fancy way of saying it offloaded work to the GPU to render graphics. This made it the place to go for high-performance rendering on OS X (at least until 2002, when Quartz Extreme freed Quartz from the CPU).
OpenGL’s smooth 2D animation capabilities and lightning-fast GPU rendering allowed turn-of-the-century developers to create high-performance apps on hardware that would embarrass your grandmother. OpenGL used numerous modern optimisation techniques such as double-buffering — this displayed one frame while drawing the next, ensuring a smooth frame rate.
I’ve set up a simple Objective-C Mac App project in Xcode, which you’re welcome to follow along with! This 2004 tutorial from Apple proved invaluable in learning the ropes — and once again demonstrates how they were untouchable regarding documentation.
Creating our OpenGL drawing
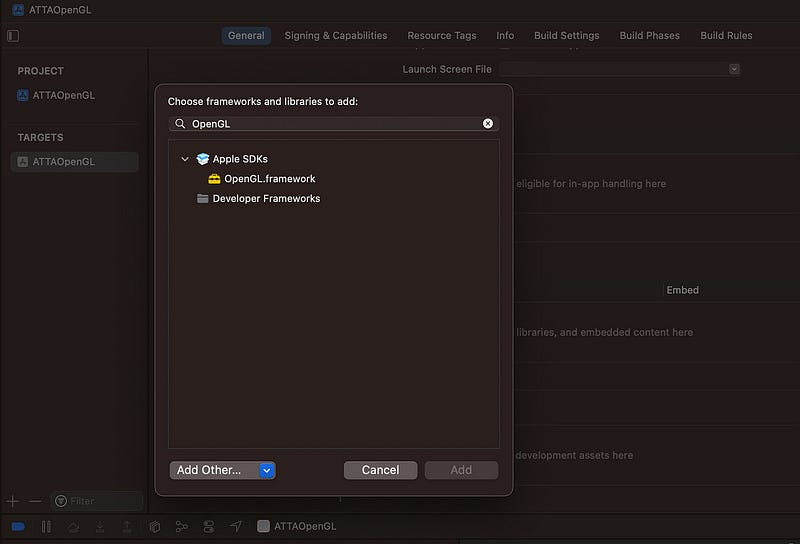
First, import OpenGL to Frameworks, Libraries, and Embedded Content in the Xcode General project settings:
Now, we can make a simple Obj-C header file, ATTAOpenGLView.h:
#import <Cocoa/Cocoa.h>

@interface ATTAOpenGLView : NSOpenGLView

- (void) drawRect: (NSRect) bounds;

@end
I hit a build warning before I even implemented anything:
@interface MyOpenGLView : NSOpenGLView“NSOpenGLViewis deprecated: first deprecated in macOS 10.14. Please useMTKViewinstead.”OpenGL was actually deprecated in MacOS Mojave, in favour of Metal, which we’ll come to later on. If you want to silence this warning, and the many more that will follow, throw up a
-DGL_SILENCE_DEPRECATIONcompiler flag in the Xcode project build settings.
Next, we write our implementation file, ATTAOpenGLView.m:
#include <OpenGL/gl.h>
#import "ATTAOpenGLView.h"

@implementation ATTAOpenGLView

- (void) drawRect : (NSRect) bounds
{
    glClearColor(0, 0, 0, 0);
    glClear(GL_COLOR_BUFFER_BIT);
    drawAnObject();
    glFlush();
}

static void drawAnObject(void)
{
    glColor3f(0.5f, 0.8f, 0.1f);
    glBegin(GL_TRIANGLES);
    {
        glVertex3f( -0.5, -0.5, 0.0);
        glVertex3f(  0.0,  0.5, 0.0);
        glVertex3f(  0.5, -0.5, 0.0);
    }
    glEnd();
}

@end
The drawRect(bounds:) method sets black as the background color, runs our drawing routine, and then calls glFlush() to send drawing instructions to the GPU.
drawAnObject() sets a green RGB color and draws out the vertices of a triangle. glBegin(GL_TRIANGLES) tells OpenGL that the vertices in the block should be grouped into threes and drawn on-screen as triangles. Since we give three vertices, that renders a solitary triangle.
Finally, to display the view on-screen, I set the main View Controller’s view as a new instance of ATTAOpenGLView as we did when looking at Quartz.
@implementation ViewController

- (void)viewDidLoad {
    [super viewDidLoad];
    self.view = [[ATTAOpenGLView alloc] init];
}
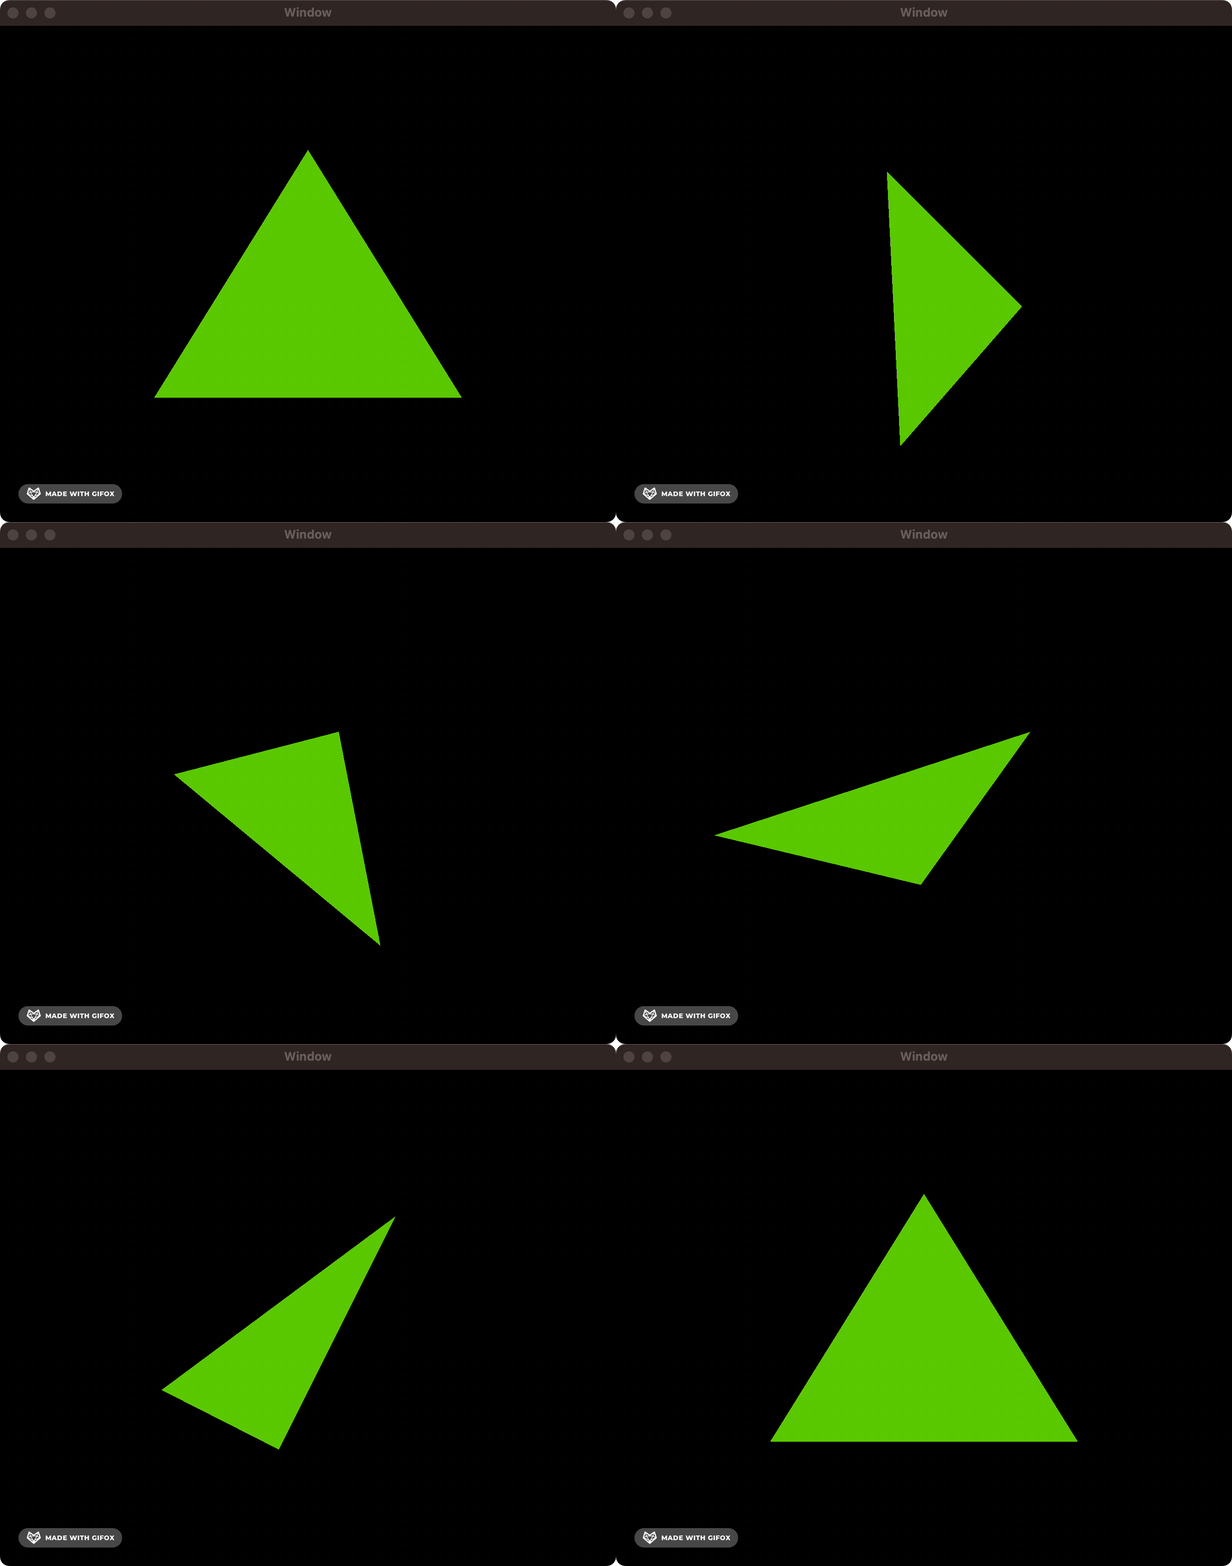
Finally, we are blessed with a beautiful green triangle drawn on-screen.
Let’s add some animation!
Like before, we could use an NSTimer to trigger our re-drawing logic, but a more performant approach is to use CVDisplayLink to sync updates up with your screen’s refresh rate, so we don’t waste clock cycles rendering frames that never appear on our screen.
You know what that means? It’s time for some more boilerplate! 😃
#include <OpenGL/gl.h>
#import <CoreVideo/CVDisplayLink.h>
#import "ATTAOpenGLView.h"

static CVReturn ATTADisplayLinkCallback(
    CVDisplayLinkRef displayLink,
    const CVTimeStamp* now,
    const CVTimeStamp* outputTime,
    CVOptionFlags flagsIn,
    CVOptionFlags* flagsOut,
    void* displayLinkContext)
{
    @autoreleasepool {
        ATTAOpenGLView* view = (__bridge ATTAOpenGLView*)displayLinkContext;
        [view performSelectorOnMainThread:@selector(markForRedisplay) withObject:nil waitUntilDone:NO];
        return kCVReturnSuccess;
    }
}

@implementation ATTAOpenGLView

- (void)markForRedisplay {
    [self setNeedsDisplay:YES];
}

- (instancetype)initWithFrame:(NSRect)frame {
    self = [super initWithFrame:frame];

    GLint swapInterval = 1;
    [[self openGLContext] setValues:&swapInterval forParameter:NSOpenGLCPSwapInterval];

    rotation = 0.0f;

    CVDisplayLinkCreateWithActiveCGDisplays(&displayLink);
    CVDisplayLinkSetOutputCallback(displayLink, &ATTADisplayLinkCallback, (__bridge void*)self);
    CVDisplayLinkStart(displayLink);

    return self;
}

- (void) dealloc {
    CVDisplayLinkStop(displayLink);
    CVDisplayLinkRelease(displayLink);
}

// ... our actual drawing code is all the way down here ...

@end
Long story short, upon initialisation, we are doing two things:
We set the “swap interval” on the
NSOpenGLViewto 1. This tells OpenGL to sync up its buffer swaps — i.e., its frame rate — with your screen’s refresh rate (a.k.a. its “v-sync” rate). Jargon aside, we tell OpenGL how many frames per second to calculate.We also tell
CoreVideoto send a callback each time our screen’s display refreshes. This callback executes a selector on the main thread (GCD isn’t invented for another eight years!), which marks the view for re-drawing. This ensures that the actual drawing to the screen happens at the correct time to avoid a screen refresh mid-calculation (this can cause a visual effect called tearing).
The rest of our implementation isn’t too hard. Each time setNeedsDisplay is set, the drawRect method is called, we update our rotation, and upgrade drawAnObject with some snazzy rotation logic:
@implementation ATTAOpenGLView

// ... CVDisplayLink boilerplate ...

- (void) drawRect:(NSRect)dirtyRect {
    [super drawRect:dirtyRect];
    rotation += 1.0f;
    glClearColor(0, 0, 0, 0);
    glClear(GL_COLOR_BUFFER_BIT);
    drawAnObject(rotation);
    glFlush();
}

static void drawAnObject(float rotation)
{
    glPushMatrix();
    glRotatef(rotation, 0.33333333333f, 1.0f, 0.5f);
    glColor3f(0.5f, 0.8f, 0.1f);
    glBegin(GL_TRIANGLES);
    {
        glVertex3f( -0.5, -0.5, 0.0);
        glVertex3f(  0.0,  0.5, 0.0);
        glVertex3f(  0.5, -0.5, 0.0);
    }
    glEnd();
    glPopMatrix();
}

@end
The big difference here is we’ve added glRotatef, which gives a very cool 90s-chic rotation along a 3D axis. Finally, glPushMatrix and glPopMatrix add and remove the transformation matrix to and from a stack — essentially ring-fencing the enclosed transformations so that nothing else on-screen is affected. Not exactly important in this one-shape case, but good manners.
We’re rewarded for our efforts with a high-tech 3D triangle.


