Apple Animation Through the Ages: 2019
Try out real code from NeXTSTEP to Mac OS X to SwiftUI
Timeline
1989 — NeXTSTEP Generation: Display PostScript
2001 — Apple’s Renaissance: Quartz & OpenGL
2007 — The Modern Era: Core Animation
2014 — The Performance Age: Metal
2019 — The Declarative Revolution: SwiftUI
2019 — The Declarative Revolution: SwiftUI
Let’s set the stage one last time as we flash toward the present.
In 2013, React slammed the heft of Facebook face-first into the constantly-changing mess that was frontend in the early 2010s. React treated UI as a function of state, introduced the virtual DOM for high performance, and worked with component-based, compositional rendering.

Apple, which had witnessed the gradual neutering of Microsoft Windows by the web in the 2000s, had been doing everything in its power to kill the web as a viable platform on iOS.
But there were barbarians at the gates!
Facebook’s React Native introduced cross-platform app compilation using standard React syntax in 2015. Shortly after, in 2017, Google introduced Flutter, which used the Dart language to allow React-style UI development across web, Android, and iOS. Both approaches came packed with developer-friendly ergonomics like hot-reloading UI.

This competition, coupled with the uncomfortable platform split across iPhone (UIKit), Mac (AppKit), and Apple Watch (WatchKit), native app development was beginning to look like a bad long-term bet for new engineers.
SwiftUI was announced as the future of Apple platform UI development in 2019, spawning years of arguments about whether it was production-ready (it is).
SwiftUI was the declarative framework to create UI across all Apple platforms. It was built on Core Animation and Metal foundations and made animation far easier than ever before.
If you’ve been following the article, and we aren’t yet in the 2040s rendering your Vision Pro projects with Generative AR, you don’t need me to tell you how to set up a SwiftUI app.
Let’s get right to it.
As always, my sample code for this mini-project is available on GitHub.
SwiftUI 1.0: Basic animations
Looking through the SFSymbols catalogue for inspiration, I stumbled upon this number, dumbbell.fill. A sporty theme would work great here!
In SwiftUI, animations are truly a function of state. When we animate a state change, the UI, which depends on the state, naturally animates to represent the new state. This level of declarative-ness could make Core Animation blush!
We can get started in ContentView.swift with a simple dumbbell image at the bottom of the screen.
import SwiftUI

struct ContentView: View {

    var body: some View {
        Image(systemName: "dumbbell.fill")
            .imageScale(.large)
            .foregroundColor(.accentColor)
            .frame(maxWidth: .infinity, maxHeight: .infinity, alignment: .bottom)
    }
}
I want to create a looping animation that creates the effect of doing alternating reps with two dumbbells. This would involve two components:
A vertical translation
Image scaling
We can use scaleEffect modifier, along with the alignment property of the frame modifier to achieve this.
struct ContentView: View {

    @State private var isAnimated: Bool = false

    var body: some View {
        Image(systemName: "dumbbell.fill")
            .imageScale(.large)
            .foregroundColor(.accentColor)
            .scaleEffect(isAnimated ? 4 : 1)
            .frame(maxWidth: .infinity,
                   maxHeight: .infinity,
                   alignment: isAnimated ? .top : .bottom)
            .animation(loopingAnimation, value: isAnimated)
            .onAppear {
                isAnimated = true
            }
    }

    private var loopingAnimation: Animation {
        .easeInOut(duration: 0.75)
        .repeatForever(autoreverses: true)
    }
}
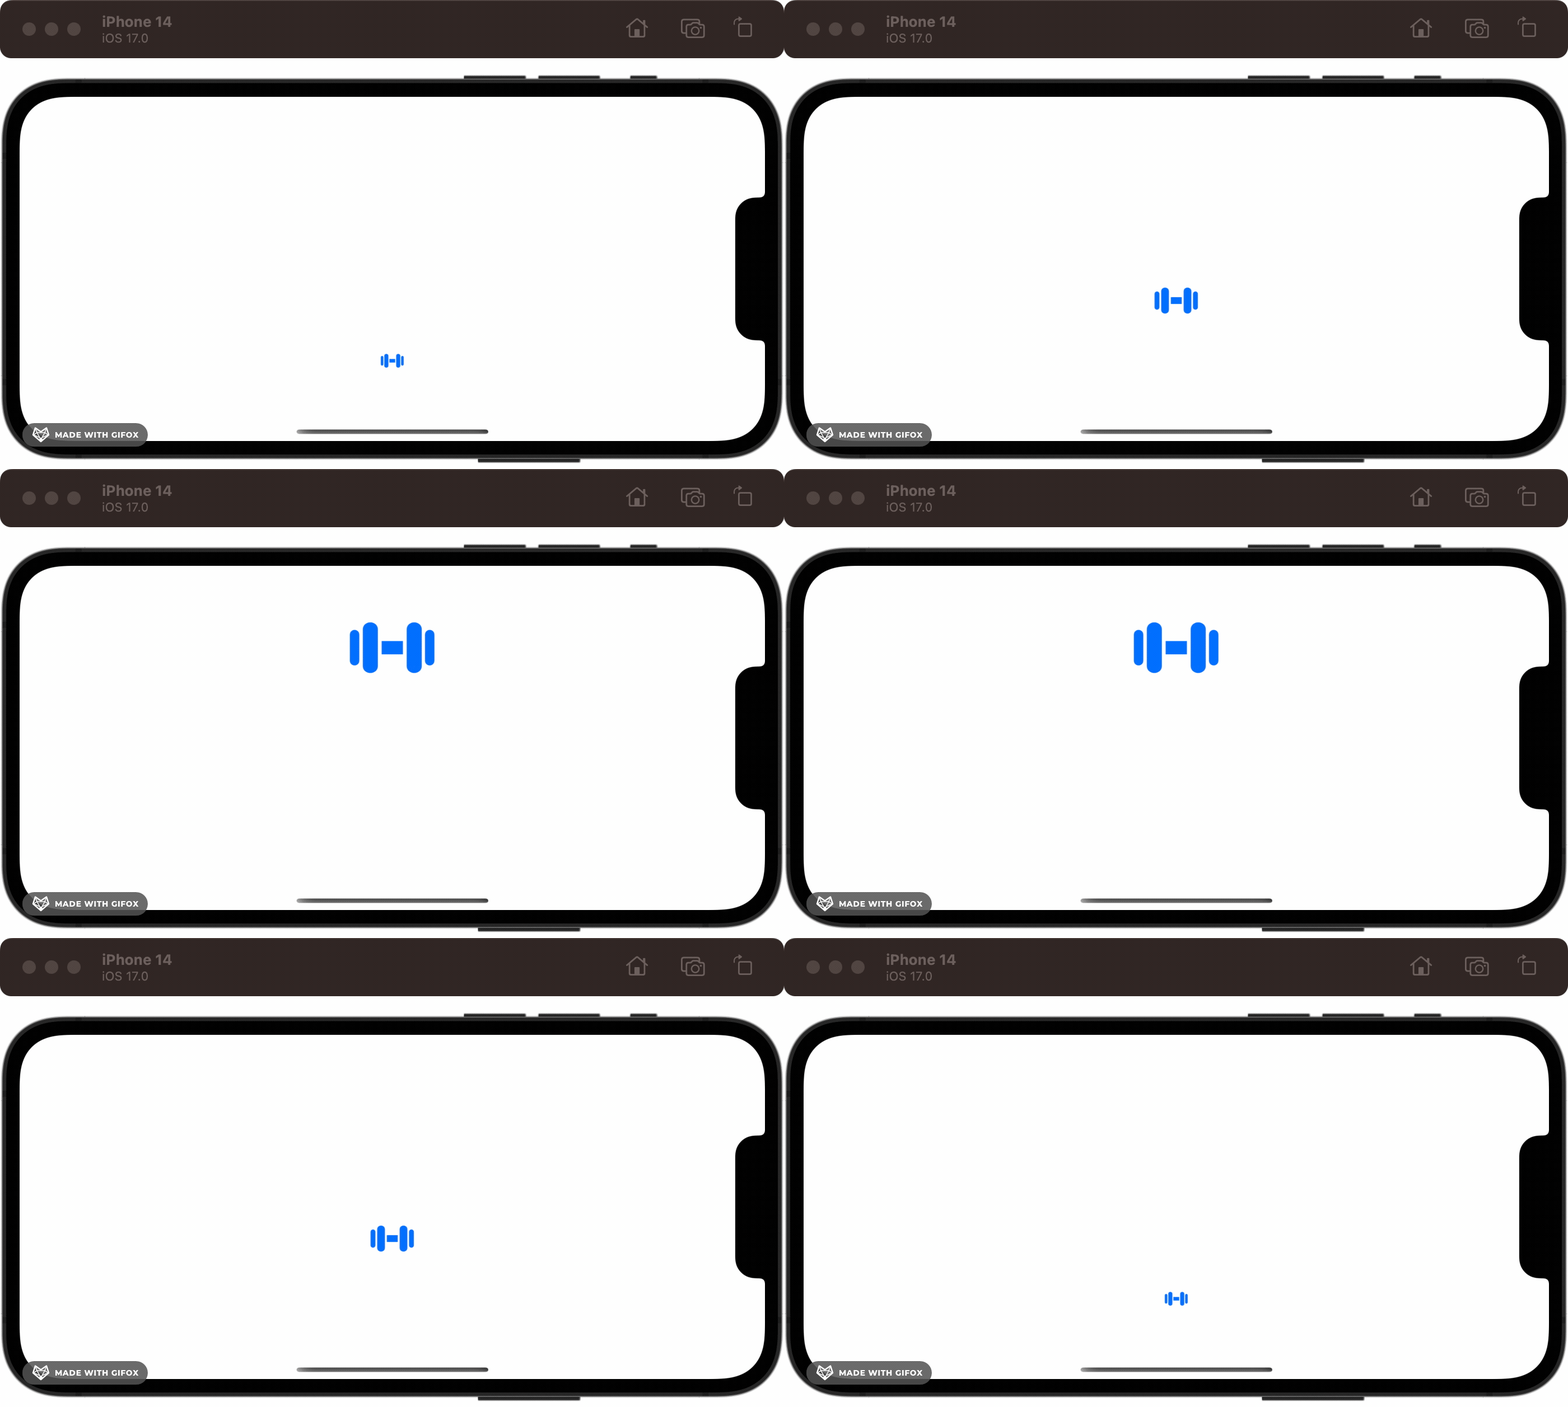
We create an implicit animation using the animation modifier. This tells the SwiftUI rendering engine to animate a state change when the specified value updates. Here, we’re just using a simple isAnimated property as the value we sets in onAppear; and using repeatForever on our Animation to ensure it loops. Now we get a clean lifting effect:
Going further, we can make this look even snazzier and give the code a clean-up.
If you know anything about me, you’ll know I love to use enums where I can. Here, I create a Rep enum to represent the state; and store the visual effects I want for each state.
enum Rep {
    case left
    case right

    mutating func lift() {
        switch self {
        case .left: self = .right
        case .right: self = .left
        }
    }

    func scale(rep: Rep) -> Double {
        self == rep ? 4 : 1
    }

    func alignment(rep: Rep) -> Alignment {
        self == rep ? .top : .bottom
    }
}
Since I want to make two dumbbells, the effect will depend on which side I lift in my rep. The scaleEffect and alignment will be larger and higher when the rep matches the dumbbell’s side.
Here’s the final SwiftUI view:
struct DumbbellView: View {

    @State private var rep: Rep?

    var body: some View {
        HStack {
            dumbbell(side: .left)
            dumbbell(side: .right)
        }
        .padding(40)
        .background(Color.indigo)
        .onAppear {
            if rep == nil {
                rep = .left
                rep?.lift()
            }
        }
    }

    private func dumbbell(side: Rep) -> some View {
        Image(systemName: "dumbbell.fill")
            .imageScale(.large)
            .foregroundColor(.white)
            .scaleEffect(side.scale(rep: rep ?? .left))
            .frame(maxWidth: .infinity,
                   maxHeight: .infinity,
                   alignment: side.alignment(rep: rep ?? .left))
            .animation(loopingAnimation, value: rep)
    }

    private var loopingAnimation: Animation {
        .easeInOut(duration: 0.75)
        .repeatForever(autoreverses: true)
    }
}
To make two dumbbells, we’ve refactored our SwiftUI code to create a dumbbell view via a helper method, initializing an icon for each side. Since we use repeatForever in our Animation, we only need to change the state once, using onAppear, to cause the animated state change to continue forever.
Now we’ve produced a truly gainful animation.
SwiftUI 2.0: matchedGeometryEffect
SwiftUI 1.0 was both revolutionary and highly flawed. While introducing UI as a function of state to the native iOS world and a beautiful declarative syntax, navigation was completely busted, and many key features were missing.
2020’s release on iOS 14 fixed many of these problems and introduced some great new features — my favourite being matchedGeometryEffect. This creates an animation effect similar to Keynote’s Magic Move.
matchedGeometryEffect requires you to set unique identifiers between elements, which allows SwiftUI to maintain an understanding of the view’s identity even between different subviews in a hierarchy. The rendering engine captures the geometry — that is, position and size — and creates a smooth motion that interpolates the changes between the two views when a transition happens.
Here’s some example code in CourtsideView, demonstrating a sports team swapping sides at half-time. I’ll show the key snippets, but check out my GitHub for the full code.
import SwiftUI

struct CourtsideView: View {

    @Namespace private var animation
    @State private var isFirstHalf: Bool = true

    var body: some View {
        VStack {
            HStack {
                if isFirstHalf {
                    team(name: "Red Team", color: .red, flipped: false)
                    Spacer()
                    team(name: "Green Team", color: .green, flipped: true)
                } else {
                    team(name: "Green Team", color: .green, flipped: false)
                    Spacer()
                    team(name: "Red Team", color: .red, flipped: true)
                }
            }
        }
    }

    private func team(name: String, color: Color, flipped: Bool) -> some View {
        Text(name)
            .foregroundColor(color)
            .font(.title)
            .fontWeight(.bold)
            .rotationEffect(.radians(flipped ? (.pi / 2) : (-.pi / 2)))
            .matchedGeometryEffect(id: name, in: animation)
    }
}
There are a few core concepts here:
@Namespace private var animationsets up a global namespace for SwiftUI to identify our views.We create two arrangements: in the first half, red team is at the leading edge of the
HStackand the green team is on the trailing end; this is swapped after the first half — i.e., whenisFirstHalfis toggled tofalse.The
teamhelper function helps create a small view showing our team name, color, and rotational arrangement.Finally,
matchedGeometryEffect(id: name, in: animation)on each team tells the global namespace the identity of the view; so it can be animated smoothly when the half changes.
Note that I said
leadingandtrailing, not right and left —HStackswitches these around when using a left-to-right language!
Our half-time button toggles the @State property with an explicit spring animation. This means that everything in our view that depends on the isFirstHalf property gets animated when it changes.
private var halfTimeButton: some View {
    Button(action: {
        withAnimation(.spring()) {
            isFirstHalf.toggle()
        }

    }, label: {
        Label("Half Time", systemImage: "flag.filled.and.flag.crossed")
    })
}
Here, we can see the half-time button in action to swap the teams’ sides:
I’m only scratching the surface of the power of matchedGeometryEffect here. It shows its true potential when you use it to create a hero image animation during a view transition, allowing a small image in a collection to seamlessly expand into a full-size header when you view a details screen.
SwiftUI 2023: Keyframe animations
The latest SwiftUI release is the biggest change for animations yet. Primarily, it introduces the long-awaited keyframe animation to give developers and UI designers fine-grained control. It’s yet to be shown if this will kill Lottie once and for all.
The concept of a “keyframe” harkens back to the old-school Disney animation era. Senior artists would draw the main points of motion — the “key frames” — and more junior animators would fill in the many frames between these key poses.
Keyframes in software are much the same: we define specific points along a timeline, setting values for properties such as position, scale, and opacity. The software, acting as our trusty junior animator, interpolates between these sets of values in the keyframes and computes all the frames to render in between.
For our final example, let’s work on our deadlift.
import SwiftUI

struct DeadliftView: View {

    struct Transformation {
        var yScale = 1.0
    }

    var body: some View {
        Image(systemName: "figure.strengthtraining.traditional")
            .keyframeAnimator(initialValue: Transformation(),
                              repeating: true,
                              content: { content, transformation in
                content
                    .scaleEffect(y: transformation.yScale, anchor: .bottom)
            },
                              keyframes: { _ in
                KeyframeTrack(\.yScale) {
                    LinearKeyframe(0.6, duration: 0.25)
                    LinearKeyframe(1.0, duration: 0.25)
                    LinearKeyframe(1.4, duration: 0.25)
                    LinearKeyframe(1.0, duration: 0.25)
                }
            })
    }
}
There’s a substantial quantity of new API here, so I’ve intentionally made the animation itself as dull as possible. Hence, it’s easy to follow along with the KeyframeTrack as we perform a deadlift rep:
For the first
duration: 0.25seconds, we crouch down — transforming ouryScalevalue in theTransformationstruct from the initial 1.0 to 0.6. ThescaleEffect(y: transformation.yScale)view modifier applies to our content and causes the initial dip.We then stand up with the barbell, going from a
yScaleof 0.6 to 1.0 and then 1.4 over 0.5 seconds. I’ve used two separate linear keyframes here, so the durations all match up, but we could just as easily have used a singleLinearKeyframe(1.4, duration: 0.5)to do this in one.Finally, we return to our original scale — 1.0, in the final 0.25 seconds to loop smoothly.
The keyframeAnimator modifier is the star of the show here, setting up the whole shebang with the following arguments:
initialValuetakes a genericValuewhich holds all the properties we want to animate — in this case, theTransformationstruct initialized with our initial values.repeating: trueto keep our keyframe animation looping indefinitelycontentis aViewBuilderclosure where we apply transformations to the view (content) using the interpolated value of the transformations between each keyframe (transformation)keyframesto define how the transformation values will be changed over time — this is where we set up theKeyframeTracks, which allow separately timed transformations over the properties we choose.
We can spruce up the animation with an additional yTranslation property in our Transformation struct:
struct Transformation {
    var yScale = 1.0
    var yTranslation = 0.0
}
We add an additional offset modifier to the content in our keyframeAnimator:
content
    .scaleEffect(y: transformation.yScale, anchor: .bottom)
    .offset(y: transformation.yTranslation)
And lastly, we add another KeyframeTrack with some new ways to interpolate the translation:
KeyframeTrack(\.yTranslation) {
    LinearKeyframe(20, duration: 0.25)
    SpringKeyframe(-40, duration: 0.5, spring: .snappy)
    CubicKeyframe(0, duration: 0.25)
}
And now our resident strongman is getting a leg workout at the same time:
I’m barely scratching the surface since WWDC 2023 introduced an astonishing amount of advanced animation APIs:
Creating your own timing curves for keyframe animation interpolation using the
CustomAnimationprotocol.Using
phaseAnimatorto enable views to animate through a series of discrete steps.Advanced animations along MapKit routes with
mapCameraKeyframeAnimation.Most excitingly, the ability to use Metal shaders directly in SwiftUI with new modifiers for
colorEffect,distortionEffect,visualEffect,layerEffect.
The Future of Animation
We’ve come to the end of our journey through time. We started in the NeXTSTEP era with Display Postscript, through to the original Mac OS X, which introduced Quartz and OpenGL as the core graphical pillars. Core Animation revolutionised animation with a declarative approach to defining state changes in the early iPhone era, and Metal was built to blaze through the performance bottlenecks of non-native graphics engines.
Finally, SwiftUI has been evolving and made incredible animations easier than ever. It’s a far cry from our starting point of shape-level manipulation.
I can’t wait to see what the future holds — SwiftUI is the direction of travel Apple has doubled down on, and it’s still in its infancy today. Vision Pro is the big wild card — it’s likely to go through some incredible iterations over the next decade (remember the iPhone 2G? Me neither!). As developers learn how to craft new immersive experiences in Spaces, our paradigms will continue to evolve.
Today, developer ergonomics feel closer to the OpenGL days of shape-level manipulation for 3D experiences in AR and VR. I predict, perhaps by WWDC 2026, a SwiftUI flavour of ARKit to introduce a declarative way of defining 3D experiences — one where we tell the system what we want to see, but not the precise location of objects in space. I also reckon a 3D version of SFSymbols is closer to introducing an object catalogue for free use in VisionOS.
I’ll see you in the future!


