Advanced Core Image
Use Metal to create custom Core Image kernels
Subscribe to Jacob’s Tech Tavern for free to get ludicrously in-depth articles on iOS, Swift, tech, & indie projects in your inbox every week.
Paid subscribers unlock Quick Hacks, my advanced tips series, and enjoy exclusive early access to my long-form articles.
Last time, we walked through the basics of Core Image. But even very clever mixing-and-matching of filters isn’t quite sufficient to differentiate your camera app from the competition.
To elevate your app’s snaps above the fray, we need to get down with the pixels.
Since its inception in 2005, Core Image was designed to be pluggable, meaning you could subclass CIFilter to create your own filters. These are first-class citizens that mix-and-match with built-in system filters in your customised rendering recipe.
These subclasses might themselves be combinations of built-in CIFilters, or customised pixel shaders written in OpenGL Shader Language (GLSL). These custom shaders, which operate on every pixel of an image, are referred to as Core Image kernels.
These days, Core Image kernels can be written in Metal. This brings ergonomic benefits such as improved compile-time errors and debugging. Performance is also boosted thanks to Metal’s direct GPU access; unbottlenecked by driver software.
Today, we’re going to build on my previous article, Core Image: The Basics, and write our own custom Core Image kernels for CoreImageToy (download it on the App Store!). We’re going to cover:
Configuring Xcode for Core Image kernels
Setting up a
CIFiltersubclasses to use custom kernelsColor filter kernels
Warp filter kernels
Texture filter kernels
With these advanced technique in your tool-belt, your only bottleneck becomes your skill and imagination.
If you’re not familiar with Metal, I recommend looking at my tutorial Metal in SwiftUI: How to Write Shaders. It assumes zero existing Metal knowledge, explaining fundamental theory from scratch. Through three code-along mini-projects, I guide you through the basics of writing colour, distortion and layer effects you can use in your SwiftUI views!
The project here is entirely open-source, so check out CoreImageToy on GitHub if you get stuck following along.
Configuring Xcode
Following along the WWDC videos in chronological order proved to be confusing, because it took Apple a few tries to work out the ergonomics. Specifically, how to tell the Linker how to compile our Metal files for use with Core Image.
In 2020, the state-of-the-art was an arcane multi-step pipeline of Build Rules, using xcodebuild commands to tell Xcode how to convert .ci.metal files into linkable metal libraries.
These days, we can simply add a linker flag in Xcode Build Settings, under Metal Linker — Build Options:
-framework CoreImageUpdate: 12 November 2025
Looks like now you have to add this flag on Xcode 26:
-fcikernelWhy do they keep changing the ergonomics!?
Linking is the final stage of the compiler, where object files (containing assembly code) are combined together into an executable app. This flag ensures that code in the Core Image dynamic library is linked with — and made accessible to — your Metal library.
This allows us to import CoreImage into our .metal files.
#include <CoreImage/CoreImage.h>By default, Xcode compiles all your .metal source files into default.metallib resource. This will be important soon.
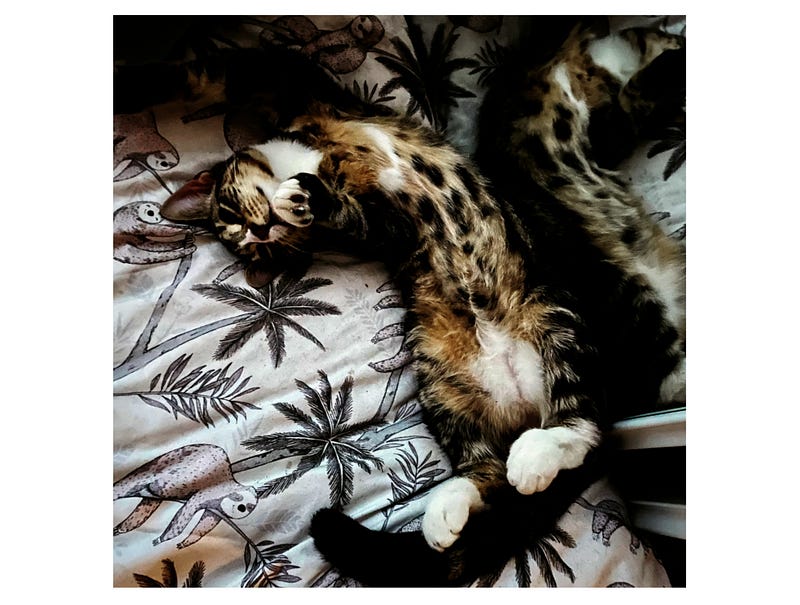
As we work, I’ll apply our filters to this beautiful photo of Rosie as a kitten.
Colour Filter Kernels
Colour filters are similar to the .colorEffect() modifier for Metal in SwiftUI.
Making the CIFilter
Our custom filter subclasses the CIFilter base class. We’re going to add a film-grain effect to our photos, creating a nostalgic early-2000s disposable camera effect to our images.
The subclassing boilerplate is similar for all our custom filters, so it’s worth taking the time to get your head around it.
final class GrainyFilter: CIFilter {

    // 1
    @objc dynamic public var inputImage: CIImage?

    // 2
    override public var outputImage: CIImage? {
        guard let input = inputImage else {
            return nil
        }
        return Self.kernel.apply(extent: input.extent,
                                 arguments: [input])
    }

    // 3
    static private var kernel: CIColorKernel = { () -> CIColorKernel in
        getKernel(function: "grainy")
    }()
}
1 — Input Image
The inputImage needs to be marked @objc dynamic in order to expose it to the key-value coding used by Core Image — when using the filter, we set the input image like so:
filter.setValue(originalImage, forKey: kCIInputImageKey)2 — Output Image
The outputImage is a computed property, applying the Core Image kernel to the input image.
The kernel is applied to the ‘extent’ of the input image — that is, the rectangular region in which the image’s pixels are rendered.
Because the kernel operates on each pixel individually, it’s important to specify exactly which pixels we want to included so we don’t waste processing. Technically, a CIImage has infinite extent, meaning there is no limit on their dimensions unless we actually specify.
The arguments are what we pass into the shader function itself. Here, we pass in the image. We’ll see this in action momentarily.
3 — Color Kernel
We finally need to include a reference to our kernel function — here, we have a CIColorKernel, which is specialised for processing pixel colour information in images.
Our getKernel function is a little (global) helper method:
func getKernel(function: String) -> CIColorKernel {
    let url = Bundle.main.url(forResource: "default",
                              withExtension: "metallib")!
    let data = try! Data(contentsOf: url)
    return try! CIColorKernel(functionName: function,
                              fromMetalLibraryData: data)
}
This fetches the default.metallib bundle which is created at compilation. It parses the Metal library as raw data and produces a CIColorKernel object — the Core Image kernel itself — from a function name defined in the library. Here, we’re requesting the grainy function.
Metal Color Kernels
Due to the Metal linker flag set up in Xcode, we can import Core Image into .metal files, which are compiled together into the above metallib file by Xcode.
If you haven’t started coding along, begin now — you don’t learn shaders without getting your hands dirty!
Film grain is an emergent effect of the chemical process used to record images. Film is covered with light-sensitive silver halide particles, which vary in size. Larger particles are more light sensitive, brightening part of the film, while smaller particles show up darker. The random distribution of particles and sizes leads to the grainy effect we know and love.
To create this film-grain effect, I adapted the Random Noise shader from my Metal in SwiftUI tutorial. Mathematically, I want to partially overlay this noise over my images, making each pixel randomly a little brighter or darker.
The original function signature of our SwiftUI noise shader looked like this:
#include <metal_stdlib>
using namespace metal;

[[ stitchable ]]
half4 randomNoise(float2 position, half4 color) {
    float value = fract(sin(dot(dest.coord() / 1000,
                            float2(12.9898, 78.233))) * 43758.5453);
    return half4(value, value, value, color.a);
}
We can adapt this to use Core Image with a few changes:
#include <metal_stdlib>
#include <CoreImage/CoreImage.h>
using namespace metal;

[[ stitchable ]]
float4 grainy(coreimage::sample_t s, coreimage::destination dest) {
    float value = fract(sin(dot(dest.coord() / 1000,
                            float2(12.9898, 78.233))) * 43758.5453);
    float3 noise = float3(value, value, value);
    return float4(s.rgb + noise, s.a);
}
Albeit with some more coreimage:: namespacing, everything should be conceptually quite familiar:
coreimage::sample_t sis the input colour of a pixel, with a vector typefloat4(for r, g, b, and a components).The
coreimage::destination destis the destination pixel to be rendered on-screen.
Applying this filter in our code, we can simply create an instance of GrainyFilter() and use it the same as any other CIFilter.
apply(filter: GrainyFilter(), to: originalImage)If you want a refresher of how to apply Core Image filters, refer to my piece on Core Image Basics.
Applying the filter, we get instant results.
This is working, however we are making it way too bright. Since each pixel is adding between 0 and 1 brightness to its colour, many pixels simply go past an RGB of 1, 1, 1, and clip into full white.
We can easily damp this out by attenuating the magnitude of the noise component, capping the maximum value at 0.1.
[[ stitchable ]]
float4 grainy(coreimage::sample_t s, coreimage::destination dest) {
    float value = fract(sin(dot(dest.coord() / 1000,
                            float2(12.9898, 78.233))) * 43758.5453);
    float3 noise = float3(value, value, value) * 0.1;
    return float4(s.rgb + noise, s.a);
}This looks much better, but I’m a perfectionist and this is still making the image 10% brighter than the original. To keep average brightness the same, I’m adding a damping factor of -0.1 to each colour component in my kernel function.
[[ stitchable ]]
float4 grainy(coreimage::sample_t s, coreimage::destination dest) {
    float value = fract(sin(dot(dest.coord() / 1000,
                            float2(12.9898, 78.233))) * 43758.5453);
    float3 noise = float3(value, value, value) * 0.1;
    float3 dampingFactor = float3(0, 0, 0) * -0.1;
    return float4(s.rgb + noise + dampingFactor, s.a);
}Retro perfection. Who needs silver halide?
More Colour Filters
Colour filters are conceptually the simplest Core Image kernels, so if you’re coding along, take some time to play around! For inspiration, here’s a few examples I created on my own:
An alien filter which swaps about the RGB components to turn cats into little green men:
[[ stitchable ]]
float4 alien(coreimage::sample_t s) {
    return float4(s.b, s.r, s.g, s.a);
}A spectral filter which constructs a greyscale version of the image, inverts the colours, and darkens each pixel on a cubic scale for a ghostly effect:
[[ stitchable ]]
float4 spectral(coreimage::sample_t s) {
    float3 grayscaleWeights = float3(0.2125, 0.7154, 0.0721);
    float avgLuminescence = dot(s.rgb, grayscaleWeights);
    float invertedLuminescence = 1 - avgLuminescence;
    float scaledLumin = pow(invertedLuminescence, 3);
    return float4(scaledLumin, scaledLumin, scaledLumin, s.a);
}A normalise filter which squares each RGB value — this very smoothly darkens the image to give an OLED-style impression of higher dynamic range in the image.
[[ stitchable ]]
float4 normalize(coreimage::sample_t s) {
    return float4(pow(s.r, 2), pow(s.g, 2), pow(s.b, 2), 1.0);
} You’ll notice none of these require the optional coreimage::destination argument, since the same processing is applied to each pixel regardless of position.
Warp Filter Kernels
Warp filters produce a distortion on the source image, shuffling the pixels around at your command. They’re analogous to the .distortionEffect() modifier you can use in SwiftUI.
Creating the CIFilter
Creating the CIFilter subclass is a little more work than before, due to the more verbose API of CIWarpKernel.
First, we instantiate the basic CIFilter subclass with a custom initialiser, so users can instantiate the filter with any parameter they choose.
final class ThickGlassSquaresFilter: CIFilter {

    @objc dynamic var intensity: Float
    @objc dynamic var inputImage: CIImage?

    override var outputImage: CIImage? {
        // ...
    }

    init(intensity: Float) {
        self.intensity = intensity
        super.init()
    }

    required init?(coder: NSCoder) {
        fatalError("init(coder:) has not been implemented")
    }
}
To make sure the API doesn’t diverge too much from system Core Image filters, I’ve also marked my custom properties @objc dynamic so that they’re fine-tuneable through key-value coding.
The kernel we use is a CIWarpKernel this time, but otherwise the call-site isn’t too different.
static private var kernel: CIWarpKernel = { () -> CIWarpKernel in
    getDistortionKernel(function: "thickGlassSquares")
}()
Finally, the outputImage is a little more complex.
override public var outputImage: CIImage? {
    guard let input = inputImage else {
        return nil
    }
    return Self.kernel.apply(extent: input.extent,
                             roiCallback: { $1 },
                             image: input,
                             arguments: [intensity])
}
The CIWarpKernel.apply() method takes extent as before, but has a few more arguments:
roiCallbackdetermines the “region of interest” for processing the image, i.e., what part of the input is required to generate the output. This avoids wasting resources processing anything outside this region. Since we aren’t aiming to change the bounds of the image, we can simply return the source rectangle ($1).imageis, obviously, the inputCIImagewe want to process.argumentsallows us to pass our custom args into the shader function — here, we’re usingintensityto allow users of the filter to fine-tune the exact behaviour they want.
Our kernel-fetching helper function is the same as before, except we return a different subclass of CIKernel this time, the CIWarpKernel.
func getDistortionKernel(function: String) -> CIWarpKernel {
    let url = Bundle.main.url(forResource: "default",
                              withExtension: "metallib")!
    let data = try! Data(contentsOf: url)
    return try! CIWarpKernel(functionName: function,
                             fromMetalLibraryData: data)
}
Now we’ve got the boilerplate out of the way, we can begin to creat the distortion shader.
Metal Warp Kernels
Our thickGlassSquares shader returns a float2, the coordinates of the source image from which to take a colour sample.
[[ stitchable ]]
float2 thickGlassSquares(float intensity, coreimage::destination dest) {
    return float2(dest.coord().x
            + (intensity * (sin(dest.coord().x / 40))),
                  dest.coord().y
            + (intensity * (sin(dest.coord().y / 40))));
}
If you’re unfamiliar with warping, these kernels might be unintuitive, until you understand how the shader is actually working. The shader needs to work out what to render in each pixel of the screen.
Here, dest is the position of the destination pixel to be rendered. The output float2 is the coordinate of the source pixelto find. By running the function this way around, no unnecessary work is done — only pixels that actually appear in the drawable area are evaluated.
Clever use of the repeated oscillation of the sin function in this warp gives a skeuomorphic effect as if Rosie is behind thick square panes of glass.
More Warp Filters
I created another filter somewhat inspired by the CIBumpDistortion, where pixels are distorted about a radius to give a lensing effect. I want to create a glass lens on top of my cat, refracting light about his head.
This uses several additional parameters in the CIFilter subclass, to allow for more complex tuning. All are passed as arguments into the kernel.
final class LensFilter: CIFilter {

    @objc dynamic var inputImage: CIImage?
    @objc dynamic var centerX: Float = 0.3
    @objc dynamic var centerY: Float = 0.6
    @objc dynamic var radius: Float = 0.2
    @objc dynamic var intensity: Float = 0.6

    override public var outputImage: CIImage? {
        guard let input = inputImage else {
            return nil
        }
        return Self.kernel.apply(extent: input.extent,
                                 roiCallback: { $1 },
                                 image: input,
                                 arguments: [input.extent.width,
                                             input.extent.height,
                                             centerX,
                                             centerY,
                                             radius,
                                             intensity])
    }

    static private var kernel: CIWarpKernel = { () -> CIWarpKernel in
        getDistortionKernel(function: "lens")
    }()
}
The shader function signature takes in all the arguments we defined, plus the coreimage::destination dest, since it’s a warp filter, returning a float2 vector representing the source pixel to find as before.
[[ stitchable ]]
float2 lens(
    float width,
    float height,
    float centerX,
    float centerY,
    float radius,
    float intensity,
    coreimage::destination dest
) {
    // ...
}
A bit of Maths
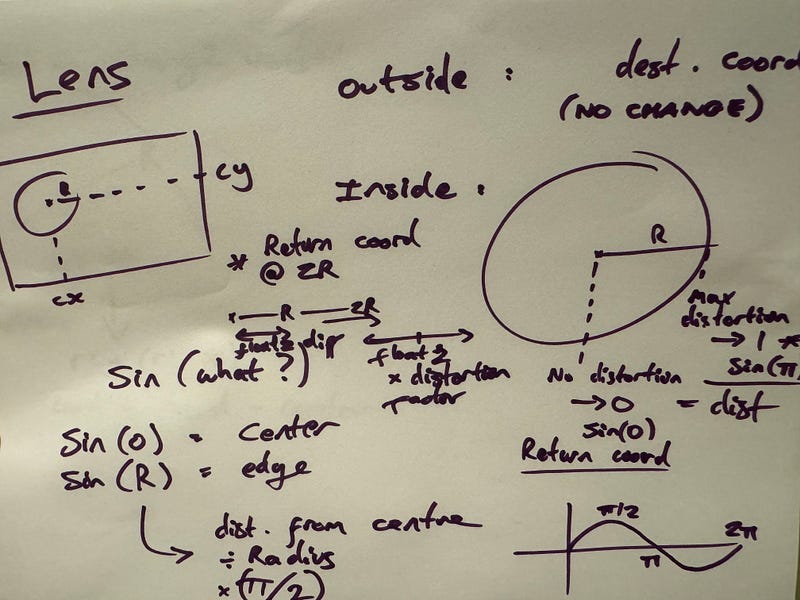
It took me some trial and error to work out how I wanted the distortion to work.
Applying a sin function again, I worked out that I wanted to:
Center a lens on the given
centerXandcenterYcoordinates.Only distort pixels inside the lens
radius, everything outside should return the originaldest.coord().Not do anything for a pixel in the very centre of the radius — whatever maths we do should use
sin(0)and resolve to zero.Apply maximum distortion to a pixel at the
radiusedge. I’ll use the maximum value ofsin(pi/2), and grab a source pixel from outside the radius, in the line away from the centre. Theintensitywill define how far away we sample from.
The shader body turned out like this:
float2 size = float2(width, height);
float2 normalizedCoord = dest.coord() / size;
float2 center = float2(centerX, centerY);
float distanceFromCenter = distance(normalizedCoord, center);

if (distanceFromCenter < radius) {
    float2 vectorFromCenter = normalizedCoord - center;
    float normalizedDistance = pow(distanceFromCenter / radius, 4);
    float distortion = sin(M_PI_2_F * normalizedDistance) * intensity;
    float2 distortedPosition = center
                             + (vectorFromCenter * (1 + distortion));
    return distortedPosition * size;

} else {
    return dest.coord();
}
Here, I normalised the coordinates so that the image dimensions were between (0, 0) and (1, 1). This makes any kind of maths a lot easier.
I used the built-in Metal distance function to calculate relative positioning vectors and distorted pixels closest to the inside rim of the radius.
The resulting warping effect looks like so — it actually turned out the opposite of the bump distortion from which I took inspiration, but I like it.
A bit of Physics
I had an archimedes bathtub moment the next morning.
I also did GCSE physics, you see. And A-Level. And degree.
I’m arbitrarily using sin to up-to-double the pixel distance… but really, a light beam travelling from a hemispherical convex lens, into air, will be refracted away from the normal of the lens edge. Towards the tangent.
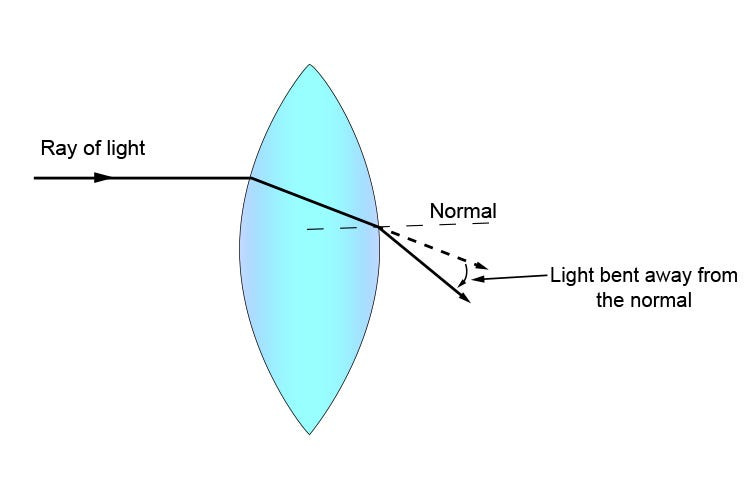
This inspiration fired me up to give a one-line update to our shader:
float distortion = tan(M_PI_2_F * normalizedDistance) * intensity;Hell yeah, that’s more like it. Who said I’d never use my Physics bachelor’s degree when I took a job in software engineering?*
*No one. Nobody ever says this.
Frankly, I was pretty proud of myself about this one.
Texture Filter Kernels
These are the trickiest kernel to get your head around. If you know all about Metal in SwiftUI, they are the counterpart to the .layerEffect() modifier.
Creating the CIFilter
The kernel uses a CISampler, which is able to take pixel samples to process in our kernel. Therefore, instead of processing pixels independently, our filter is context-aware and can measure neighbouring pixels.
In keeping with our early-2000s theme, I want to create a stereoscopic 3D-glasses effect. Let’s start with a CIFiltersubclass as before.
final class ThreeDGlassesFilter: CIFilter {

    @objc dynamic public var inputImage: CIImage?

    override public var outputImage: CIImage? {
        // ...
    }
}
We retrieve our kernel the same way as before — this time, however, we return the CIKernel base class instead of a specific subclass.
static private var kernel: CIKernel = { () -> CIKernel in
    getKernel(function: "threeDGlasses")
}()

static private func getKernel(function: String) -> CIKernel {
    let url = Bundle.main.url(forResource: "default",
                              withExtension: "metallib")!
    let data = try! Data(contentsOf: url)
    return try! CIKernel(functionName: function,
                         fromMetalLibraryData: data)
}
Finally, the outputImage ties it all together:
override public var outputImage: CIImage? {
    guard let input = inputImage else {
        return nil
    }
    let sampler = CISampler(image: input)
    return Self.kernel.apply(extent: input.extent,
                             roiCallback: { $1 },
                             arguments: [sampler])
}
Here, as before, roiCallback determines the “region of interest” for processing, so we can simply return the source rectangle.
Now, we pass the shiny new CISampler as the argument for our kernel.
We’re going to have a lot of fun with this one.
Metal Texture Kernels
The kernel for our texture filter, much like the warp filter, can have a single argument — but this coreimage::sampler has a lot of power.
It behaves a little like a hybrid of the colour kernel and the warp kernel: It can read the original colour at its own coordinate, while also reading the colour at another coordinate you specify. It then returns a float4 vector for the final pixel colour for the pixel on which the shader operates.
To get this stereoscopic effect, we essentially want our threeDGlasses shader to separate and offset the RGB components of each pixel.
[[ stitchable ]]
float4 threeDGlasses(coreimage::sampler src) {
    float4 color = sample(src, src.coord());
    float2 redCoord = src.coord() - float2(0.03, 0.03);
    color.r = sample(src, redCoord).r;
    float2 blueCoord = src.coord() + float2(0.015, 0.015);
    color.b = sample(src, blueCoord).b;
    return color * color.a;
}
This took a bit of trial and error, as well as scouring the docs to find the right syntax for what I wanted. Debugging shaders is tricky!
coreimage::sampler srcis the sampler argument we passed in from ourCIFiltersubclass.sample(src, src.coord())gets the pixel colour at this shader’s coordinate.src.coord()is a normalised (i.e. from(0, 0)to(1, 1)) coordinate.
Using these tools, we can create coordinates for red and blue components, offset them, and then sample the red, blue, and original green colour components from these offsets.
The result is another piece of hallmark nostalgia of the early-2000s: Old-school 3D-movie stereoscopic glasses.
Conclusion
You now have all the low-level tools in your skillset to manipulate photos down to the pixel level:
Colour kernels allow you to create filters which modify the colour of each pixel in an image.
Warp kernels allow you to build filters which mathematically transform the location of each pixel.
Texture kernels allow for advanced filter effects where each pixel can affect neighbouring pixels.
If you haven’t already, download CoreImageToy on the App Store to try out all these custom filters (and more!) yourself, and draw some inspiration.
More importantly, now that you’re an expert, I’m open to creative contributions to the CoreImageToy open-source project on GitHub to make the app part of the community.
Don’t feel like to subscribing yet? Follow me on Twitter!


